

A Complete Guide to Using Pgsync for Live Postgres Migration
People have been using pg-dump/pg_restore to migrate the Postgres database for ages. While these tools are reliable and widely used, they have several limitations.
- The process involves manual steps, such as creating and restoring backups, which can be time-consuming and error-prone.
- They can be complex, especially for large databases with complex schemas and dependencies.
- Data loss or corruption is risky, especially when handling schema changes or table truncation during the migration process.
PgSync has emerged as a powerful solution for PostgreSQL database synchronization needs.
Whether you’re looking to implement live Postgres migration, maintain database consistency across environments, or set up efficient data replication workflows, pgsync offers a streamlined approach compared to traditional methods
Introducing pgsync, a modern and efficient alternative for Postgres migrations and syncronisation
pgsync automates many aspects of the migration process, making it faster, safer, and more convenient.
What is pgSync?
pgsync is a tool used to synchronize data between two PostgreSQL databases. It makes syncing data easier by managing schema changes, truncating tables, and reloading data.
It can be useful in various scenarios such as
- Keeping development and production databases in sync
- Replicating data between different environments
- Migrating data between databases.
Here are some features that make this tool shine
- It is Lightning fast as it transfers tables in parallel and doesn’t require predefined schemas. It can automatically detect schema changes and adapt to them during synchronization.
Itprovides flexibility in choosing the tables to sync, allowing you to specify specific tables or sync entire databases.- It is highly secure as it provides built-in methods to prevent sensitive data from leaving the servers.
If you’re dealing with large databases, need to minimize downtime, or require ongoing synchronization, pgsync provides a more efficient solution for Postgres data synchronization
Installation
It is available as a CLI utility and docker image.
This tool can be installed with the gem
gem install pgsyncThis can fail crying of the dependencies. If you install it on a MacBook, use brew install pgsync command.
In Ubuntu, you can install using apt-get.
sudo apt-get install ruby-dev libpq-dev build-essential -y
sudo gem install pgsync
How to use pgsync?
To use it in the command line, run the below command
pgsync --initThis will generate a .pgsync file where we define the parameters such as source, destinations, etc
Default .pgsync.yml file, which will look something like this
# source database URL
# database URLs take the format of:
# postgres://user:password@host:port/dbname
#
# we recommend a command which outputs a database URL
# so sensitive information is not included in this file
#
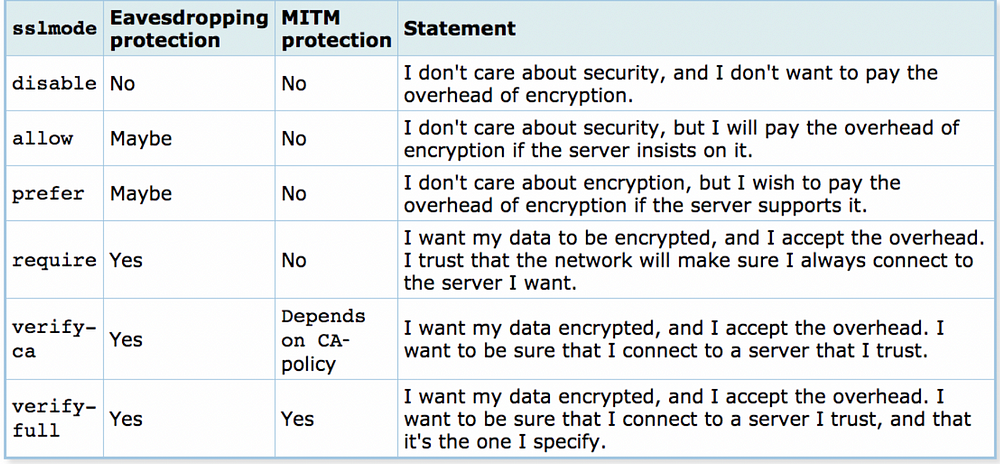
# we *highly recommend* you use sslmode=verify-full when possible
# see https://ankane.org/postgres-sslmode-explained for more info
from: $(some_command)?sslmode=require# destination database URL
to: postgres://localhost:5432/myapp_development# exclude tables
# exclude:
# - table1
# - table2# define groups
# groups:
# group1:
# - table1
# - table2# sync specific schemas
# schemas:
# - public# protect sensitive information
data_rules:
email: unique_email
phone: unique_phone
last_name: random_letter
birthday: random_date
encrypted_*: nullYou can customize the config as per your needs.
If you want to sync between 2 databases, you can use from and to configure the source and destination database endpoints.
To prevent unintended changes to production data, the default destination is restricted to localhost or 127.0.0.1. To sync between two database hosts, add to_safe: true in your .pgsync.yml configuration file.
To use encryption during data transfer, you can pass sslmode query parameters.
from: postgres://user:password@source-host:port/dbname?sslmode=require
to: postgres://user:password@destination-host:port/dbname
to_safe: true
sslmode supports multiple options, check this for more details.
To sync two databases, we can run the pgsync command. We need to make sure that schema is set up in both databases.
pgsync Provide the schema migration option.
# Sync the schema without data (this wipes out existing data)
pgsync --schema-only
Once the Schema is set up, run pgsync to sync both databases.
# To Sync the databases
pgsync# To Sync specific tables
pgsync table1,table2
To exclude specific tables from getting synced, use--exclude
pgsync --exclude table1,table2Add to .pgsync.yml to exclude by default
exclude:
- table1
- table2
You can also sync the Schema before tables in a single command.
# Sync the schema before the data (this wipes out existing data)
pgsync --schema-first
Sync tables from all schemas or specific schemas (by default, only the search path is synced)
# Sync tables from all schemas or specific schemas (by default, only the search path is synced)
pgsync --all-schemas
# or
pgsync --schemas public,other
# or
pgsync public.table1,other.table2
Use pgsync as a docker container
# Pull the docker image
docker pull ankane/pgsync:latest
# Create the .pgsync with the required values
vi .pgsync.yml
# Mount the config and run pgsync container
docker run -ti -v "$(pwd)":/app ankane/pgsync --config /app/.pgsync.yml
Demo: Pgsync to synchronize the two Postgres databases.
To demo the tool, I will use pgsync it to sync the two Postgres databases hosted in AWS RDS.
I have created 2 RDS Postgres instances with the below details. I will use an EC2 machine running Ubuntu Linux images in the VPC where we created the RDS instances.
RDS: pg-database-1
db: db1
user: postgres
password: admin1234
port: 5432

RDS: pg-database-2
db: db2
user: postgres
password: admin1234
port: 5432
I will use a Flask-based web app to write to the first database. I will copy the code from my GitHub repo.
I will create the DB links for both of the Postgres DBs. The Postgres db link should look like this –
postgresql://<user>:<password>@<end point>:5432/<database name>pg1: postgresql://postgres:admin1234@pg-database-1.cfykukwcw419.ap-south-1.rds.amazonaws.com:5432/db1pg2: postgresql://postgres:admin1234@pg-database-2.cfykukwcw419.ap-south-1.rds.amazonaws.com:5432/db2Create one Ubuntu instance with the below specifications
- Public IP
- The security group allows access to the Postgres database on port 5432.
- Access to the database, either with an IAM role attached to EC2 or using AWS access keys.
I have created a role with admin access and attached it to EC2 for the demo. Using admin access policies are not recommended, you should use granular permissions.
Installing pgsync in Ubuntu
# Install postgresql
sudo apt-get install wget ca-certificates
wget --quiet -O - https://www.postgresql.org/media/keys/ACCC4CF8.asc | sudo apt-key add -sudo sh -c 'echo "deb http://apt.postgresql.org/pub/repos/apt $(lsb_release -cs)-pgdg main" > /etc/apt/sources.list.d/pgdg.list'
sudo apt-get install postgresql-client -y
# Install ruby dependencies
sudo apt-get install ruby-dev libpq-dev build-essential -y
# Install pgsync with gem
sudo gem install pgsync# install python if not installed already
sudo apt install python3
# Install pip if not already done
sudo apt install python3-pip
For the demo, I will clone the Flask code from my public GitHub Repo
git clone https://github.com/akhileshmishrabiz/Devops-zero-to-hero
cd Devops-zero-to-hero/project5
I have configured the Flask app in app.py and used app.config[‘SQLALCHEMY_DATABASE_URI’] to configure the database link.
I will use the first database pg1 with the app.
pg1: postgresql://postgres:admin1234@pg-database-1.cfykukwcw419.ap-south-1.rds.amazonaws.com:5432/db1# edit the app.py
vi app.py
# or use any other editor like nano, vim to edit the app.py
Install the dependencies with pip and run the Flask app
pip install -r requirements.txt
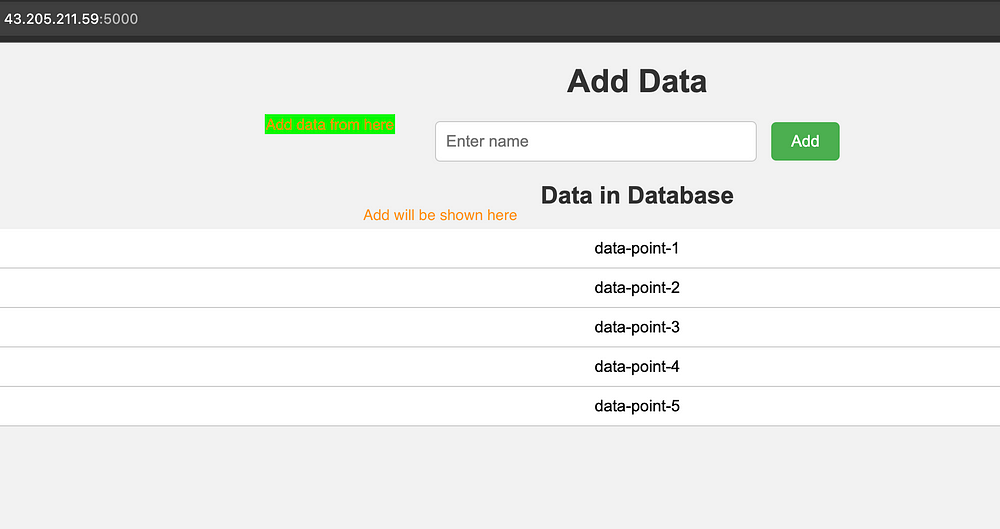
python3 app.pyThis app can be accessed with the public IP of the Ubuntu machine. Make sure you have opened inbound on port 5000 for the Flask app.

Use the public IP with port 5000 to access the application. Here we can create some data by filling out the form. All data will be stored in the database attached to the Flask app.
I have listed data from the database below the form.
Use psql to verify that data on the first database
# psql -h host_name -p port_number -U username -d database_name
psql -h pg-database-1.cfykukwcw419.ap-south-1.rds.amazonaws.com -p 5432 -U postgres -d db1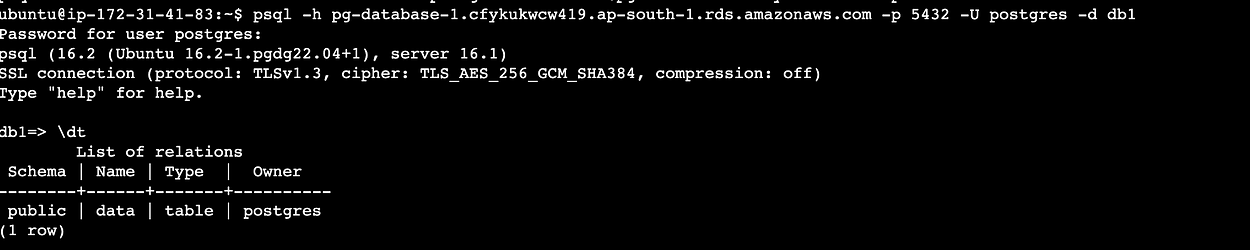

Let’s connect to the second database and see if it has anything inside.

Now, we will use the pgsync tool to sync the data from the first database to the second one.
In the project directory, run the below command to initialize the pgsync
pgsync --initWe will edit the file, replace the from and to with the source and destination database links and remove everything else.
from: postgresql://postgres:admin1234@pg-database-1.cfykukwcw419.ap-south-1.rds.amazonaws.com:5432/db1
to: postgresql://postgres:admin1234@pg-database-2.cfykukwcw419.ap-south-1.rds.amazonaws.com:5432/db2
to_safe: true
I will use ?sslmode=require at the end of the db link for the database for better security.

Now we are ready to sync both the databases
pgsync --schema-first
Let’s use psql to verify if data is synced across both DBs.
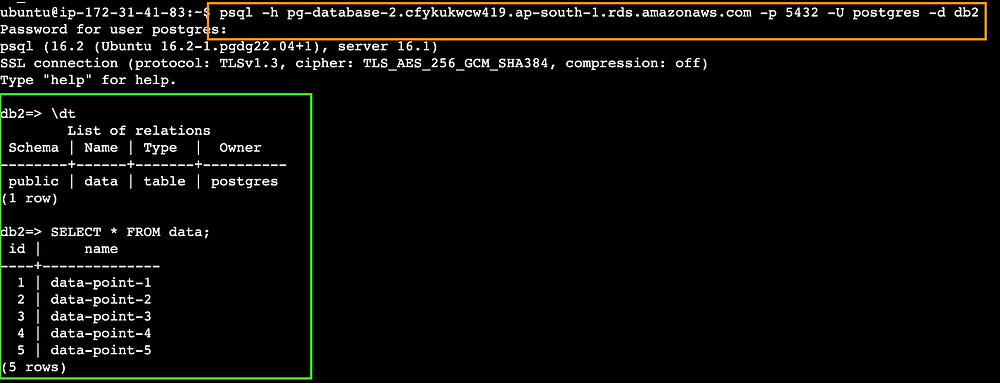
We can connect the second database to our Flask app by modifying app.config[‘SQLALCHEMY_DATABASE_URI’] parameter values app.py and rerunning the app.


Now we have successfully synced the data across both the Postgres databases using pgsync.
Conclusion
PgSync offers a powerful, flexible solution for PostgreSQL database synchronization needs. With its parallel processing capabilities, schema auto-detection, and selective synchronization options, it’s an excellent tool for modern database migration and replication workflows.
Whether you’re managing development environments or planning a production migration, it provides the reliability and efficiency needed for seamless Postgres data synchronization.
FAQ
Is pgsync suitable for very large databases?
Yes, it is designed to handle large databases efficiently with its parallel processing capabilities
Can PGSYNC handle continuous replication?
While it is excellent for one-time or scheduled synchronization, it’s not designed for continuous replication like PostgreSQL’s native replication features.
Does pgsync support data transformations during sync?
Yes, through its data_rules feature, it can transform sensitive data during the synchronization process.
Can I use pgsync with hosted PostgreSQL services like AWS RDS?
Absolutely! As demonstrated in our guide, it works seamlessly with hosted services like AWS RDS.”
