
Managing the AWS Lambda Layer Was a Nightmare Until I Did This
I started my Devops career with the Google Cloud platform and used Cloud functions for event-driven serverless workloads. It was pretty straightforward — package the Python code with its dependencies, i.e. requirements.txt and everything else will be taken care of by Cloud Function(i.e. GCP).
Then I moved to AWS and discovered Lambda, their popular serverless offering. It was great, except for one headache: managing code dependencies.
I was used to just using a requirements.txt file, but that doesn’t work with Lambda. Instead, you have two options. You can either bundle all your libraries with your code in a big zip file (which is a pain to manage) or use something called Lambda Layers.
Before I explain Layers and how to use them effectively, let me give you a quick rundown on Lambda and serverless computing in general.
What is serverless?
Don’t let the term “serverless” fool you — it doesn’t mean servers have vanished into thin air. Instead, think of it as “servers you don’t see.” In this model, your cloud provider manages the resources for you, handling all the nitty-gritty of server maintenance.
At its core, serverless computing is about simplifying your life as a developer or business owner. It’s a world where you can focus on what truly matters — your code and business logic — without getting bogged down in the complexities of managing the machines that run it.
That’s the promise of serverless computing — it’s about freeing you to innovate, while your cloud provider handles the heavy lifting of infrastructure management.
What is the Lambda?
It is the Function as a service (serverless) offered by AWS. It uses an event-driven architecture, meaning it runs a piece of code when some event occurs. It integrates well with other AWS services such as Dynomodb, S3, SQS, API gateway, etc.
Your code may be just a couple of lines, or spread across 2 files but if it requires 15 different packages to tie everything together, it’s referred to as a “deployment package.
It is best practice to manage the code dependencies separately and this is where lambda Layers come in handy.
What is the Lambda layer?
To Quote AWS documentation —
A Lambda layer is a
.zipfile archive that contains supplementary code or data. Layers usually contain library dependencies, a custom runtime, or configuration files.
In simple words, if your Python code requires 5,10,15 libraries to run the code, you build them separately and enable Lambda to use them on runtime.
Lambda Layers are the zip archives that contain these “packages” (or libraries). The libraries enable you to add the dependency code in your Lambda without making it a part of your deployment package
You can also share one layer with other Lambda functions across multiple AWS accounts.
How to Build Lambda Layers?
The simplest way of building Layers is to install the Python dependencies in your local machine inside a Python directory, zip it, and upload it to AWS layers. Your Lambda function can use the layer.
Note: Creating a zip package from a non-Linux environment (even Mac) will NOT WORK with Lambda.
Alternatively, you can use the docker with -- platform linux/amd6 flag to build the layer with the help of sam/build-python docker images.
docker run --platform linux/amd64 -v \
"$PWD":/var/task "public.ecr.aws/sam/build-python3.10" /bin/sh \
-c "pip install -r requirements.txt -t python/; exit"
If you want to share your Layer in a different AWS account, add permissions by running the below command.
aws lambda add-layer-version-permission \
--layer-name <Layer_name> \
--statement-id xaccount \
--action lambda:GetLayerVersion \
--principal <AWS_ACCOUNT_ID> \
--version-number <Layer_Version>
Managing Lambda Layers manually can be a lot of pain when every other month you need to update the libraries to use new versions of libraries to take your security team off your back.
Automating the Layer build with Terraform and Github Action.
Before we start writing Terraform, create the file structure in your VSCode as shown below.

Defining Python dependencies for layers
layers/layer1/requirements.txt
aws-psycopg2
requests==2.32.3
urllib3==2.2.2
layers/layer1/requirements.txt
pyzipper ==0.3.6
pycryptodome ==3.20.0
cryptography ==41.0.7
PyPDF2 ==3.0.1- Sometimes we also need to use common scripts such as logger, and db-connection scripts used by Lambda functions. We can package them with the dependencies to avoid packaging them with Lambda code or building separate layers for these scripts.
Place those Python scripts in layers/common-scripts/ path
Writting Terraform configuration to build the Lambda layers with GitHub Action
You can find the code for this blog in my public GitHub repo here.
providers.tf
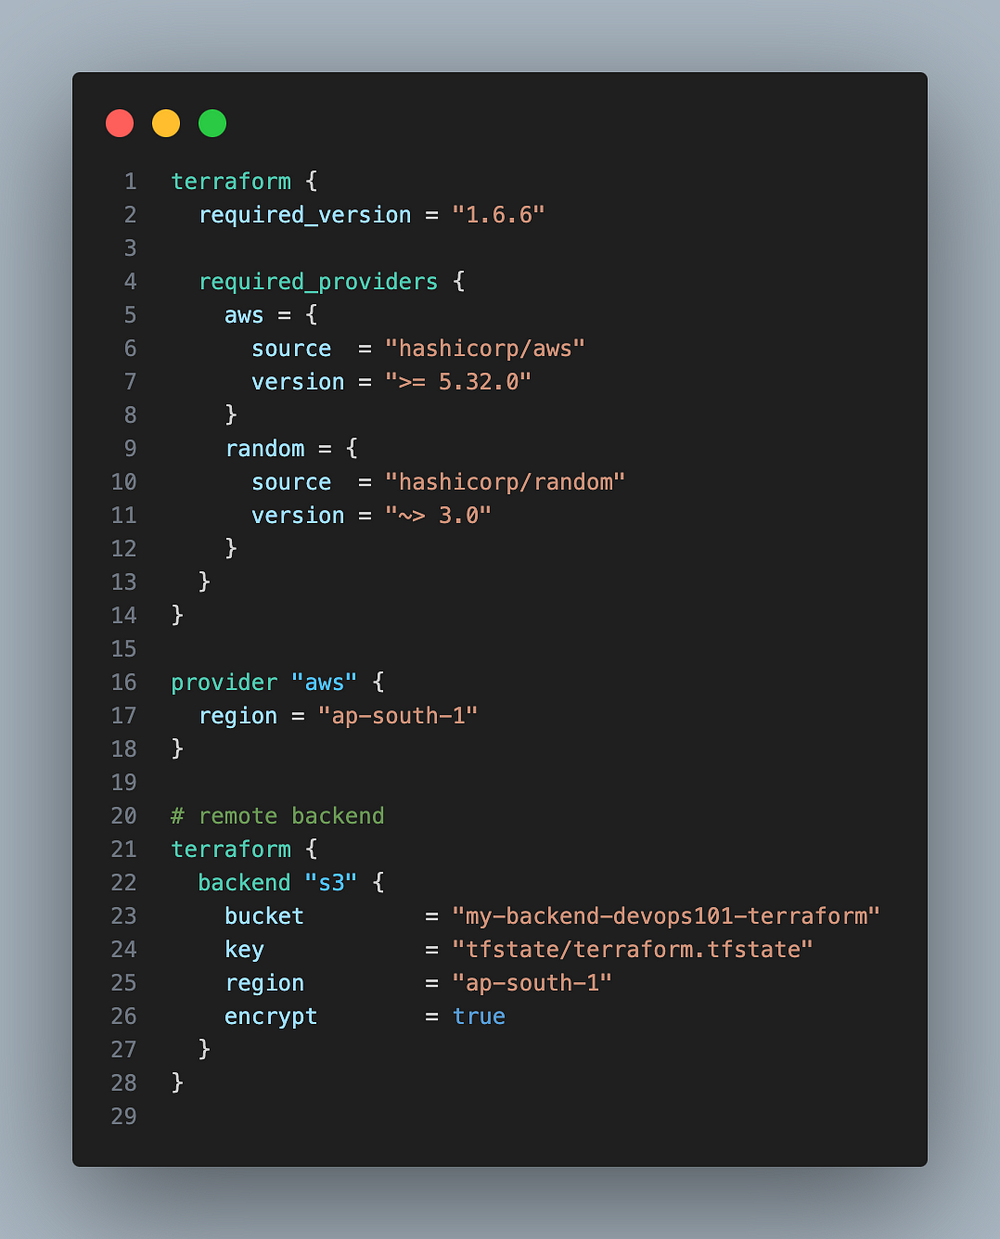
Setting up terraform providers and remote backend using s3 bucket I have already created to store the terraform state files
variable.tf
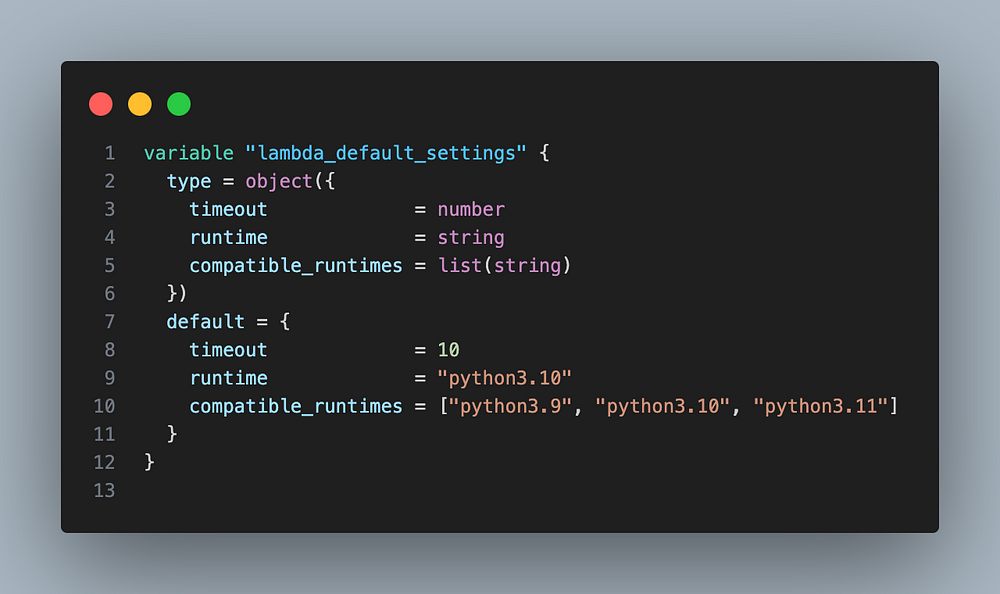
We will store default values for Python layers such as runtime, and compatible runtimes.
config.tf
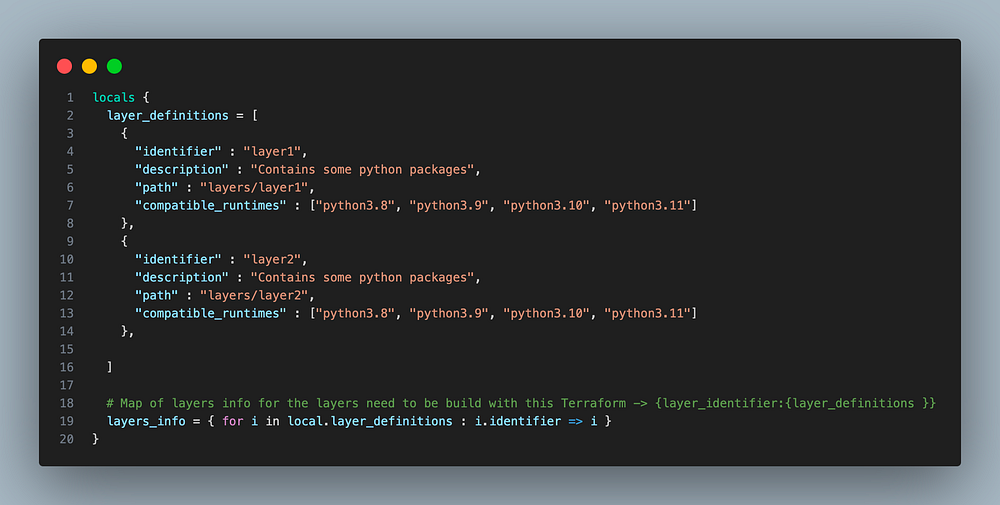
We will create local variables to store the layer details such as layer name and path to the dependencies
s3.tf

Use the data source to get the AWS account ID and use it as a prefix to ensure the unique name of the S3 bucket, and use it to store the layers packages in .zip format
main.tf
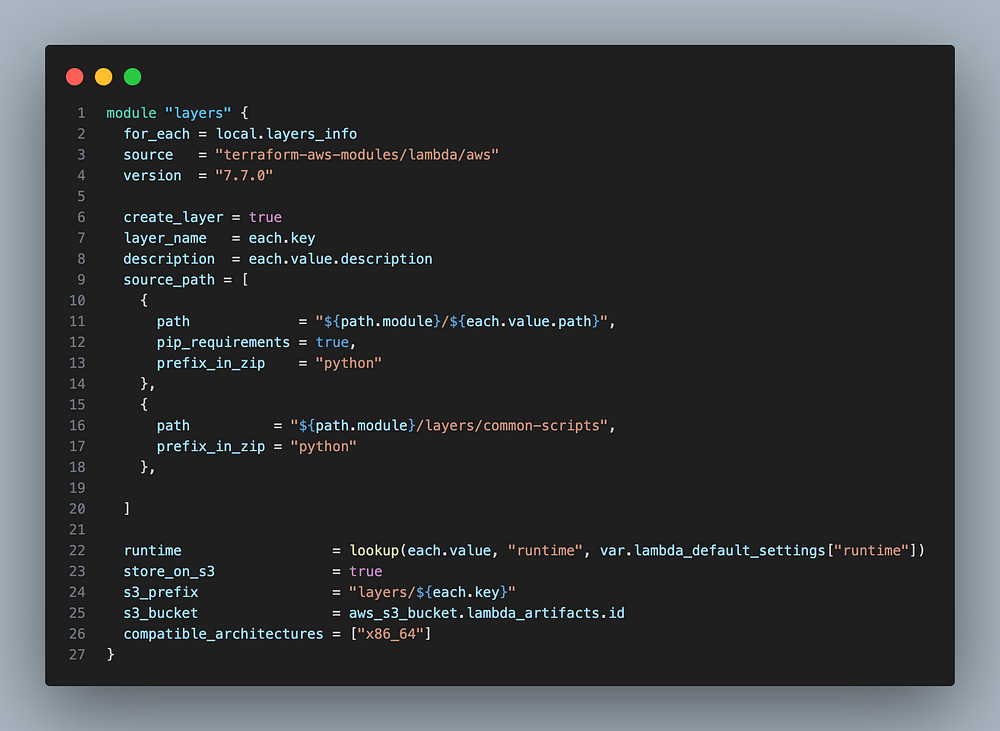
It will use the Terraform module (terraform-aws-modules/lambda/aws) for Lambda to build Python layers. I will package the custom scripts along with the layers for usability.
If you want to share the layers across multiple accounts, it can be easily done. Just below lines to your existing terraform code.
Append config.tf and main.tf with the below code## config.tf
locals{ # List of layers names
layer_names = [for i in local.layer_definitions : i.identifier] # Accounts that should have permission on layer version
allowed_accounts = ["AWS_ACCOUNT_ID_1", "AWS_ACCOUNT_ID_2"] # Mapping layers -> aws accounts for permission on layer version
layers_to_accounts = flatten([for layer in local.layer_names : [for account in local.allowed_accounts : { id = "${layer}-${account}", layer = layer, account = account }]])

# Map to be used by for_each loop for resource
layers_to_accounts_map = { for item in local.layers_to_accounts : item.id => item }
}###################################################### main.tf
resource "aws_lambda_layer_version_permission" "lambda_layer_permission" {
for_each = local.layers_to_accounts_map
layer_name = module.layers[each.value.layer].lambda_layer_layer_arn
version_number = module.layers[each.value.layer].lambda_layer_version
principal = each.value.account
action = "lambda:GetLayerVersion"
statement_id = "${each.value.layer}-${each.value.account}-${random_integer.random.result}"
}resource "random_integer" "random" {
min = 1
max = 1000
}
That is all the Terraform you need to build the layers. We will use Github Action to deploy these layers.
Here is the GitHub Action workflow that will build the layers. You can find the code for this blog in my public GitHub repo here.
build-lambda-layers.yml
name: Build layer with TF
on:
  # On push to main branch when there is a change in dependencies
  push:
    branches:
      - main
    paths:
      - lambda-python-layers/layers/
  # Run manually
  workflow_dispatch:
jobs:
  terraform:
    runs-on: ubuntu-latest
    env:
      AWS_ACCESS_KEY_ID: ${{ secrets.AWS_ACCESS_KEY_ID }}
      AWS_SECRET_ACCESS_KEY: ${{ secrets.AWS_SECRET_ACCESS_KEY }}
      AWS_REGION: ap-south-1
      TERRAFORM_VER: 1.6.6
      TERRAFORM_PATH: lambda-python-layers/
      PYTHON_VERSION: '3.10'
    steps:
      - name: Checkout Repository
        uses: actions/checkout@v2
      - name: Setup Terraform
        uses: hashicorp/setup-terraform@v3
        with:
          terraform_version: ${{ env.TERRAFORM_VER }}
      - name: Setup Python
        uses: actions/setup-python@v5
        with:
          python-version: ${{ env.PYTHON_VERSION }}
      - name: Terraform Init
        working-directory: ${{ env.TERRAFORM_PATH }}
        run: terraform init
      - name: Terraform Plan
        working-directory: ${{ env.TERRAFORM_PATH }}
        run: terraform plan -out=tfplan
      - name: Terraform Apply
        working-directory: ${{ env.TERRAFORM_PATH }}
        run: terraform apply -auto-approve tfplan
This GitHub Action workflow is designed to deploy Terraform to build the layers for a specific path(layers/ ) within a repository.
- Triggers:
– on push to themainbranch, specifically if files within thelambda-python-layers/layers/directory is updated.
– Can be triggered manually viaworkflow_dispatch. - Job Configuration:
– Job runs on theubuntu-latestrunner.
– AWS credentials and region are sourced from GitHub Secrets, and the Terraform version (`1.6.6`) and Python version (`3.10`) are specified. - Steps:
– Checkout repository using theactions/checkout@v2action.
– Install Terraform version usinghashicorp/setup-terraform@v3.
– Install Python 3.10 usingactions/setup-python@v5.
– Run Terraform commands to deploy the layers.
Running the automation.
You can clone the code from my Public Github Repo# Clone my GitHub repo
git clone https://github.com/akhileshmishrabiz/Devops-zero-to-hero.git# Create a folder/directory
mkdir lambda-layer-example
cd lambda-layer-example# Copy the terraform from Devops-zero-to-hero/lambda-python-layers
cp -r Devops-zero-to-hero/lambda-python-layers .# Create a .github/workflows folder to store the GitHub Action workflow
mkdir -p .github/workflows# Create a .yml file
touch .github/workflows/layer-build.yml# Copy the workflow code from the cloned repo
cp Devops-zero-to-hero/.github/workflows/build-lambda-layer.yml .github/workflows/layer-build.yml# Create a github repository and push the code from lambda-layer-example to
# your repo.
Create access and secret keys and store them as secrets in your GitHub repo
Go to your repo > settings > /secrets and variables > actions
Create two secrets there —
AWS_ACCESS_KEY_ID = AWS_ACCESS_KEY_YOU_CREATED
 AWS_SECRET_ACCESS_KEY = AWS_SECRET_YOU_CREATED
Push the code, and it will trigger the workflow. Also, you can run it manually.


You can see the layers in your AWS accounts — Lambda > Layer

The Terraform code for this is placed here, and the GitHub Action workflow is here.
If you found this blog post useful, clap, follow, and subscribe so you don’t miss my future articles.
About me
I am Akhilesh Mishra, a self-taught Devops engineer with 11+ years working on private and public cloud (GCP & AWS)technologies.
Connect with me on Linkedin: https://www.linkedin.com/in/akhilesh-mishra-0ab886124/
