
If you are new to using Terraform on AWS, then this blog post will show you how to use Terraform to deploy a 3-tier architecture.
Scenario: A three–tier architecture on AWS
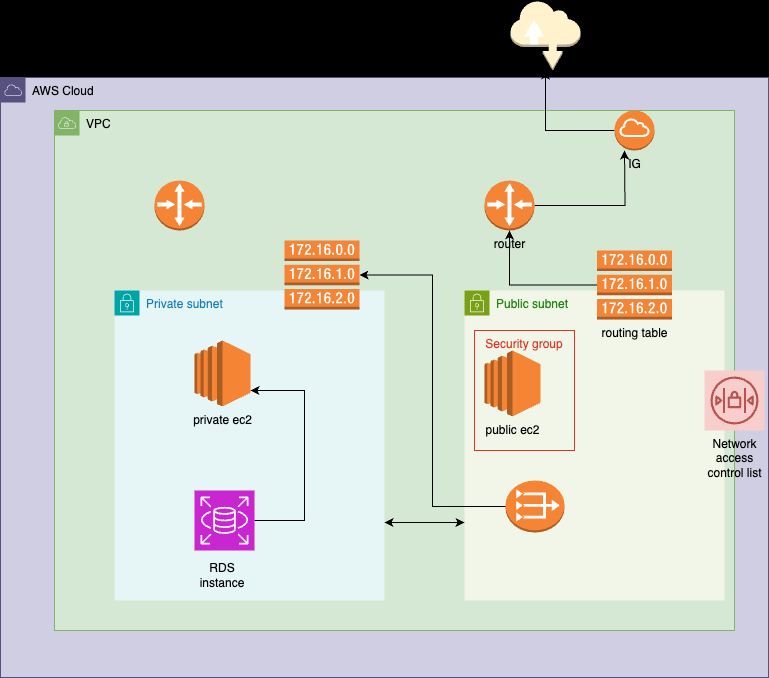
Creating a three–tier architecture on AWS involves setting up three layers: a Web layer, an Application layer, and a Database layer.
What will we be doing? — Implementation Explanation
In this blog, we’ll set up two EC2 instances: one in a public subnet with a public IP for internet access, and another in a private subnet without direct internet connectivity.
To enable software updates for the private instance, we’ll implement a NAT gateway in the public subnet with an Elastic IP. We’ll configure routes to allow the private instance to communicate through the NAT gateway.
Additionally, we’ll create an RDS instance running Postgres in the private subnet, accessible only from the private EC2 instance. This setup ensures a secure environment with controlled internet access and database isolation.
Step 1: Set Up Your Networking
- Create a new VPC with CIDR block(10.0.0.0/16)
- Create a private and public subnet and respective routing tables.
- Create an Internet Gateway and associate it with VPC. Create a public route to allow internet access to your public subnet.
- Create a NAT gateway in your public subnet and a private route allowing outbound internet access to your private subnet via the public subnet.
Step 2: Set Up the Database Layer
- Create an Amazon RDS instance for your database in the private subnet.
- Configure the database security group to allow connections only from the application layer(EC2 instance on your private subnet).
Step 3: Set Up the Application and web Layer
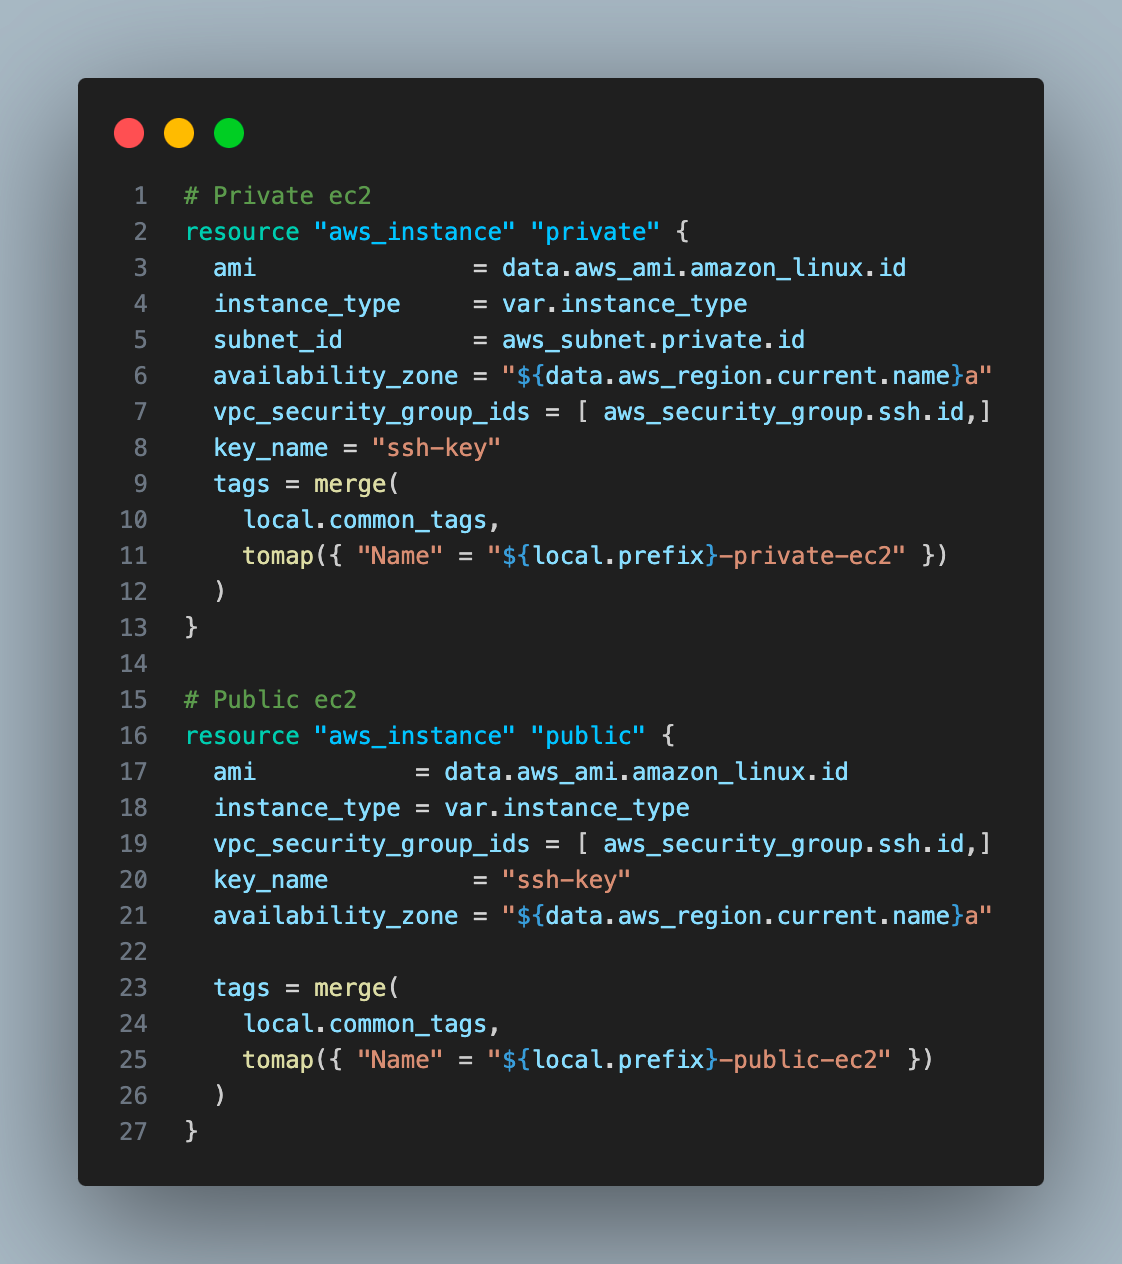
- Create an EC2 instance in your private subnet for the application layer. This will not have a public IP, you can only access it from the web layer.
- Create an EC2 instance in your public subnet for the web layer. This VM will have a public IP, allowing connection from the internet.
- Ensure that the security group allows traffic from the Web layer and to the Database layer.
Step 4: Configure Security Groups and Network ACLs
- Set up security groups to control inbound and outbound traffic at the instance level for both the application and web layer.
- Configure Network Access Control Lists (ACLs) to control inbound and outbound traffic at the subnet level.
Step 5: Testing Your Setup
- Access your web server through its public IP address or domain name.
- Check the connectivity between the layers by trying to access the application layers from the web layer, and the database layer from the application level.
Terraform code
Let’s get started with the fun part. I will explain all the pieces one by one.
Now we can get to the code-writing part —
Note: I have kept all the code in my Public GitHub repo, you can download the code from here and use it.
- We will use the Terraform data source block to get the value of the latest AMI.
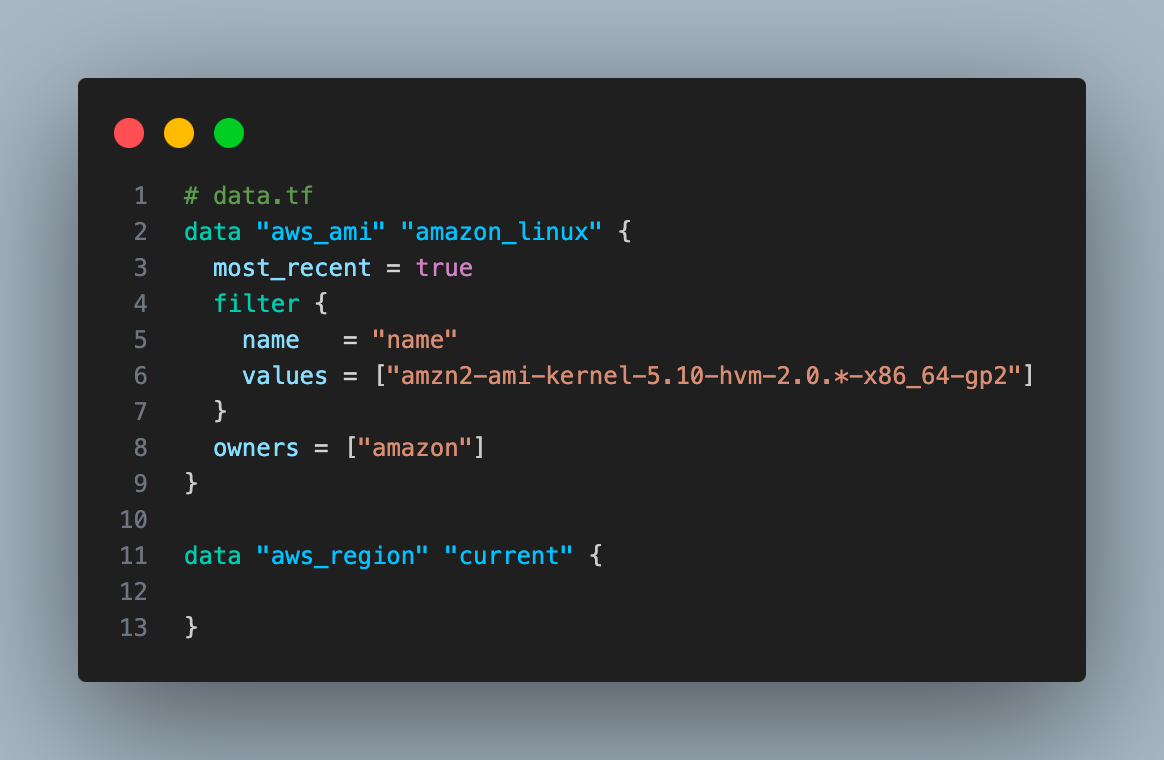
Data sources allow you to query and import external data( existing resources) within your Terraform configuration without managing their lifecycle.
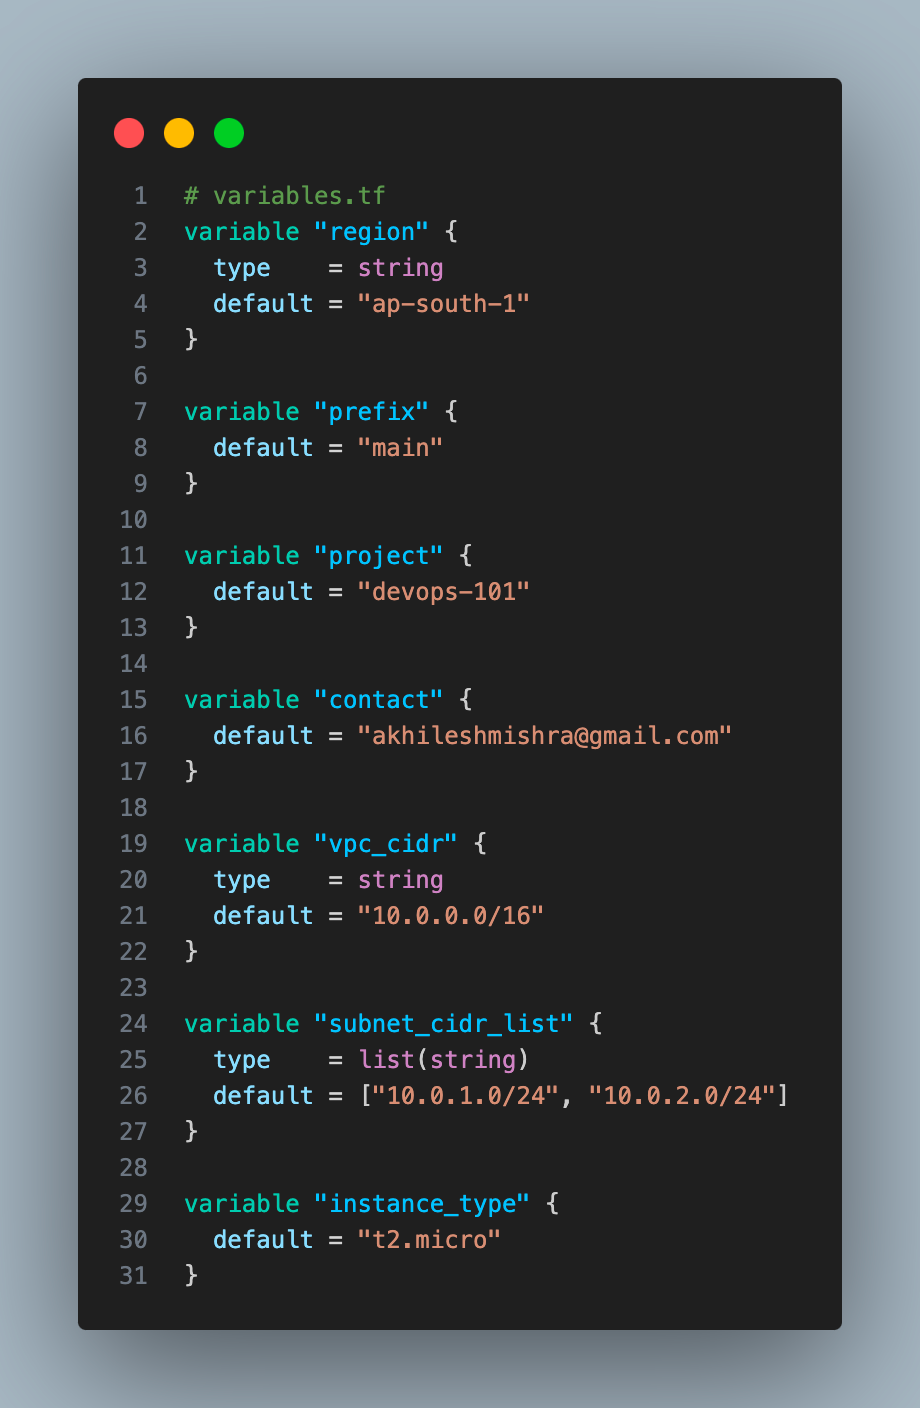
- Setup variables and local variables
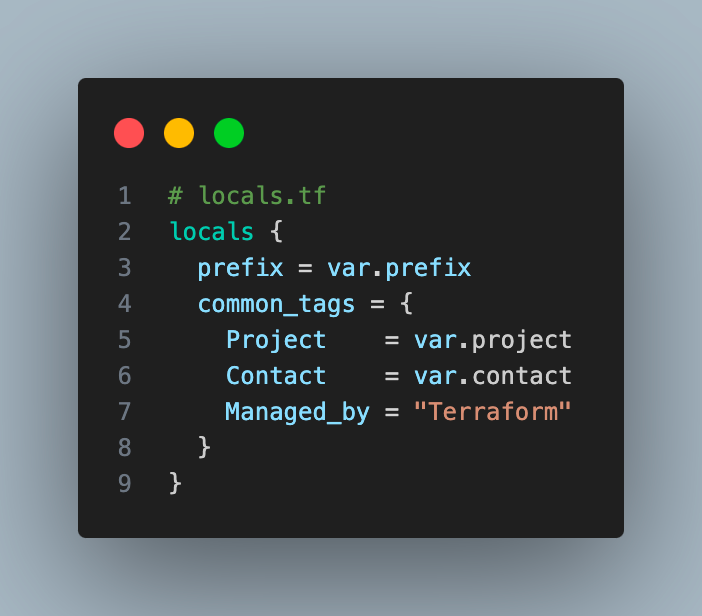
Locals let you centrally manage the common variables used in your configuration.
- We are setting up providers and the state backend.
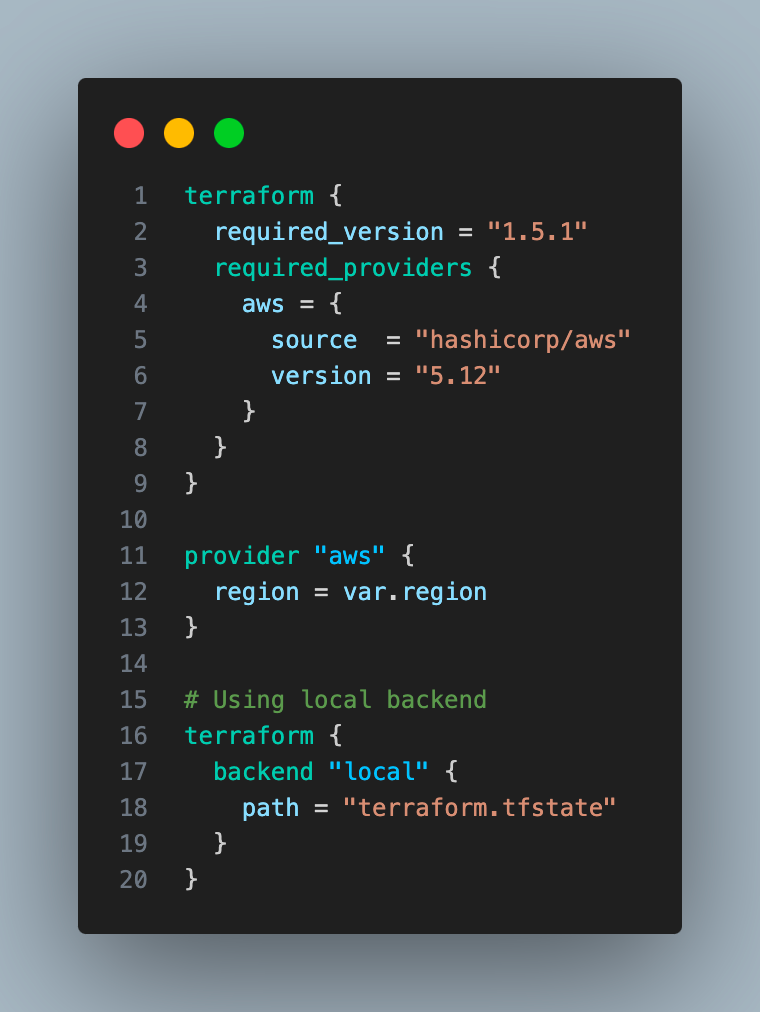
We have used the local state for Terraform for ease, although using a remote state( with an s3 bucket) and configuring state locking is recommended.
Why we should use a remote state?
This allows multiple developers or teams to work on the same infrastructure project without overwriting each other’s changes.
Why do we need state-locking?
State file locking is a Terraform mechanism that prevents operations on a specific state file from being performed by multiple users at the same time.
Some backends such as GCS(Google Cloud Storage) provide state locking by default. AWS s3 doesn’t provide state locking, we can use the dynamo db table for the state locking mechanism.
If you want to use a remote backend, use the below snippet instead.
terraform {
backend "s3" {
bucket = "my-backend-devops101-terraform"
key = "tfstate/terraform.tfstate"
region = "ap-south-1"
encrypt = true
dynamodb_table = "terraform-lock-table"
}
}
Now that we have taken care of the basic configuration — let’s head to the part where we create the rest of the Terraform config to deploy the resources as per the architecture diagram we saw at the start.
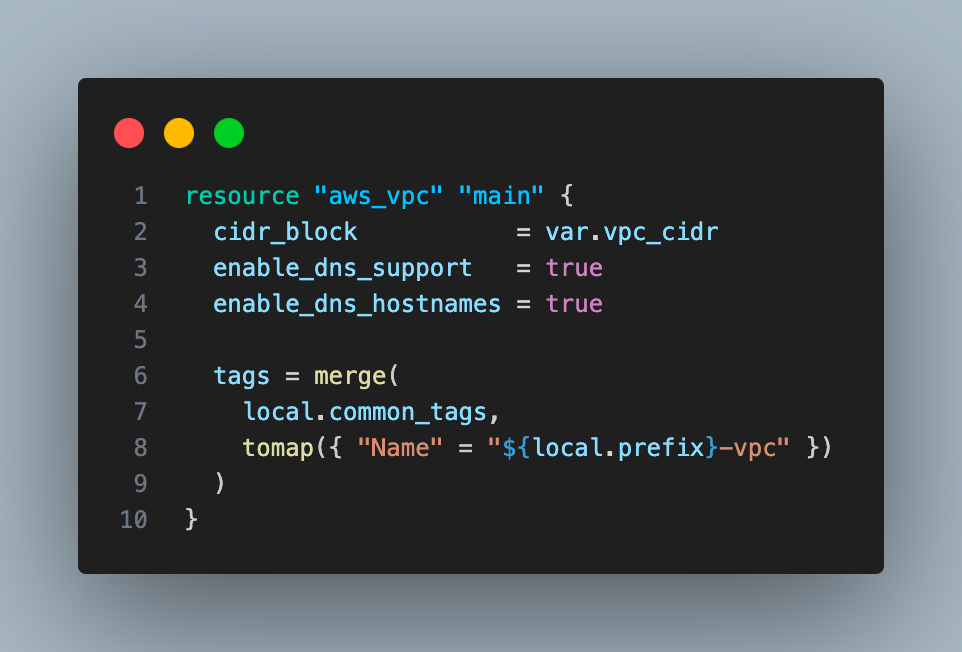
- Create a VPC with 10.0.0.0/16 CIDR block
2. Create 2 subnets, one public subnet with CIDR block 10.0.1.0/24 and one private subnet with 10.0.2.0/24 CIDR block.

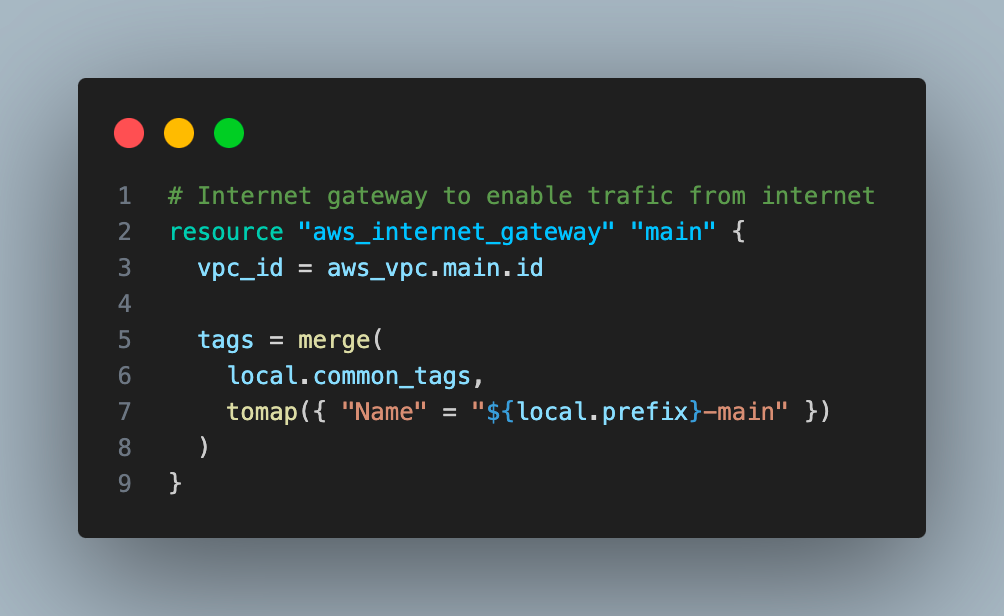
3. Create one internet gateway and attach that to VPC.
4. Create an elastic IP.
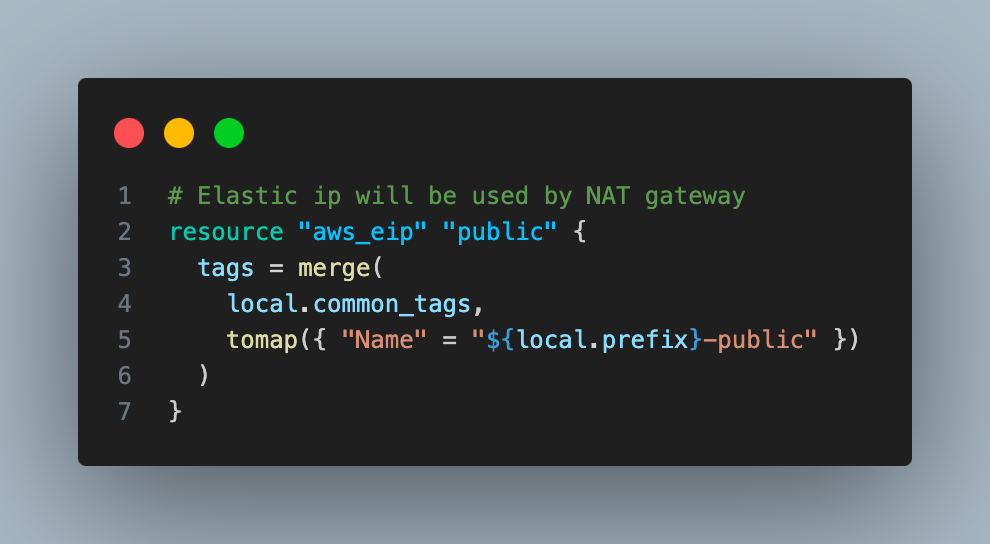
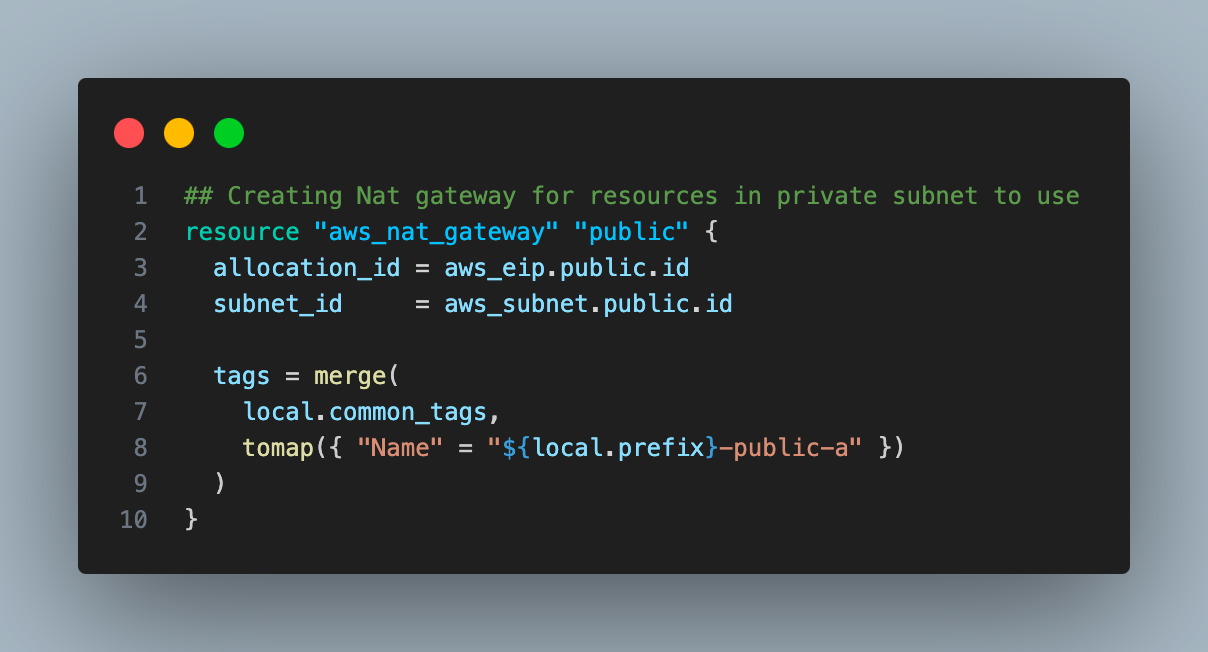
5. Create one NAT gateway in a public subnet using the elastic IP created in the last step.
6. Create two route tables, one for each subnet (private and public).
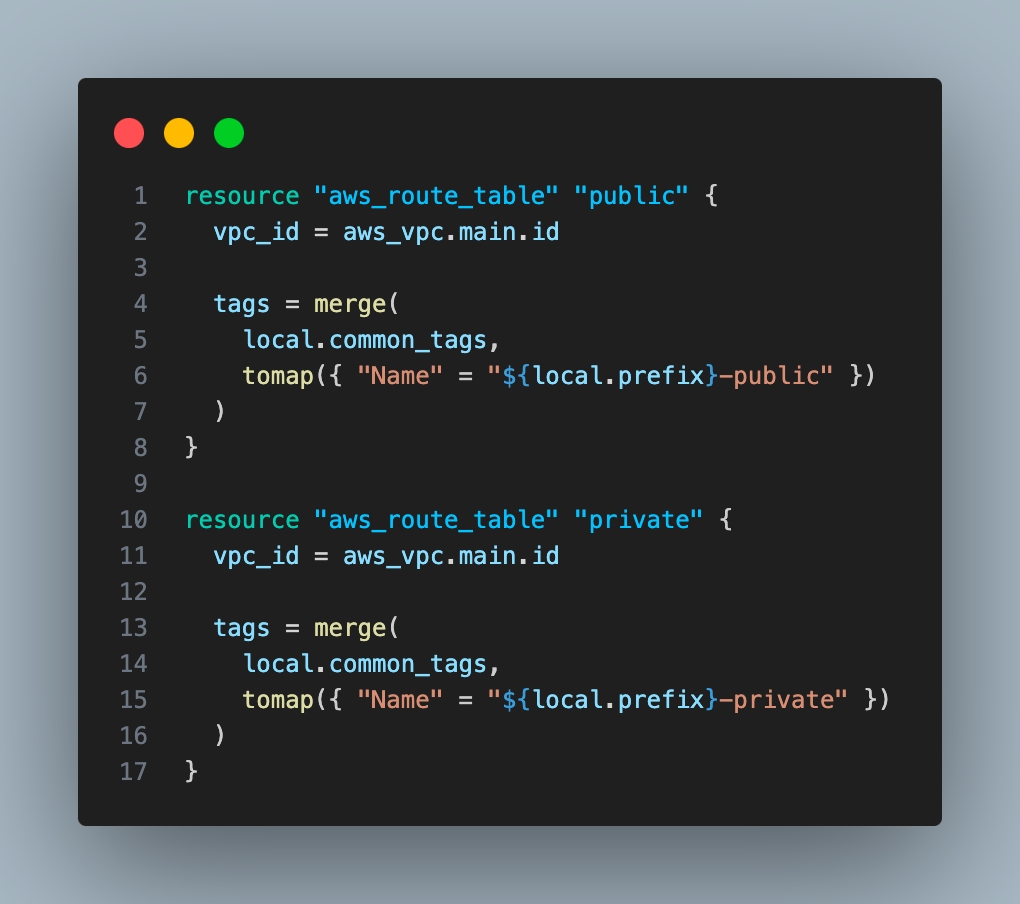
7. Create two routes, one for the public subnet and another for the private subnet. The private route will use the Nat gateway, and the public route will use the Internet gateway as gateway_id

8. Create routes associated with private and public subnets.
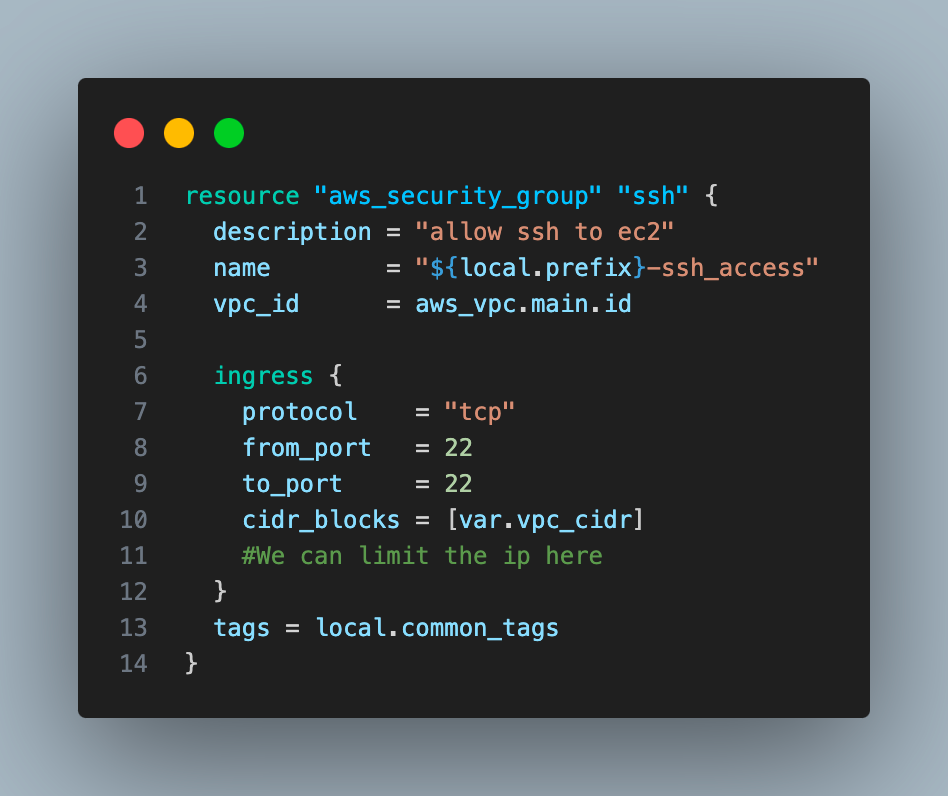
9. Create a security group that allows SSH connection to both ec2 instances.
10. Create two ec2 instances, one in a public subnet and the other on a private subnet.
11. Create an RDS instance
- Generate a random password for the RDS instance
resource "random_password" "rds_password" {
length = 16
special = false
}- Store the RDS password in the AWS Secrets Manager
resource "aws_secretsmanager_secret" "rds_password" {
name = "${var.prefix}-rds-password"
}
resource "aws_secretsmanager_secret_version" "rds_password" {
secret_id = aws_secretsmanager_secret.rds_password.id
secret_string = jsonencode({ password = random_password.rds_password.result })
}12. Create a security group for rds that will allow ingress on the DB port from a private instance. Also, create a subnet group.
- Create a security group for the RDS instance
resource "aws_security_group" "rds" {
vpc_id = aws_vpc.main.id

ingress {
from_port = 5432
to_port = 5432
protocol = "tcp"
cidr_blocks = [aws_subnet.private.cidr_block]
}

egress {
from_port = 0
to_port = 0
protocol = "-1"
cidr_blocks = ["0.0.0.0/0"]
}
}- Create a DB subnet group for the RDS instance
resource "aws_db_subnet_group" "main" {
name = "${var.prefix}-db-subnet-group"
subnet_ids = [aws_subnet.private.id]
}
That is all. I have kept all the code in my Public GitHub repo.
Let’s deploy this code and see the magic of Infrastructure as code. We will be deploying the resources by running Terraform commands manually.
Prerequisites
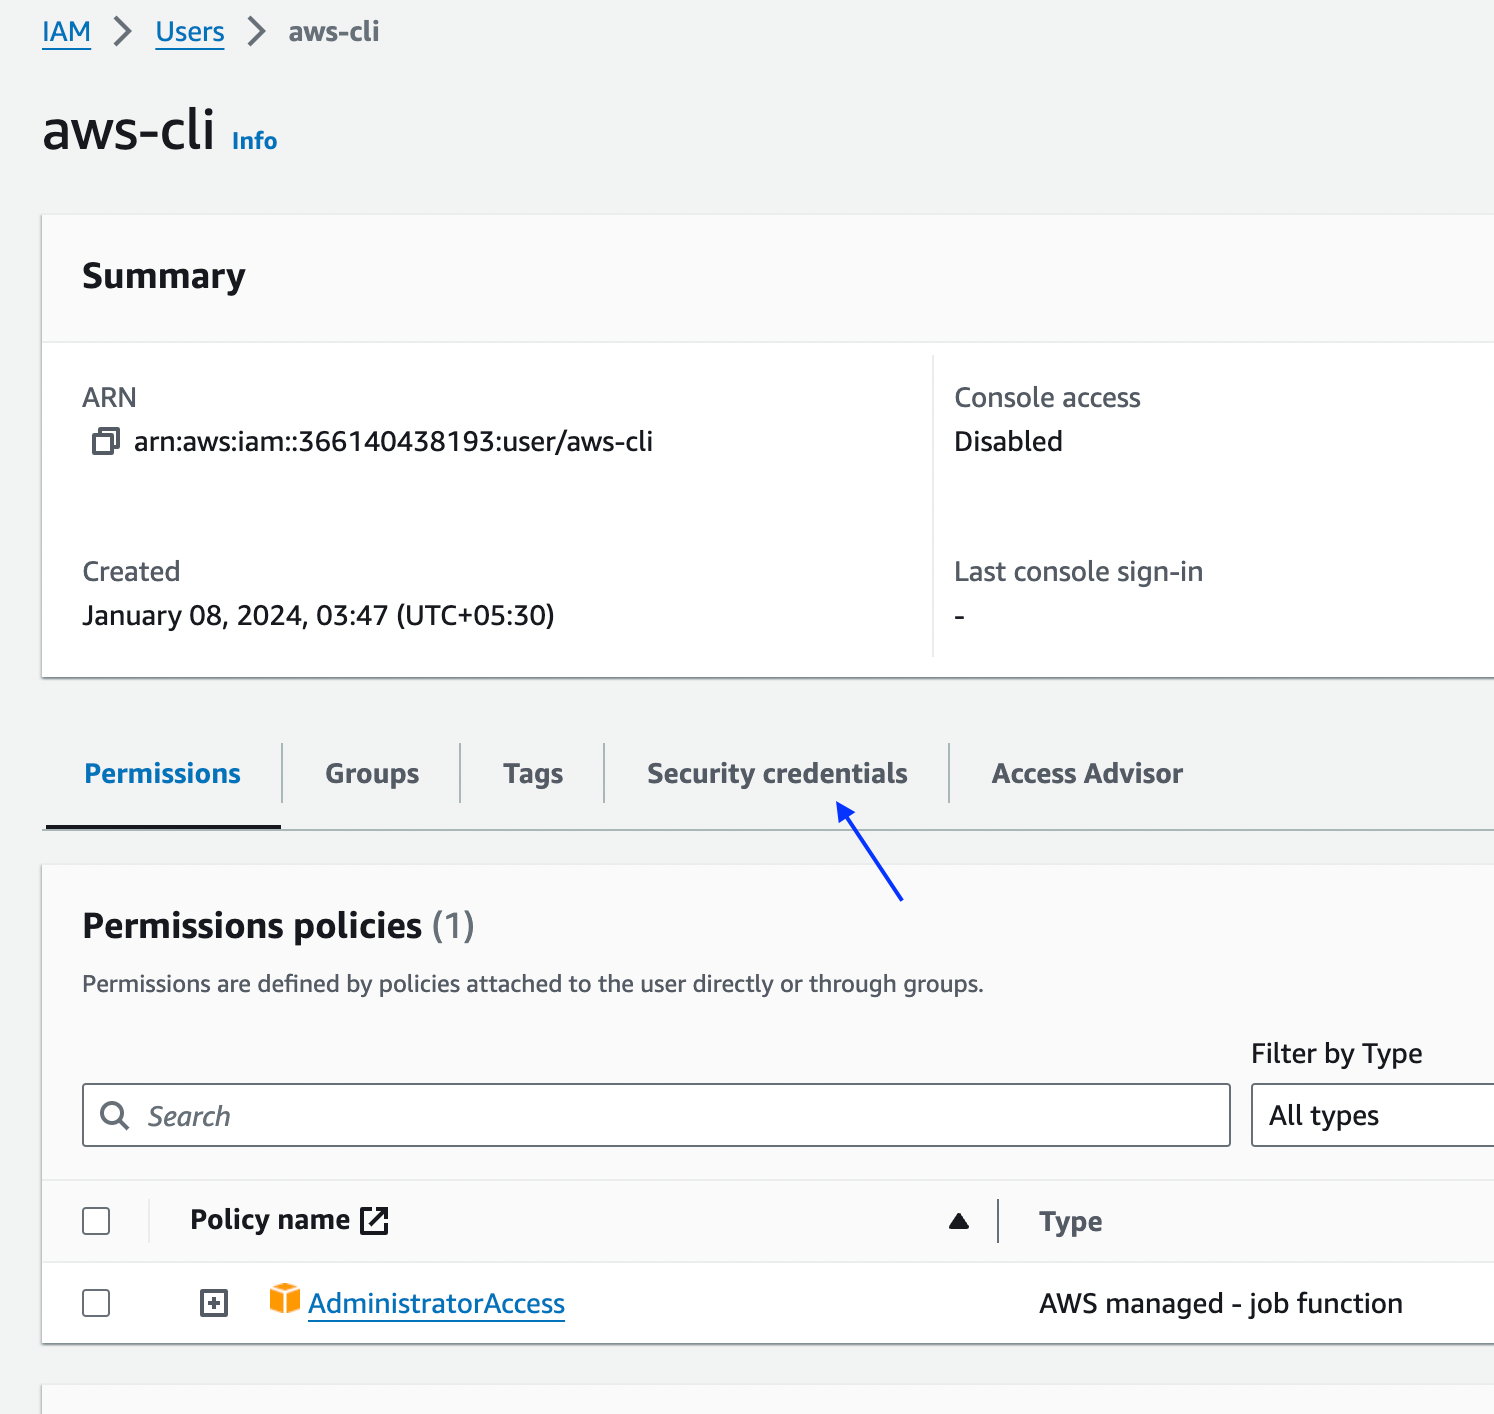
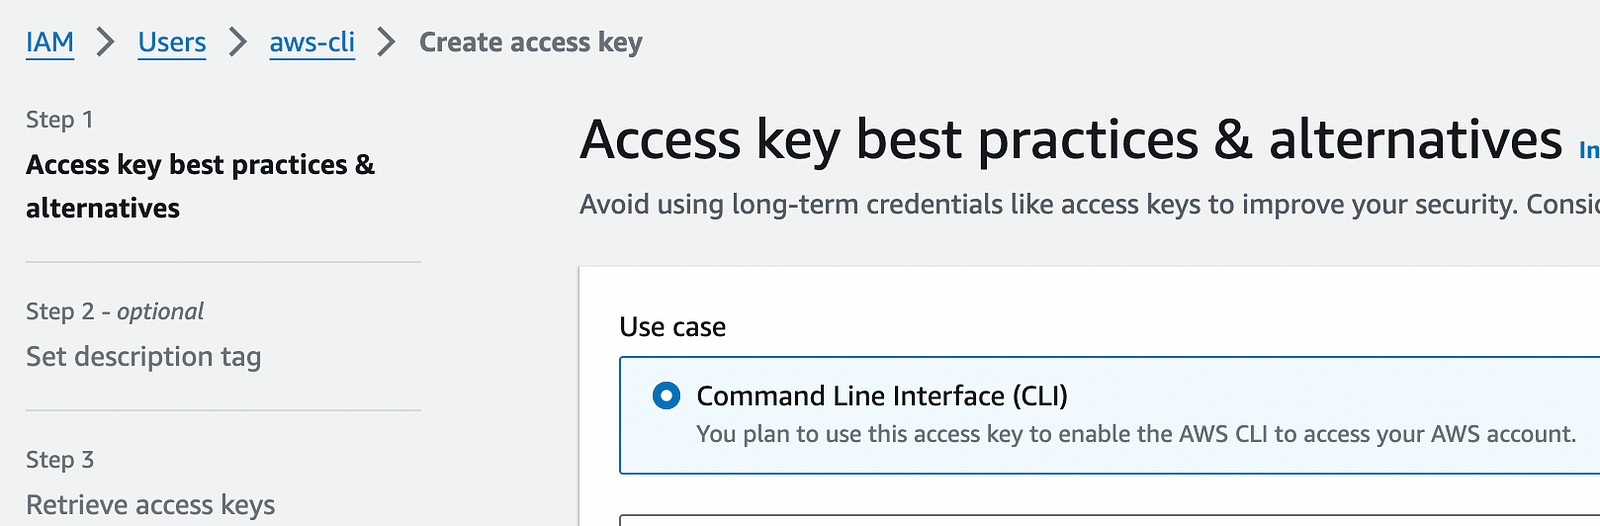
Before deploying infra on AWS, we must create a user(or a service user) and generate the access keys and secret.
Open the AWS console and head to IAM.

Create the user and attach the administrator permissions to it. Then go to user scroll down to the security credentials tab and create.
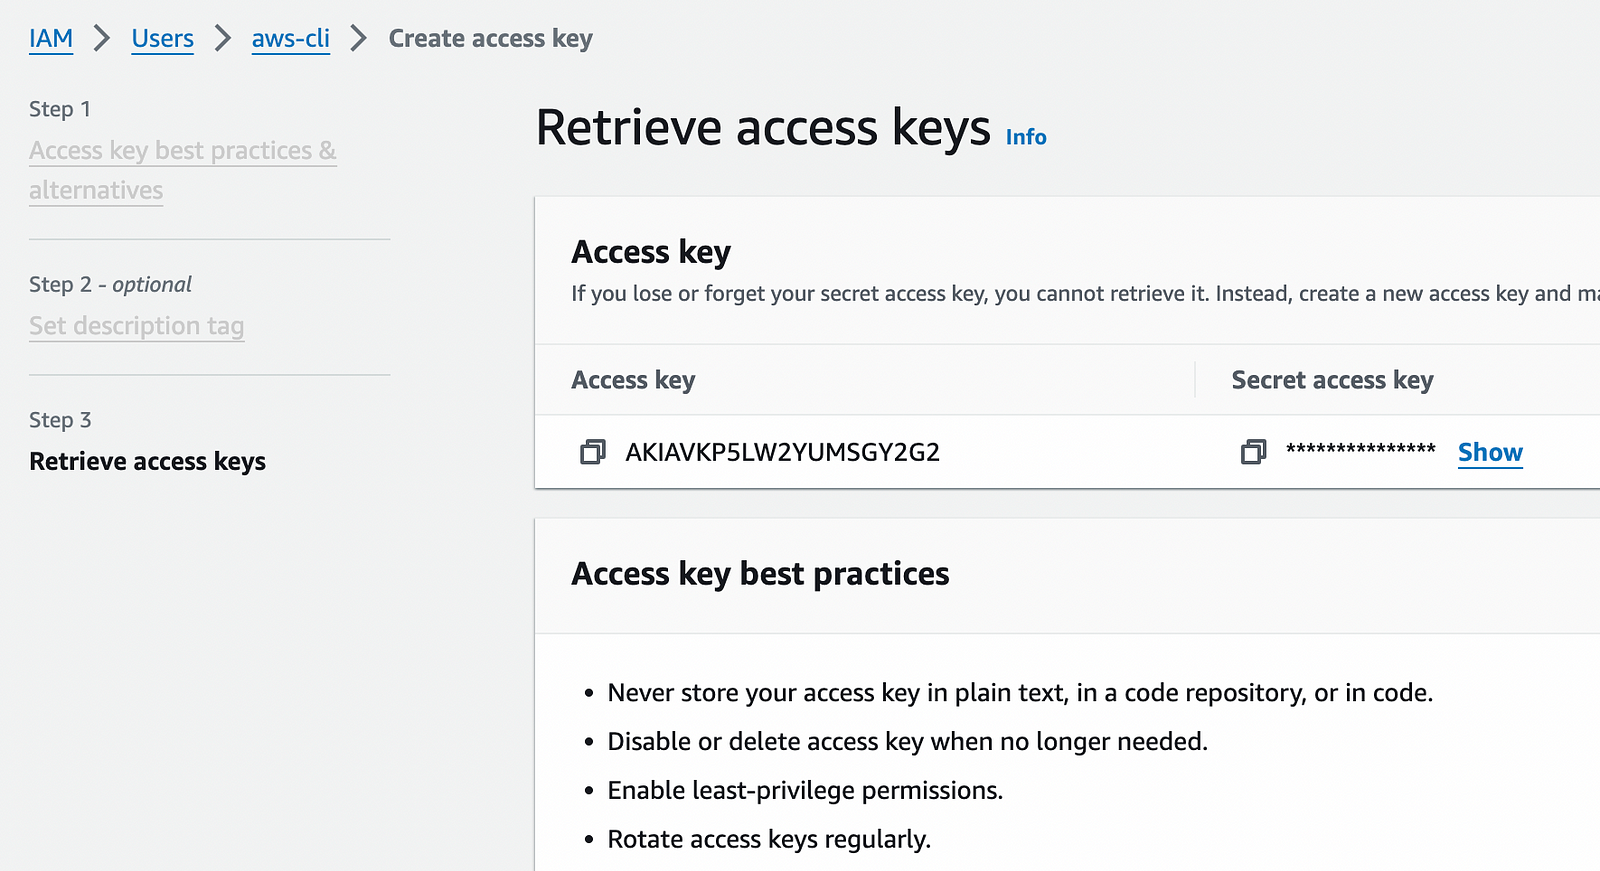
Note: I have deleted the key after taking a screenshot of it. You should protect the access key/secret with your life unless you want someone to misuse it and get you a huge bill from AWS.
Now we will set the environment variables AWS_ACCESS_KEY_ID, and AWS_SECRET_ACCESS_KEY with the values from the keys you just created.export AWS_ACCESS_KEY_ID=”access-key-id”
export AWS_SECRET_ACCESS_KEY=”access-key-secret”
Now we will install the Terraform. I am using a Mac so I can install Terraform with Brew. Windows and Linux users can install it using Terraform documentation.
brew install terraformThat is all. Now you are ready to deploy the Terraform configuration to create AWS resources.
Clone the git repo with the Terraform code. (I assume that you have git installed). Open the Terminal/Power shell on your laptop.
git clone https://github.com/akhileshmishrabiz/Devops-zero-to-hero
cd Devops-zero-to-hero # Switching to the repo.
cd AWS-Projects/aws-3-tier-architecture-terraform # project folder
Let’s run Terraform commands now.
terraform planIt will not deploy the code. It will just list the resources it will be creating.
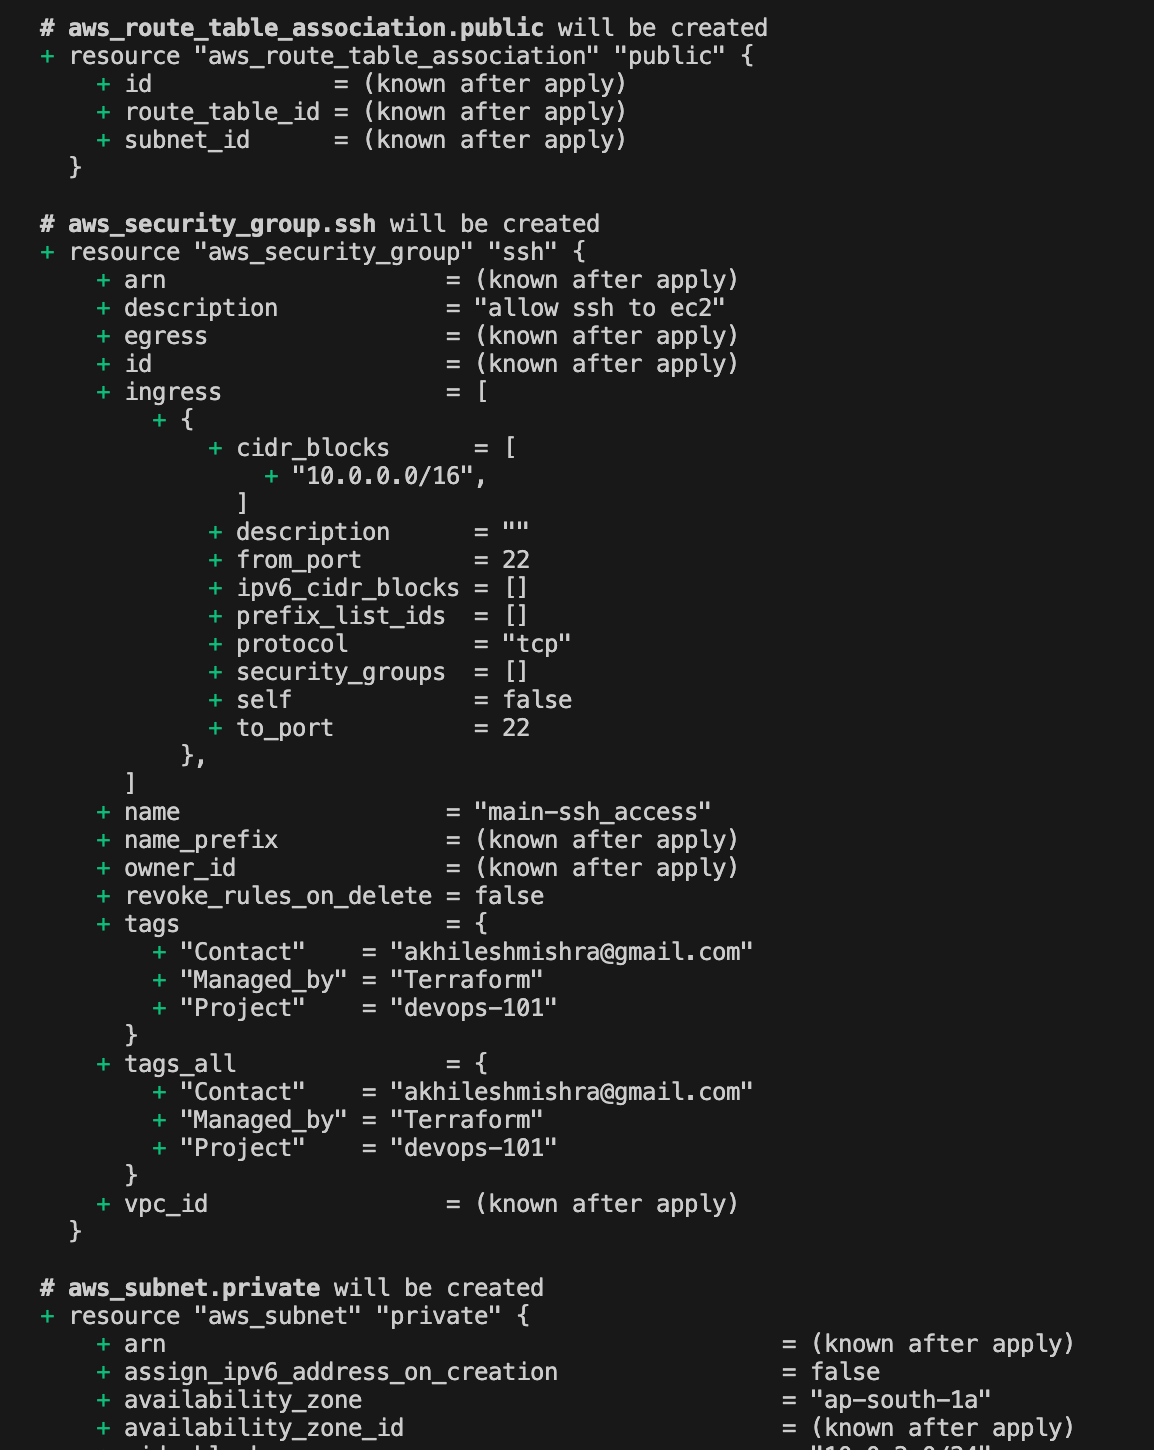
‘+’ means it will add the resource
‘-’ means it will remove the resource
‘~’ means it will update the resources.
Now run the apply command.
terraform applyIt will ask you to confirm. Type ‘yes’, and it will go ahead and create all AWS resources on the fly. You can tell Terraform not to ask for confirmation using the auto-approve flag.
terraform apply --auto-approveYou go to the AWS console and verify.
Last but not least, destroy all the resources to avoid unintended costs.
terraform destroy
# or
terraform destroy --auto-apporve
Automate Terraform deployment with GitHub Actions
name: Terraform Deploy

on:
  # On push to main branch
    branches:
      - main

  ## Manual trigger
  workflow_dispatch:

jobs:
  terraform:
    runs-on: ubuntu-latest

    env:
      AWS_ACCESS_KEY_ID: ${{ secrets.AWS_ACCESS_KEY_ID }}
      AWS_SECRET_ACCESS_KEY: ${{ secrets.AWS_SECRET_ACCESS_KEY }}
      AWS_REGION: ap-south-1
      TERRAFORM_VER: 1.5.1 # Same as your Terraform config
      TERRAFORM_PATH: . # this will be path to Terraform files

    steps:
      - name: Checkout Repository
        uses: actions/checkout@v2

      - name: Setup Terraform
        uses: hashicorp/setup-terraform@v3
        with:
          terraform_version: ${{ env.TERRAFORM_VER }}

      - name: Terraform Init
        working-directory: ${{ env.TERRAFORM_PATH }}
        run: terraform init

      - name: Terraform Plan
        working-directory: ${{ env.TERRAFORM_PATH }}
        run: terraform plan

      - name: Terraform Apply
        working-directory: ${{ env.TERRAFORM_PATH }}
        run: terraform apply -auto-approve
This GitHub Actions workflow is used to deploy infrastructure with Terraform. It runs manually with push or workflow_dispatch trigger and set up an Ubuntu environment with AWS credentials and Terraform version 1.5.1(same as Terraform code version).
The workflow checks out the code in the folder provided by you (with TERRAFORM_PATH variable), installs Terraform, and then runs three main steps: initializing Terraform, generating a plan to preview changes, and applying those changes to the infrastructure automatically. You can find the code for this GitHub action here.
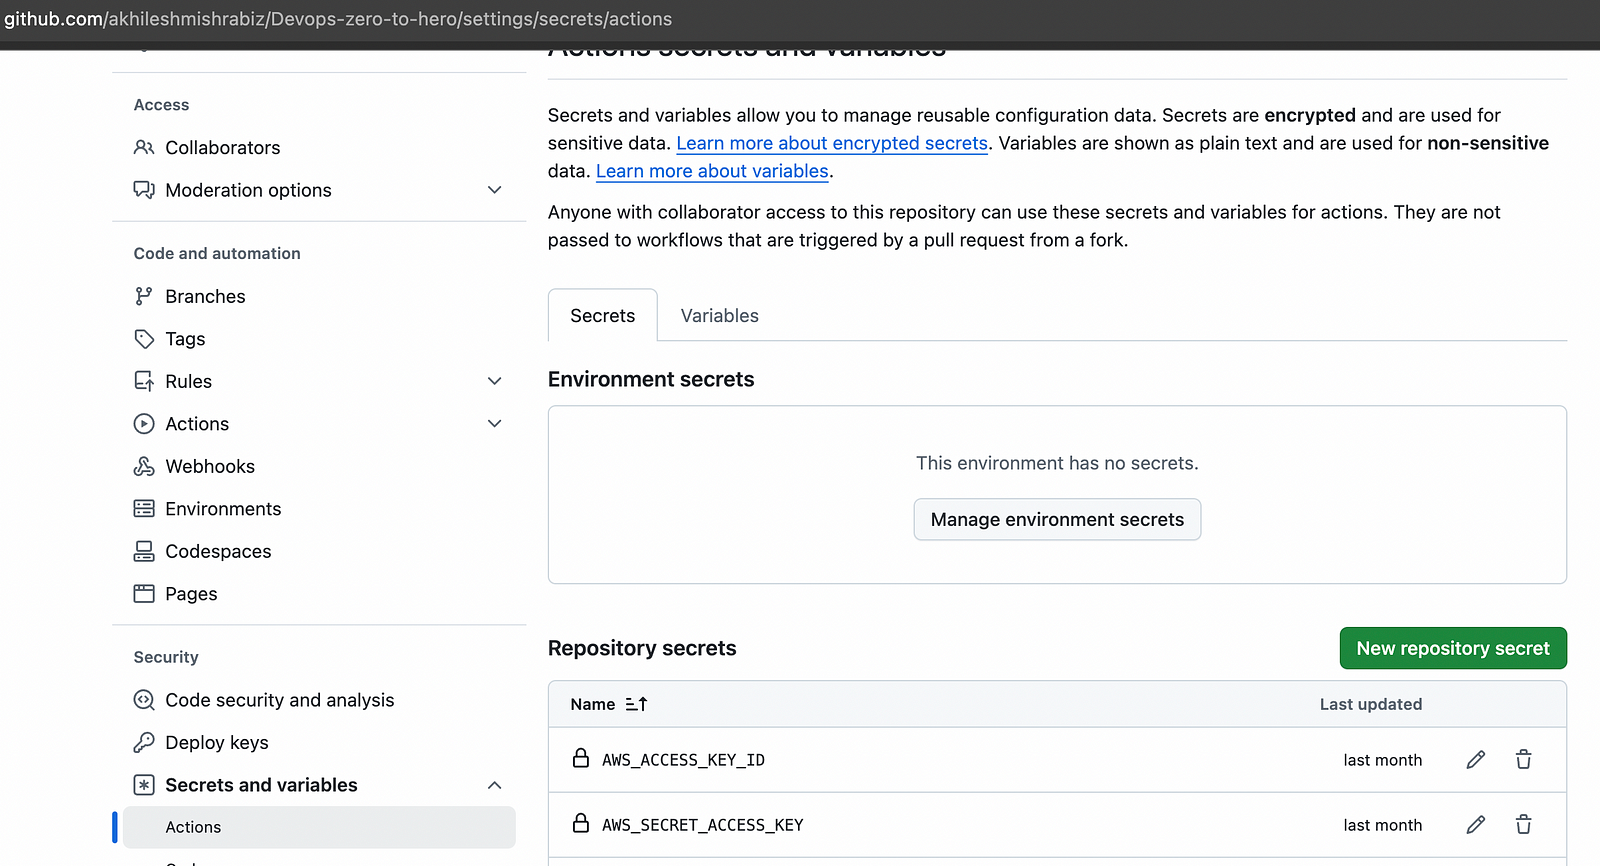
Note: You must create repo secrets with the AWS access key and secrets to run the workflow.
Go to repository settings, then scroll to secrets and variables, go to Repository Secrets, and create.
Connect with me on Linkedin: https://www.linkedin.com/in/akhilesh-mishra-0ab886124/
