Deploying a production-ready 3-tier (React frontend+Flask backend+Postgres)application on AWS EKS with real-world setup (EKS, RDS, ALB, Route53, OIDC, IAM, EC2)
If you’re in the tech space in 2025, you must have heard the term Kubernetes. If you haven’t, then something isn’t right — check if you’ve been sleeping for the last decade!
Jokes apart, Kubernetes has become an incredibly popular tool for running large-scale, containerized applications or microservices with ease. If you want to stay relevant as a DevOps engineer, SRE, or developer, you must know how to work with Kubernetes.
Are you looking to advance your DevOps career?
Join my 20-week Advanced, real-world, project-based DevOps Bootcamp is for you.
Setting up and running Kubernetes can be complex, so most popular public cloud providers offer managed Kubernetes services. The most polular ones are EKS (AWS), GKE (GCP), and AKS (Azure).
Advanced Kubernetes Tutorial Every DevOps Engineer Has Been Searching For
What to expect in this blog post?
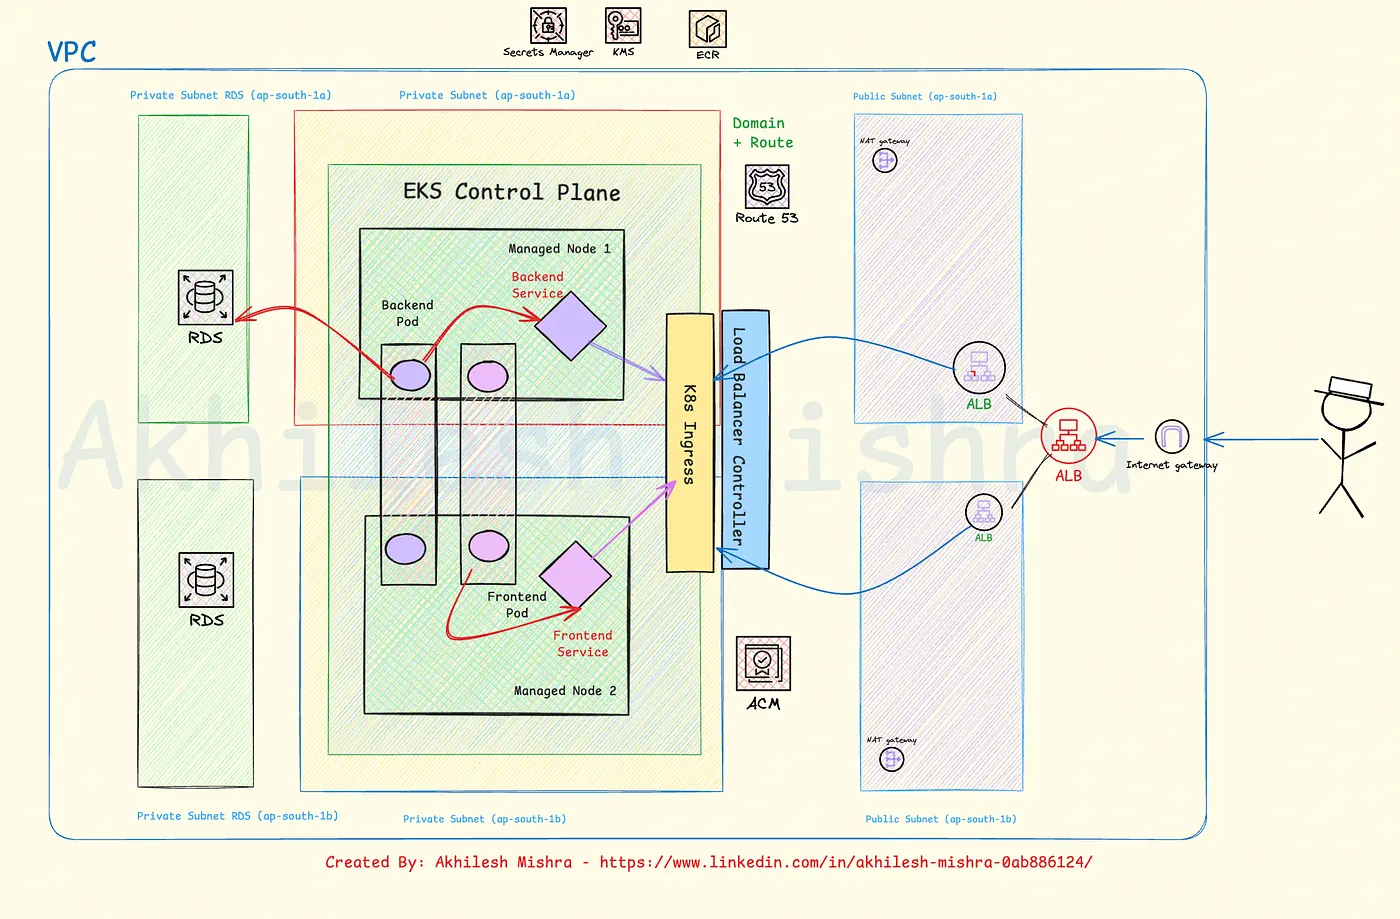
I’ll deploy a detailed 3-tier application on an EKS cluster. The application consists of a React frontend for the user interface, a Flask backend API for business logic, and a private connection to an RDS PostgreSQL database for persistent storage.
To expose the application publicly, I’ll implement the AWS Load Balancer Controller to automatically provision and configure an Application Load Balancer through Kubernetes Ingress resources. I will use Kubernetes Secrets to store sensitive database credentials and ConfigMaps for configuration.
Before deploying the backend service, I’ll run database migrations using a Kubernetes Job, ensuring the schema is properly initialized. To simplify database connectivity, I’ll utilize an External Service for the RDS instance, leveraging Kubernetes’ DNS-based service discovery to maintain a clean application configuration.
This is how you deploy a 3-tier application on AWS-managed Kubernetes(EKS)
I will deploy my three-tier application using EKS, AWS’s managed Kubernetes service. EKS provides a managed Kubernetes control plane and allows you to run your workload exactly how you want.
You have 3 options to choose to run your workload in EKS:
- Managed Node Group — AWS manages the nodes, scaling, updates, etc.
- Self-managed node group — You manage the nodes, set up the autoscaling, patch the nodes, etc. These are useful when you want to configure the nodes for your needs (security, compliance) and choose when and how to patch your cluster nodes.
- Fargate Nodes — Run your workload without EC2 nodes using a Fargate profile (AWS manages everything for you). This has limitations as you cannot use persistent volumes with Fargate; it only supports EFS.
I will use the EKSCTL utility to set up the EKS cluster with a Managed node group
Creating EKS cluster with EKSCTL
To follow along in the blog post, you must install the EKSCTL, AWS CLI, Kubectl, and Helm, as well as the credentials for your AWS accounts, to create the resources.
# EKS ctl command to build an EKS cluster with a managed node group
# with 2 node(min:1, max: 3 nodes as autoscaling)

eksctl create cluster \
  --name Akhilesh-cluster \
  --region eu-west-1 \
  --version 1.31 \
  --nodegroup-name standard-workers \
  --node-type t3.medium \
  --nodes 2 \
  --nodes-min 1 \
  --nodes-max 3 \
  --managed
When we run EKSCTL commands, it will run a cloud formation stack in the backend to configure the resources, the EKS cluster in this case.
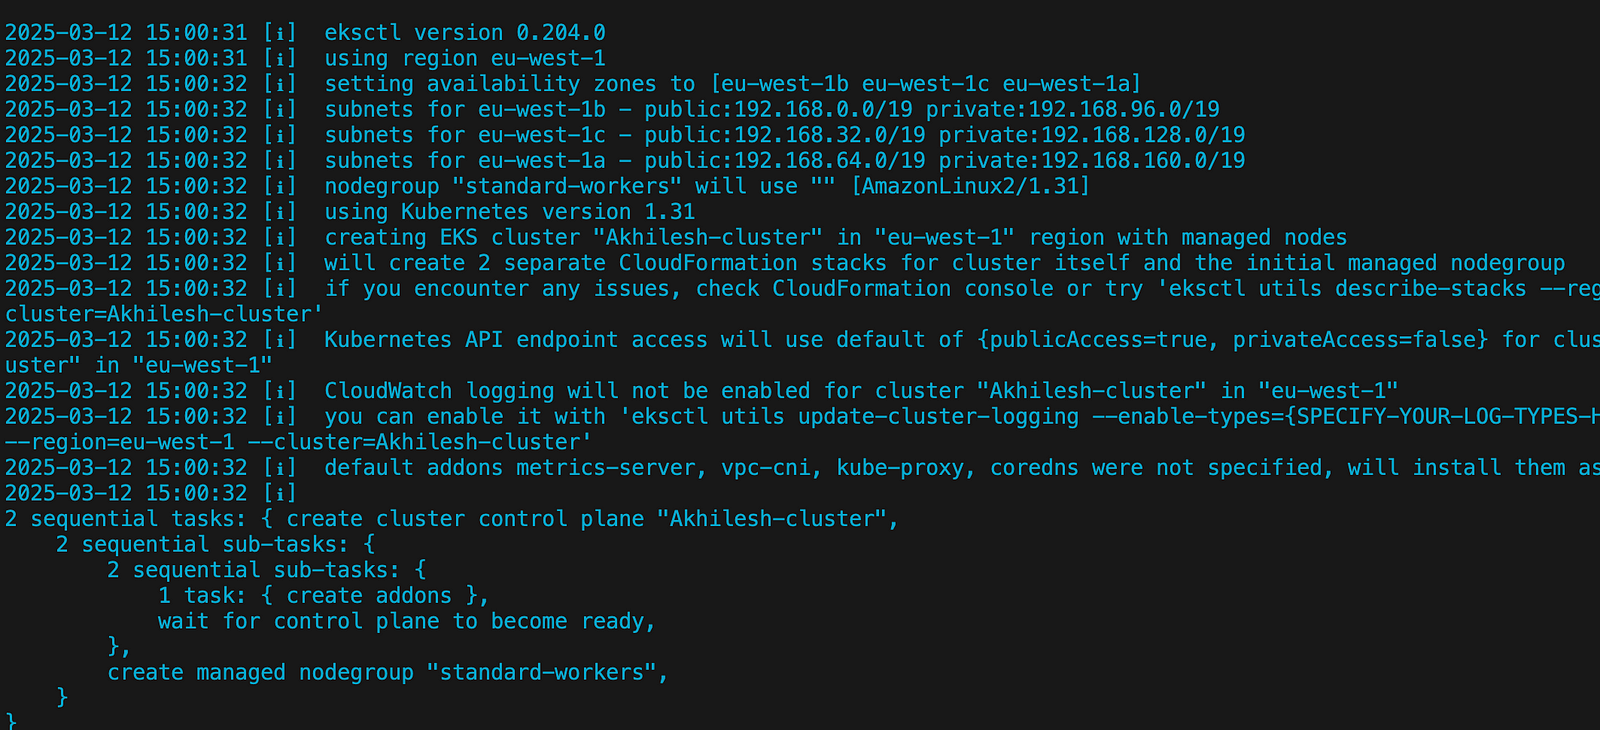
This will create a new VPC, subnets, Nat gateway, and an EKS cluster with a managed node group.
- List the cluster
aws eks list-clusters
- Setting up the cluster config to access the cluster from the local machine.
export cluster_name=Akhilesh-cluster # Name of the cluster
echo $cluster_name

# Configure the kube config
aws eks update-kubeconfig --name $cluster_name --region eu-west-1

# Get the current context
kubectl config current-context
Now you can connect to the EKS cluster using the kubectl command.
Note: Make sure you have installed Kubectl CLI on your local machine.
Kubectl to connect to the EKS cluster
Let’s run some commands to see the status of the cluster
kubectl get namespaces
kubectl get node
kubectl get pod -A
kubectl get services -A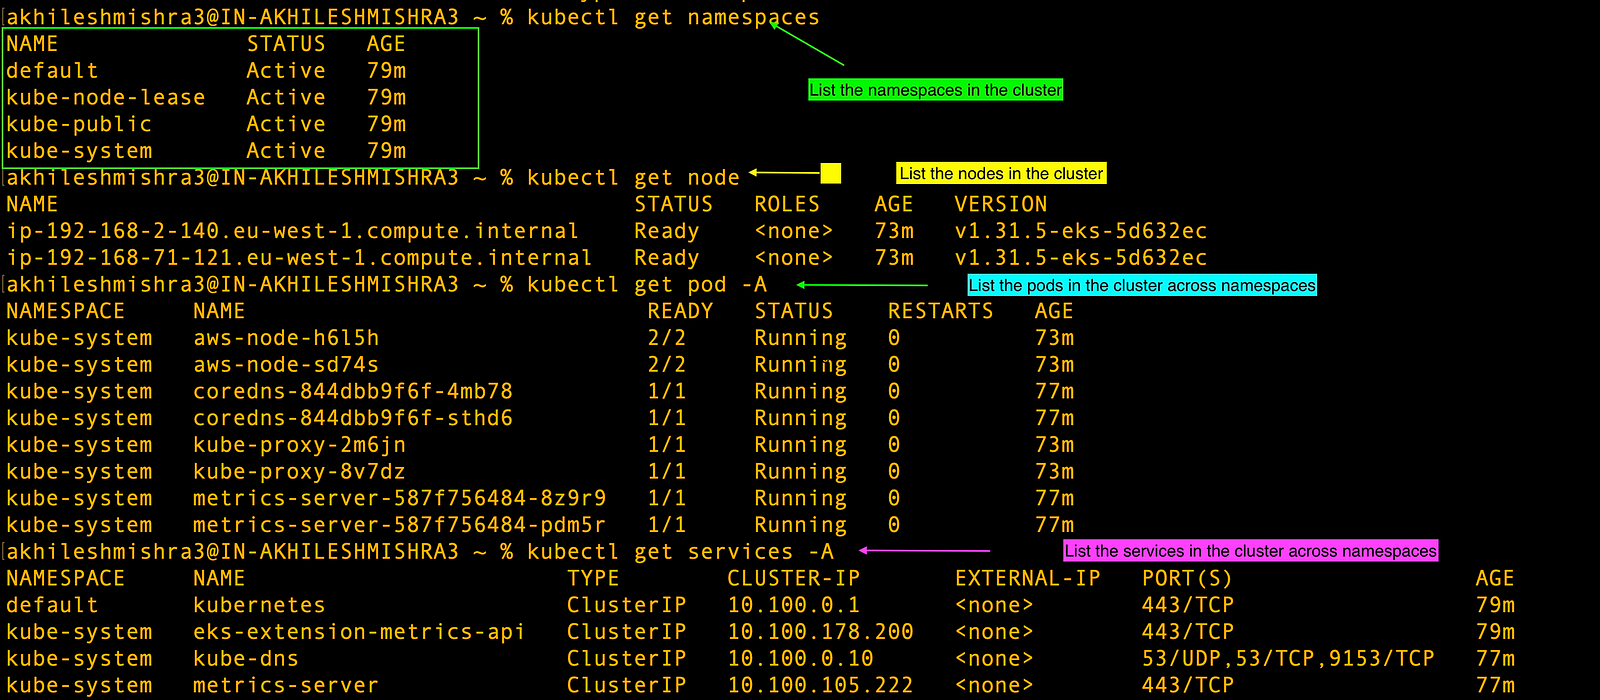
Deploying a 3-tier application on the EKS cluster
For the blog post, I have built an app with a Flask backend that connects to an RDS instance in the backend and a React frontend.
Creating RDS Postgres instance
I will create a PostgreSQL RDS instance in the same VPC as the EKS cluster. I will deploy my RDS instance using the private subnets from the VPC.
- Creating a DB subnet group
# VPC ID associated with your cluster
aws eks describe-cluster --name Akhilesh-cluster --region eu-west-1 --query "cluster.resourcesVpcConfig.vpcId" --output text

# Get VPC ID
VPC_ID=$(aws eks describe-cluster --name Akhilesh-cluster --region eu-west-1 --query "cluster.resourcesVpcConfig.vpcId" --output text)

# Find private subnets (subnets without a route to an internet gateway)
PRIVATE_SUBNET_IDS=$(aws ec2 describe-subnets \
  --filters "Name=vpc-id,Values=$VPC_ID" \
  --query "Subnets[?MapPublicIpOnLaunch==\`false\`].SubnetId" \
  --output text \
  --region eu-west-1)

# Create a subnet group using only private subnet
aws rds create-db-subnet-group \
  --db-subnet-group-name akhilesh-postgres-private-subnet-group \
  --db-subnet-group-description "Private subnet group for Akhilesh PostgreSQL RDS" \
  --subnet-ids subnet-0115609bc602b388e subnet-0611f6ecae28a510c subnet-00a21441953091d88 \
  --region eu-west-1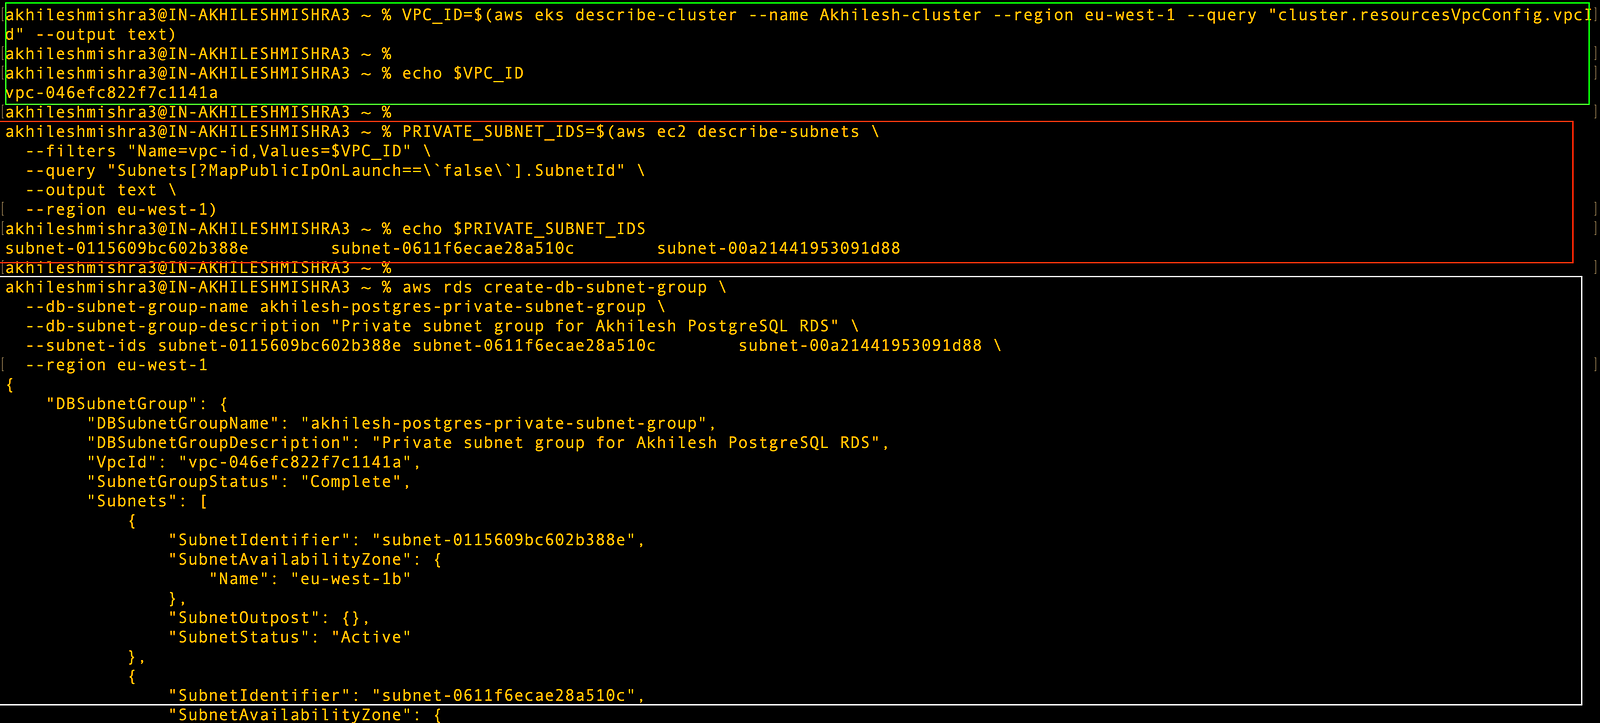
- Create a security group that
# Create security group for rds
aws ec2 create-security-group \
--group-name postgressg \
--description "SG for RDS" \
--vpc-id $VPC_ID \
--region eu-west-1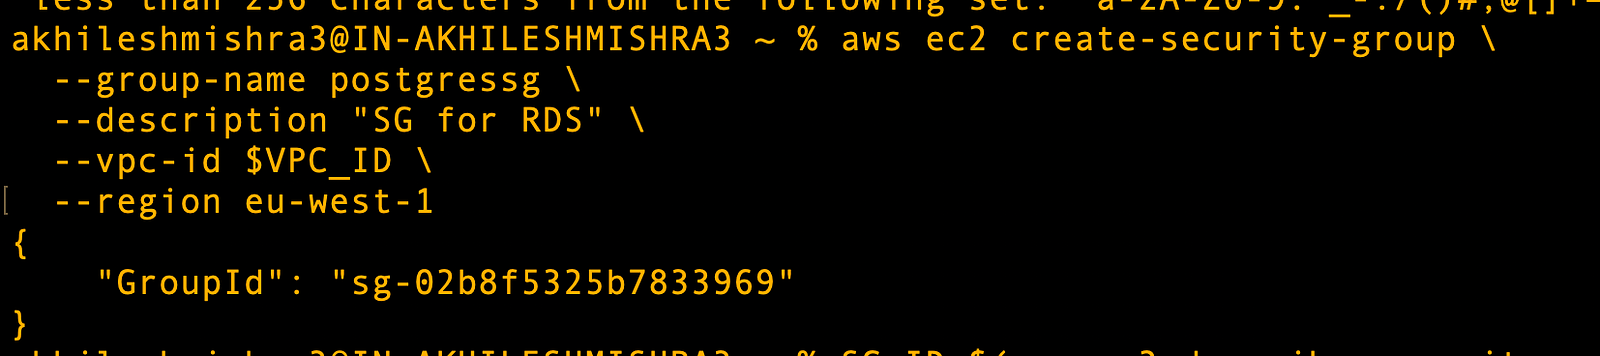
Allow the cluster nodes to reach RDS on the port 5432. For security reasons, we should only open the ports from a particular security group instead of all (0.0.0.0/0)
- Creating the security group ingress rule to allow inbound on port 5432 from Cluster SG
# Store the security group ID
SG_ID=$(aws ec2 describe-security-groups \
--filters "Name=group-name,Values=postgressg" "Name=vpc-id,Values=$VPC_ID" \
--query "SecurityGroups[0].GroupId" \
--output text \
--region eu-west-1)

# get the SG attached with cluster nodes:
NODE_SG=$(aws eks describe-cluster --name Akhilesh-cluster --region eu-west-1 \
--query "cluster.resourcesVpcConfig.securityGroupIds[0]" --output text)

# Allow cluster to reach rds on port 5432
aws ec2 authorize-security-group-ingress \
--group-id sg-02b8f5325b7833969 \
--protocol tcp \
--port 5432 \
--source-group $NODE_SG \
--region eu-west-1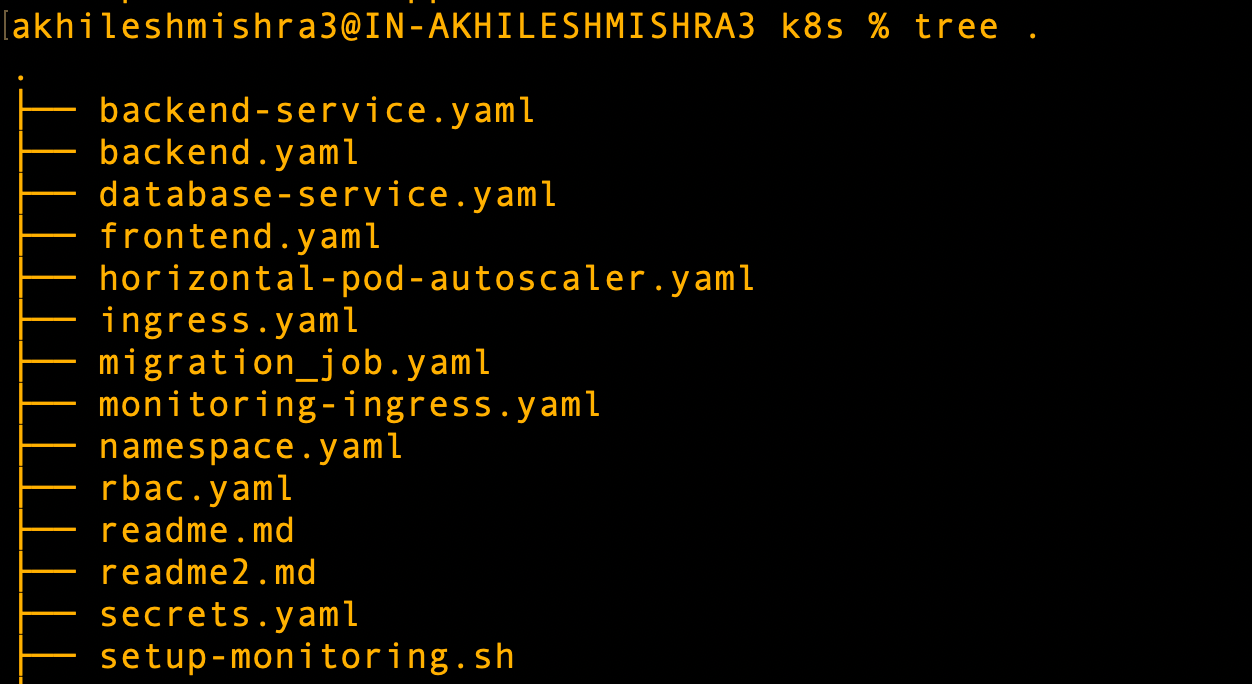
- Creating an RDS instance that can only be privately accessed.
# create the PostgreSQL RDS instance in the private subnet group
aws rds create-db-instance \
--db-instance-identifier akhilesh-postgres \
--db-instance-class db.t3.small \
--engine postgres \
--engine-version 15 \
--allocated-storage 20 \
--master-username postgresadmin \
--master-user-password YourStrongPassword123! \
--db-subnet-group-name akhilesh-postgres-private-subnet-group \
--vpc-security-group-ids $SG_ID \
--no-publicly-accessible \
--backup-retention-period 7 \
--multi-az \
--storage-type gp2 \
--region eu-west-1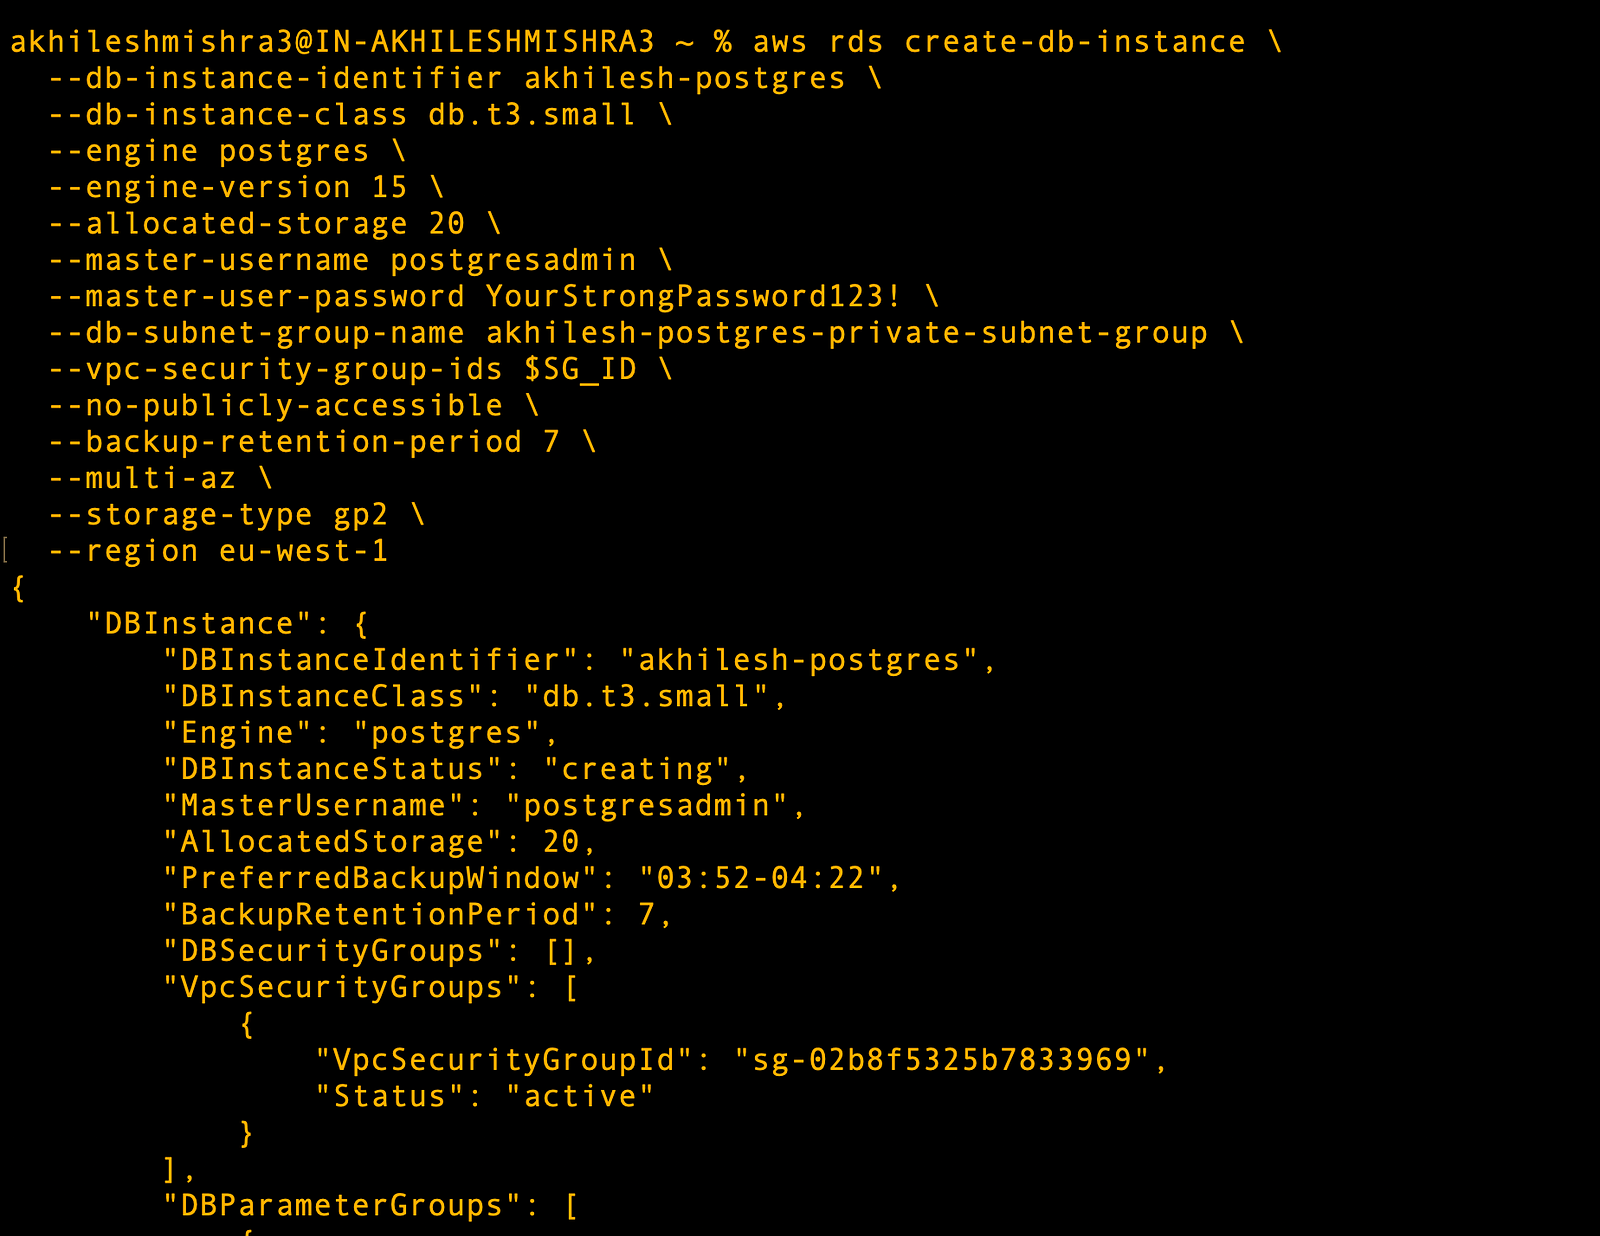
You can see that the RDS instance is getting created.
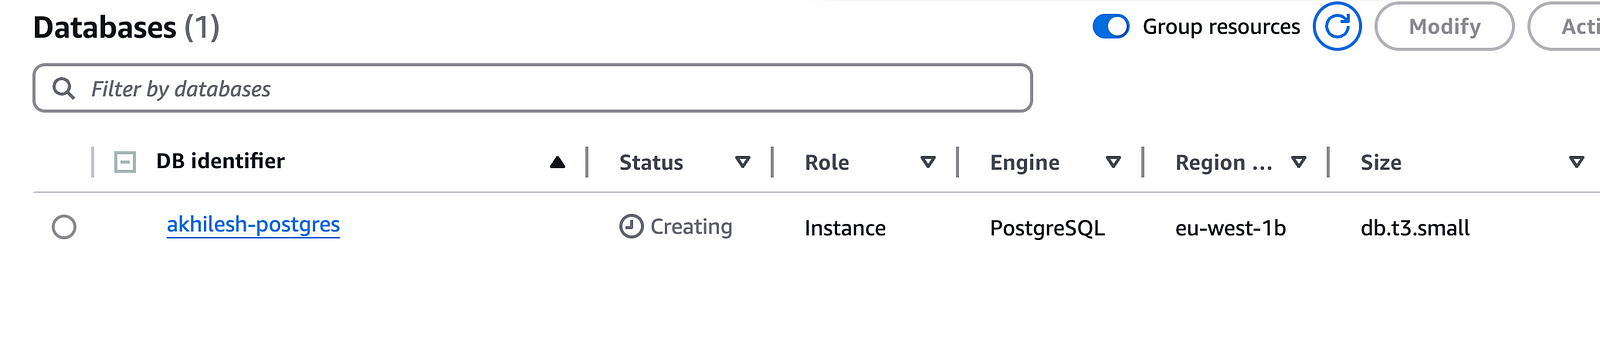
The RDS will take some time to be ready. Once it is, you can copy the RDS details.
USERNAME: postgresadmin
PASSWORD: YourStrongPassword123!
DB_HOST: akhilesh-postgres.cveph9nmftjh.eu-west-1.rds.amazonaws.com (You can found this at rds instance endpoint config)
DB_NAME: postgres (default db name if as we did not provide a custom db name)
Deploying a 3-tier application on EKS
I have built the application images on Docker Hub, will use these images.
Backend image: livingdevopswithakhilesh/devopsdozo:backend-latest
Frontend image: livingdevopswithakhilesh/devopsdozo:frontend-latest
Clone the repo
git clone https://github.com/kubernetes-zero-to-hero.git
cd 3-tier-app-eks/k8s
tree .
This is the repo with all the code.
Create a namespace with the name 3-tier-app-eks
A namespace in Kubernetes provides a mechanism to isolate groups of resources within a cluster. This allows teams to work in their own virtual cluster without worrying about resource naming conflicts.
kubectl apply -f namespace.yaml
Creating a service that points to the RDS endpoint
apiVersion: v1
kind: Service
metadata:
name: postgres-db
namespace: 3-tier-app-eks
labels:
service: database
spec:
type: ExternalName
externalName: akhilesh-postgres.cveph9nmftjh.eu-west-1.rds.amazonaws.com
ports:
- port: 5432kubectl apply -f database-service.yaml
A service is an abstraction that defines a logical set of pods and a policy to access them. Services enable network connectivity to pod sets that match specific selector criteria, regardless of where they’re running.
Now we can use this service to point to RDS, if we need to update the cluster, we can update this service and everything will stay the same.
Now we can use the DNS name for RDS using service discovery. it follows the format service_name.namespace.svc.cluster.local
We should be able to use postgres-db.3-tier-app-eks.svc.cluster.local to connect to the database
If you want to test the DNS, then run this command
kubectl run -it --rm --restart=Never dns-test --image=tutum/dnsutils \
 -- dig postgres-db.3-tier-app-eks.svc.cluster.local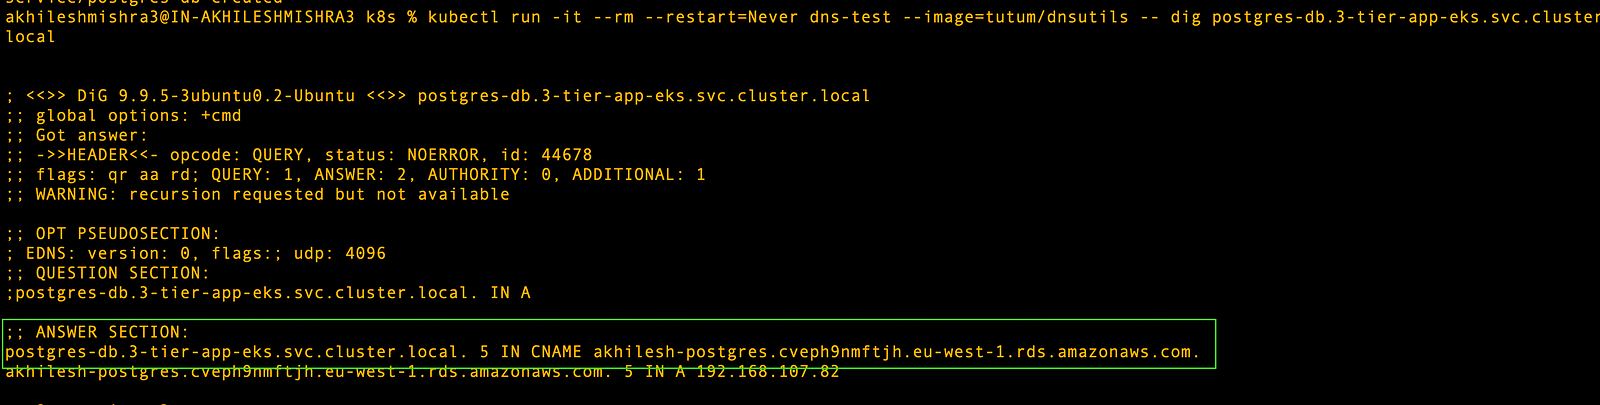
- Testing the RDS connectivity
If you see issues on your backend, you can troubleshoot with the below commands. You can also validate whether you can connect to the DB from the K8s cluster.
## to check the db connection for troubleshooting
# Run a postgres pod and access the shell
kubectl run debug-pod --rm -it --image=postgres -- bash
# Now run this command
PGPASSWORD=YourStrongPassword123! psql -h \
postgres-db.3-tier-app-eks.svc.cluster.local -U postgresadmin -d postgres
# run query to check the tables
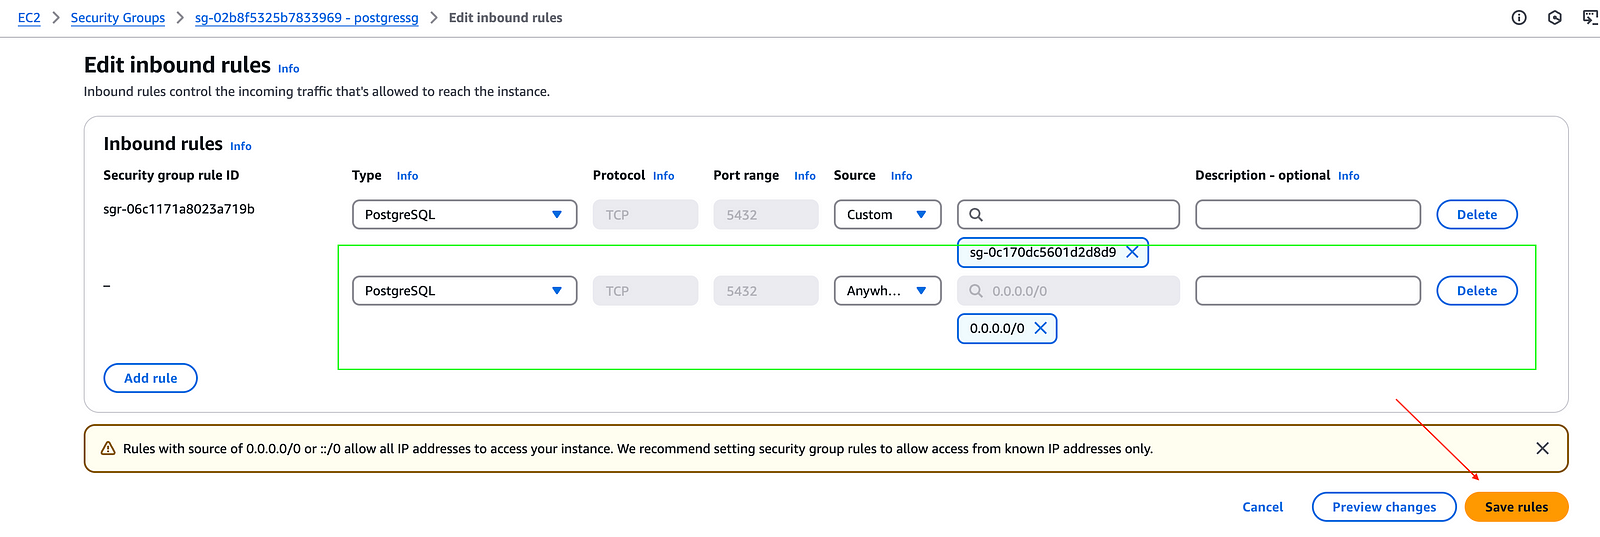
SELECT COUNT(*) FROM topics;I see the issue where I am not able to connect to the DB from the cluster. The issue could be related to the security group.

I will open all IPs to see if that fixes the issue.
Creating a secret and configmaps with RDS DB details
Secrets are Kubernetes objects that store sensitive information such as passwords, OAuth tokens, and SSH keys. ConfigMaps store non-confidential configuration data in key-value pairs that can be consumed by pods as environment variables, command-line arguments, or configuration files in a volume.
Kubernetes allows you to store secrets in base64 encoded format. If you want to create a base64 encoding for username, password. I will be mounting secrets and configmap as environment variables in the application.
echo 'postgresadmin' | base64
echo 'YourStrongPassword123!' | base64
echo 'postgresql://postgresadmin:YourStrongPassword123!@postgres-db.3-tier-app-eks.svc.cluster.local:5432/postgres' | base64
secrets.yaml
apiVersion: v1
kind: Secret
metadata:
  name: db-secrets
  namespace: 3-tier-app-eks
type: Opaque
data:
  DB_USERNAME: cG9zdGdyZXNhZG1pbg==
  DB_PASSWORD: WW91clN0cm9uZ1Bhc3N3b3JkMTIzIQ==
  SECRET_KEY: ZGV2LXNlY3JldC1rZXk=
  DATABASE_URL: cG9zdGdyZXNxbDovL3Bvc3RncmVzYWRtaW46WW91clN0cm9uZ1Bhc3N3b3JkMTIzIUBwb3N0Z3Jlcy1kYi4zLXRpZXItYXBwLWVrcy5zdmMuY2x1c3Rlci5sb2NhbDo1NDMyL3Bvc3RncmVz
configmap.yaml
apiVersion: v1
kind: ConfigMap
metadata:
  name: app-config
  namespace: 3-tier-app-eks
data:
  DB_HOST: "postgres-db.3-tier-app-eks.svc.cluster.local"
  DB_NAME: "postgres"
  DB_PORT: "5432"
  FLASK_DEBUG: "0"
Run these commands
kubectl apply -f configmap.yaml
kubectl apply -f secrets.yaml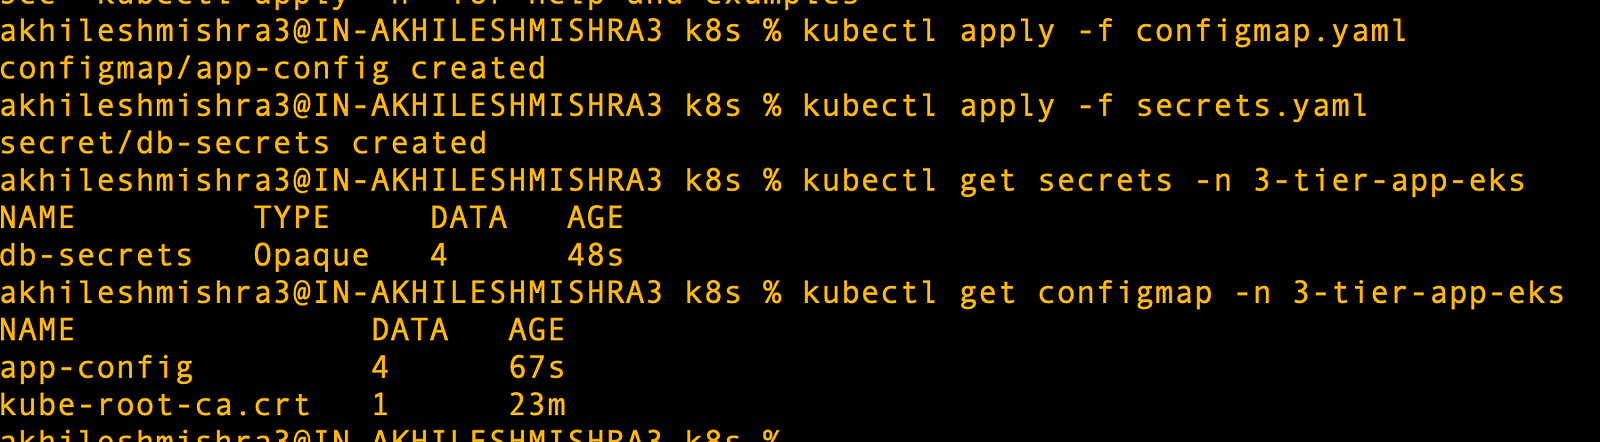
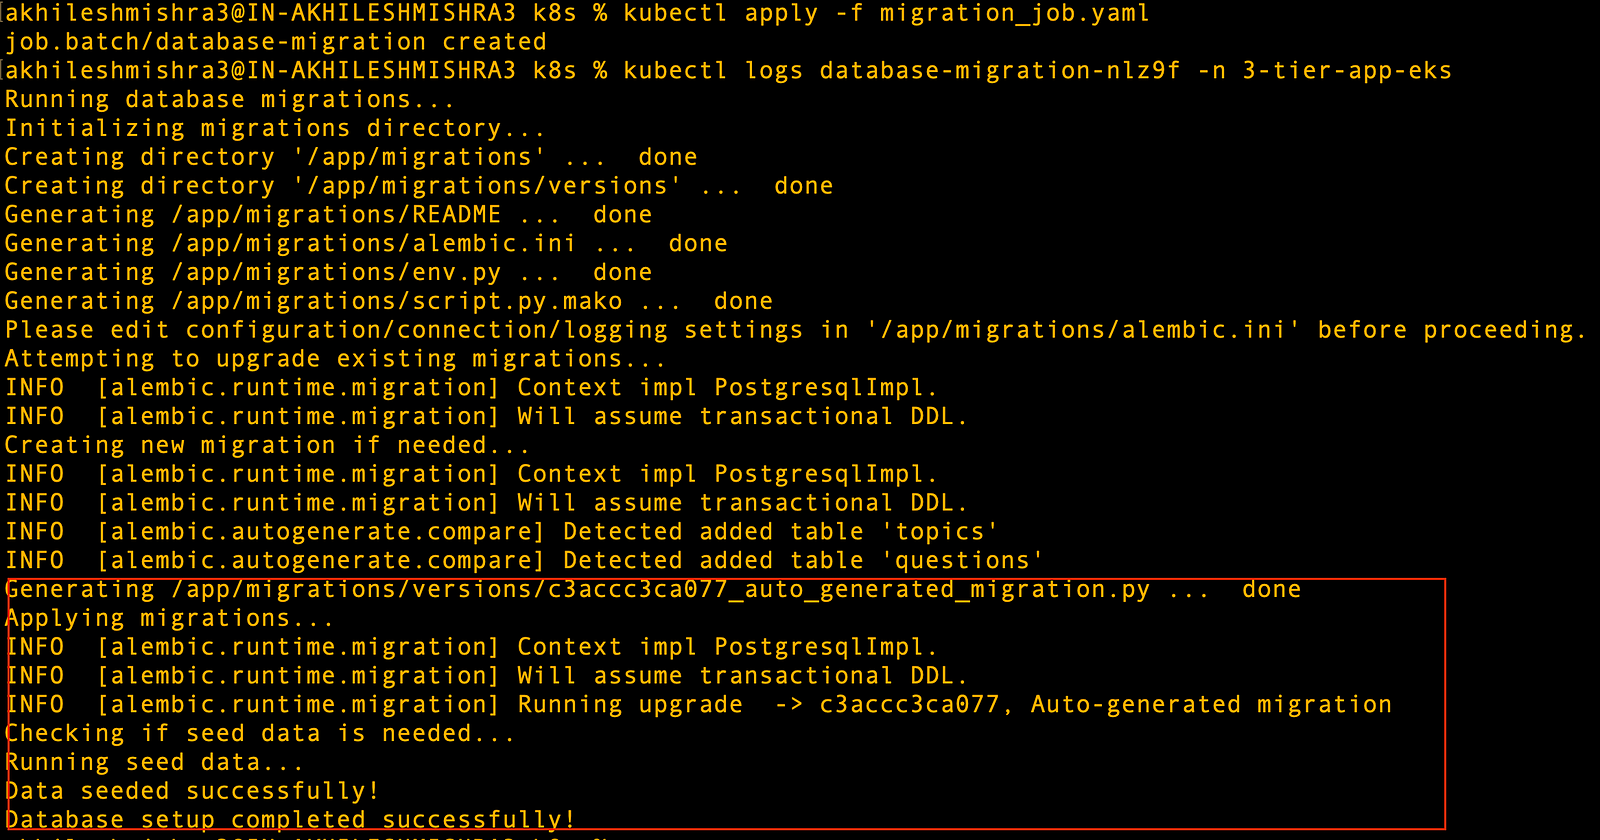
Running the database migrations job
Before we start our backend Flask API, we need to perform database migrations. We will run this as a Kubernetes job, which will create the database tables and some seed data for the application.
A job in Kubernetes creates one or more pods and ensures they successfully terminate. Jobs are useful for batch processes, data migrations, or one-time tasks that need to run to completion.
Run the below command to deploy the migration job
kubectl apply -f migration_job.yaml
kubectl get job -A
kubectl get pods -n 3-tier-app-eks
kubectl logs database-migration-nlz9f -n 3-tier-app-eks
This migration job will create the database tables and the seed data that your application will have at the start
Start the backend and frontend deployments.
A deployment is a Kubernetes resource that provides declarative updates for pods and replica sets. It allows you to describe an application’s life cycle, including which images to use, the number of pods, and how to update them.
# Creating frontend and backend deployments and services
kubectl apply -f backend.yaml
kubectl apply -f frontend.yaml
# checking the deployments and services
kubectl get deployment -n 3-tier-app-eks
kubectl get svc -n 3-tier-app-eks
kubectl get po -n 3-tier-app-eks
Accessing the application
We have not configured any ingress, but we can access the application by port-forwarding the services (the backend and the front end). Make sure to use multiple tabs, as you need both services to be available via port forwarding.
# port forward backend
kubectl port-forward -n 3-tier-app-eks svc/backend 8000:8000

# port forward the frontend
kubectl port-forward -n 3-tier-app-eks svc/frontend 8080:80
You can access the backend API with the commandcurl http://localhost:8000/api/topics

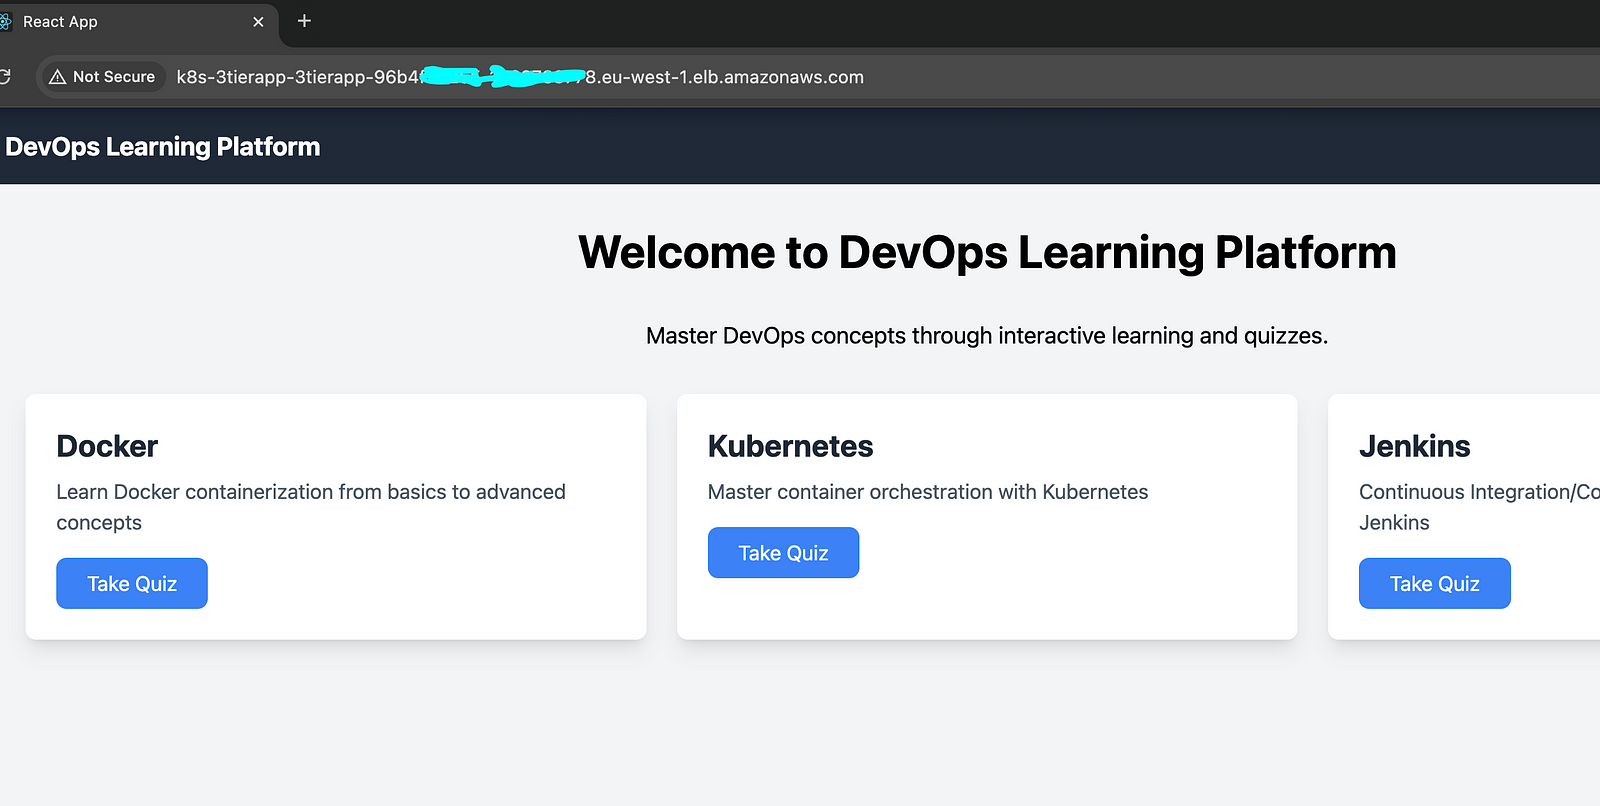
You can access the frontend on localhost on port 8080127.0.0.1:8080
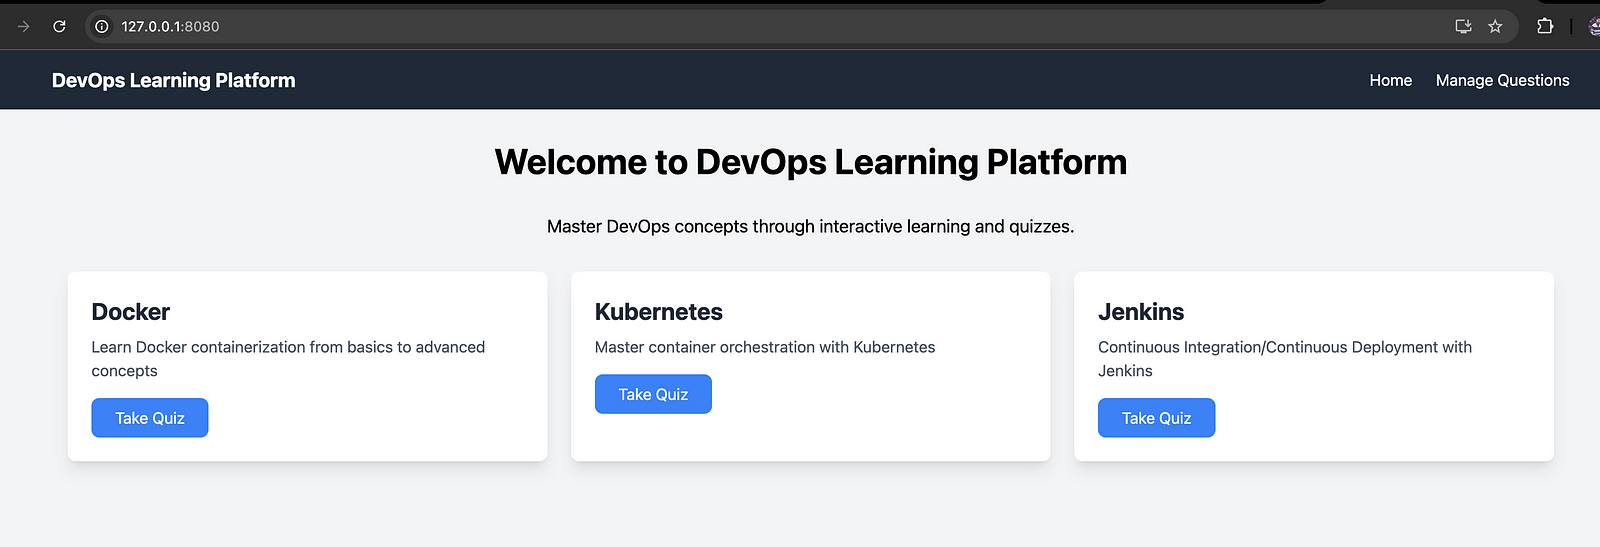
This is a quiz application around devops topics. Seed data only creates a few questions, you can add more questions using the manage question option. I have added sample CSV files on the path, 3-tier-app-eks/backend/questions-answers that you can upload to add more questions.
Check the pods’ logs for backend and frontend deployment.
kubectl logs -n devops-learning -l app=backend

kubectl logs -n devops-learning -l app=frontend
Configuring the ingress for the application
An ingress is a Kubernetes resource that manages external access to services in a cluster, typically via HTTP/HTTPS. It provides load balancing, SSL termination and name-based virtual hosting.
The AWS Load Balancer Controller automates the creation of AWS Application Load Balancers when Kubernetes Ingress resources are defined. This integration allows seamless traffic routing to your services while leveraging AWS-native features like SSL termination, HTTP/2 support, and web ACLs.
Set up an OIDC provider for the EKS cluster to enable IAM roles for service accounts
export cluster_name=Akhilesh-cluster

oidc_id=$(aws eks describe-cluster --name $cluster_name \
--query "cluster.identity.oidc.issuer" --output text | cut -d '/' -f 5)

echo $oidc_id

# Check if IAM OIDC provider with your cluster’s issuer ID
aws iam list-open-id-connect-providers | grep $oidc_id | cut -d "/" -f4

# If not, create an OIDC provider
eksctl utils associate-iam-oidc-provider --cluster $cluster_name --approve
# or use console
# -> To create a provider, go to IAM, choose Add provider.
# -> For Provider type, select OpenID Connect.
# -> For Provider URL, enter the OIDC provider URL for your cluster.
# -> For Audience, enter sts.amazonaws.com.
# -> (Optional) Add any tags, for example a tag to identify which cluster is for this provider.
# -> Choose Add provider.

Create an IAM policy with necessary permissions for the Load Balancer Controller
curl -O https://raw.githubusercontent.com/kubernetes-sigs/aws-load-balancer-controller/v2.11.0/docs/install/iam_policy.json
aws iam create-policy \
--policy-name AWSLoadBalancerControllerIAMPolicy \
--policy-document file://iam_policy.json
Create an IAM service account in Kubernetes with the policy attached
# Use the account id for your account
eksctl create iamserviceaccount \
--cluster=$cluster_name \
--namespace=kube-system \
--name=aws-load-balancer-controller \
--role-name AmazonEKSLoadBalancerControllerRole \
--attach-policy-arn=arn:aws:iam::163962758712:policy/AWSLoadBalancerControllerIAMPolicy\ --approve
# verify its creation
kubectl get serviceaccount -n kube-system | grep -i aws-load-balancer-controller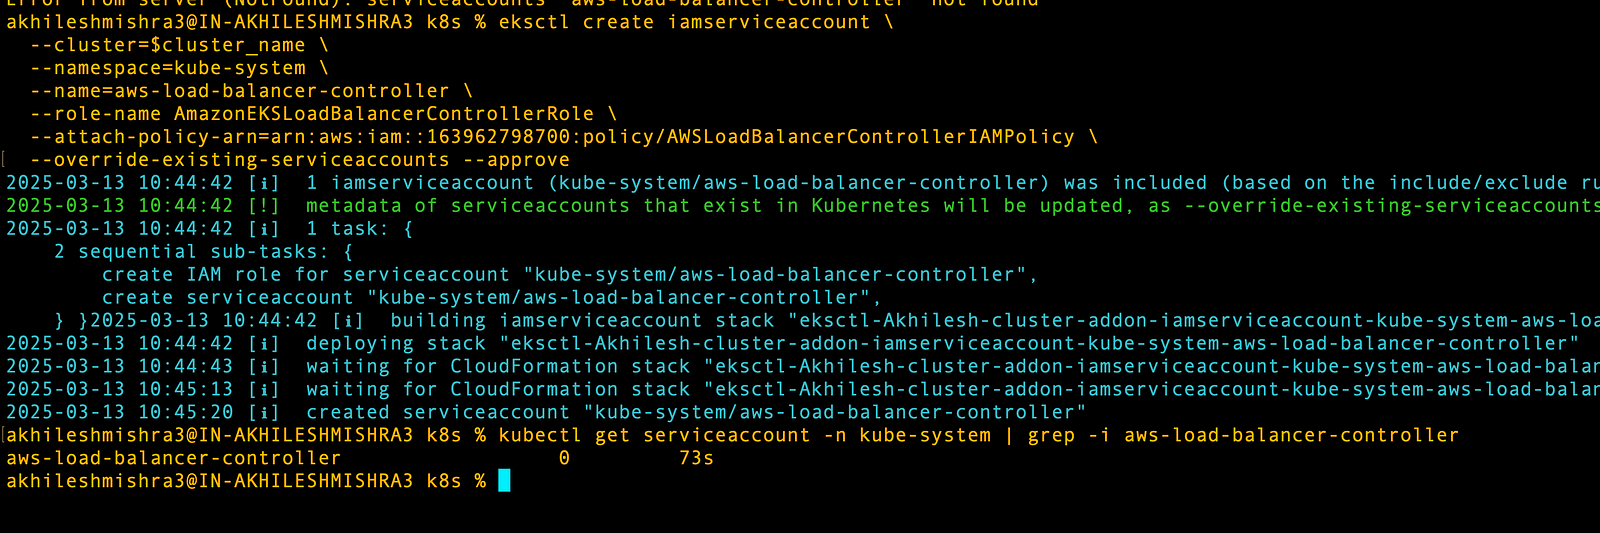
Installing the AWS Load balancer Controller with Helm
# Install the AWS Load Balancer Controller
kubectl apply -k \
"github.com/aws/eks-charts/stable/aws-load-balancer-controller/crds?ref=master"

# install helm if haven't already
brew install helm # (for mac, google for other platforms)

# Add helm repo for eks charts
helm repo add eks https://aws.github.io/eks-charts
helm repo update

VPC_ID=$(aws eks describe-cluster --name Akhilesh-cluster --region eu-west-1 --query "cluster.resourcesVpcConfig.vpcId" --output text)

helm install aws-load-balancer-controller eks/aws-load-balancer-controller \
-n kube-system \
--set clusterName=$cluster_name \
--set serviceAccount.create=false \
--set serviceAccount.name=aws-load-balancer-controller \
--set vpcId=$VPC_ID \
--set region=eu-west-1
Creating an Ingress class for alb and an Ingress resource to access the frontend service
Configuring Ingress resources with appropriate annotations for routing rules
apiVersion: networking.k8s.io/v1
kind: IngressClass
metadata:
  name: alb
  annotations:
    ingressclass.kubernetes.io/is-default-class: "false"
spec:
  controller: ingress.k8s.aws/alb
---
apiVersion: networking.k8s.io/v1
kind: Ingress
metadata:
  name: 3-tier-app-ingress
  namespace: 3-tier-app-eks
  annotations:
    alb.ingress.kubernetes.io/scheme: "internet-facing"
    alb.ingress.kubernetes.io/target-type: "ip"
    alb.ingress.kubernetes.io/healthcheck-path: "/"  # healthcheck path
spec:
  ingressClassName: "alb"
  rules:
  - http:
      paths:
      - path: /api
        pathType: Prefix
        backend:
          service:
            name: backend
            port:
              number: 8000
      - path: /
        pathType: Prefix
        backend:
          service:
            name: frontend
            port:
              number: 80
# Check the ingress and load balancer controller logs
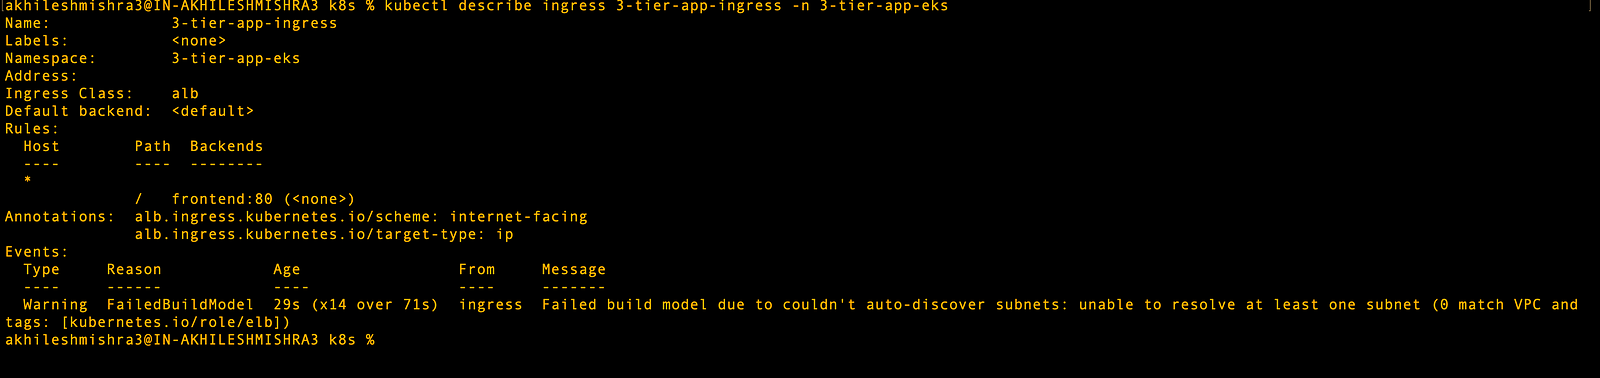
kubectl get ingress -n 3-tier-app-eks
kubectl describe ingress 3-tier-app-ingress -n 3-tier-app-eks# After ingress creation
kubectl logs -n kube-system -l app.kubernetes.io/name=aws-load-balancer-controllerAs you can see below, ingress is not able to create an ALB creation as it does not find the subnet with the required tag for application load balancer creation.
# delete ingress
kubectl delete ingress 3-tier-app-ingress -n 3-tier-app-eks# If above doesnt work, use this to force delete
kubectl patch ingress 3-tier-app-ingress -n 3-tier-app-eks -p '{"metadata":{"finalizers":[]}}' --type=merge
kubectl delete ingress 3-tier-app-ingress -n 3-tier-app-eks --grace-period=0 --forceBefore you create an ingress resource, make sure you apply the tag Key=kubernetes.io/role/internal-elb,Value=1 to public subnets for the application load balancer.
Note: if you are creating the network load balancers, then add Key=kubernetes.io/role/internal-nlb,Value=1 tag to the subnets where you want to get NLBs.
List the public subnet for the EKS cluster, and apply the tag
# VPC_ID for cluster
VPC_ID=$(aws eks describe-cluster --name Akhilesh-cluster --region eu-west-1 --query "cluster.resourcesVpcConfig.vpcId" --output text)
# verify the vpc id
echo $VPC_ID
# Public subnets for the cluster
aws ec2 describe-subnets --filters "Name=vpc-id,Values=$VPC_ID" "Name=map-public-ip-on-launch,Values=true" \
--query "Subnets[*].{SubnetId:SubnetId,AvailabilityZone:AvailabilityZone,PublicIp:MapPublicIpOnLaunch}"
# Get the list of subnets id's from above commands and run this
# Update the correct subnet id's
aws ec2 create-tags --resources subnet-05c313851d6e027e0 subnet-002f8dde08d2f1643 \
subnet-0f8aabbf5f8538d81 --tags Key=kubernetes.io/role/elb,Value=1
# Verify the tags
aws ec2 describe-subnets --subnet-ids subnet-05c313851d6e027e0 subnet-002f8dde08d2f1643 \
subnet-0f8aabbf5f8538d81 --query "Subnets[*].{SubnetId:SubnetId,Tags:Tags}"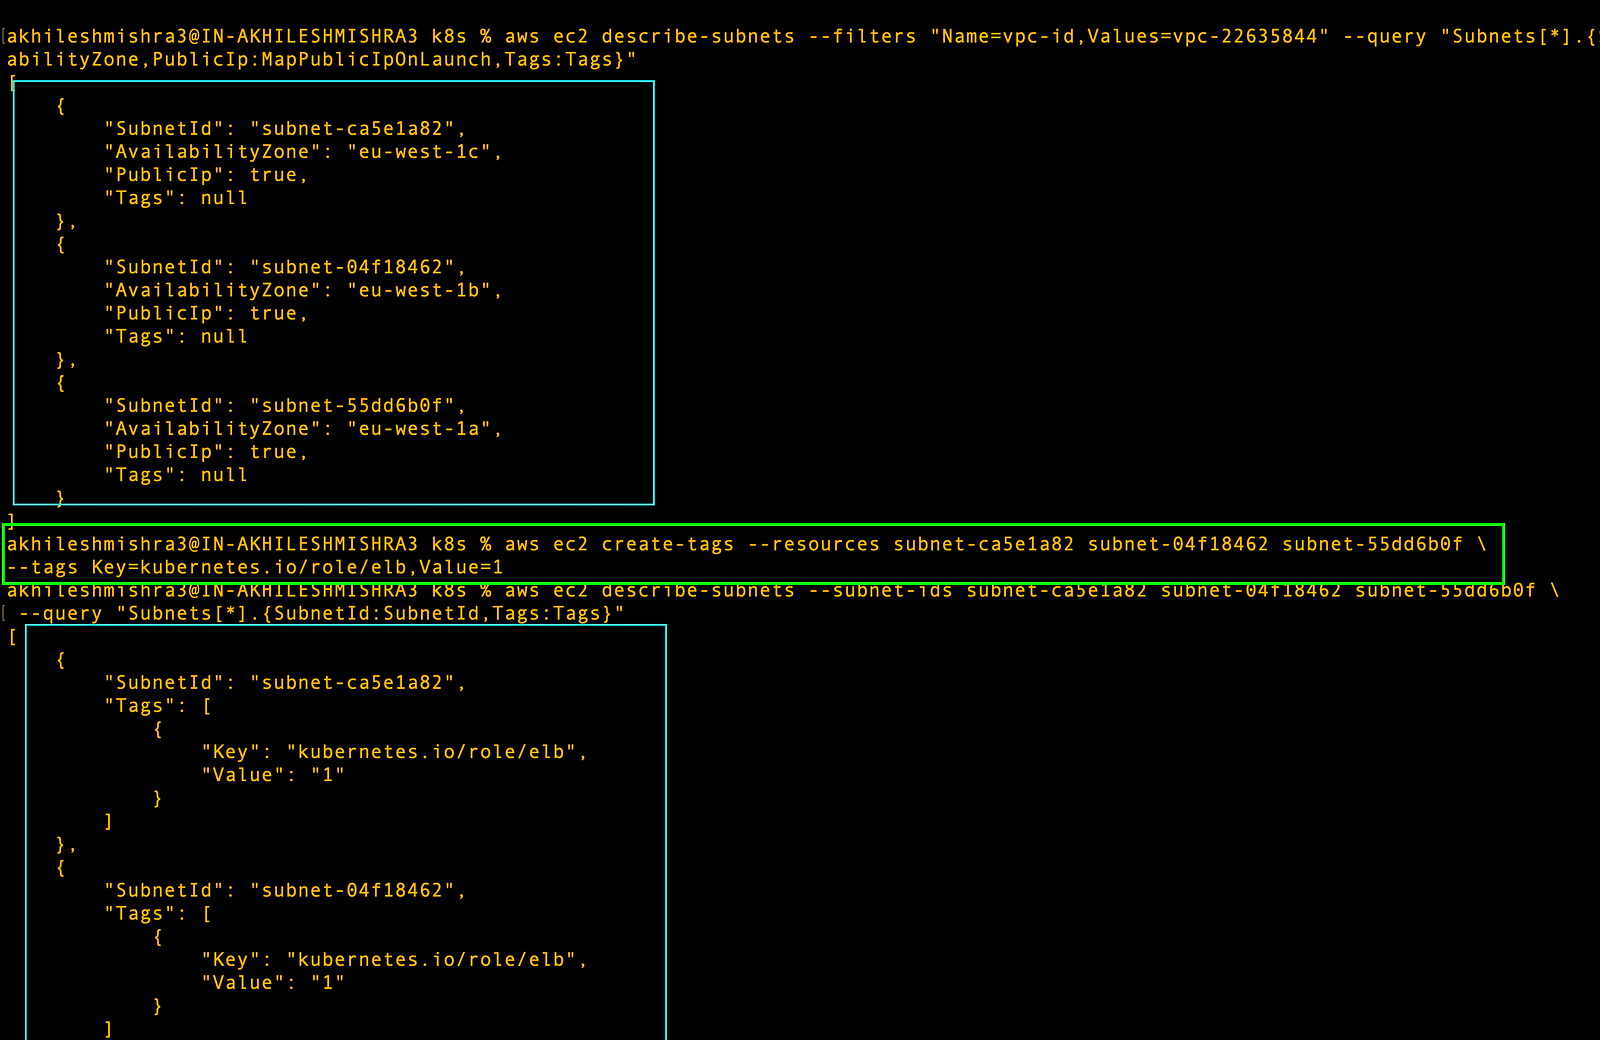
Now we can create the ingress resource, which should automatically spin up the Application load balancer.
# Create ingress class and resource
kubectl apply -f ingress.yaml
# Check the ingress and load balancer controller logs
kubectl get ingress -n 3-tier-app-eks
kubectl describe ingress 3-tier-app-ingress -n 3-tier-app-eks
# After ingress creation
kubectl logs -n kube-system -l app.kubernetes.io/name=aws-load-balancer-controller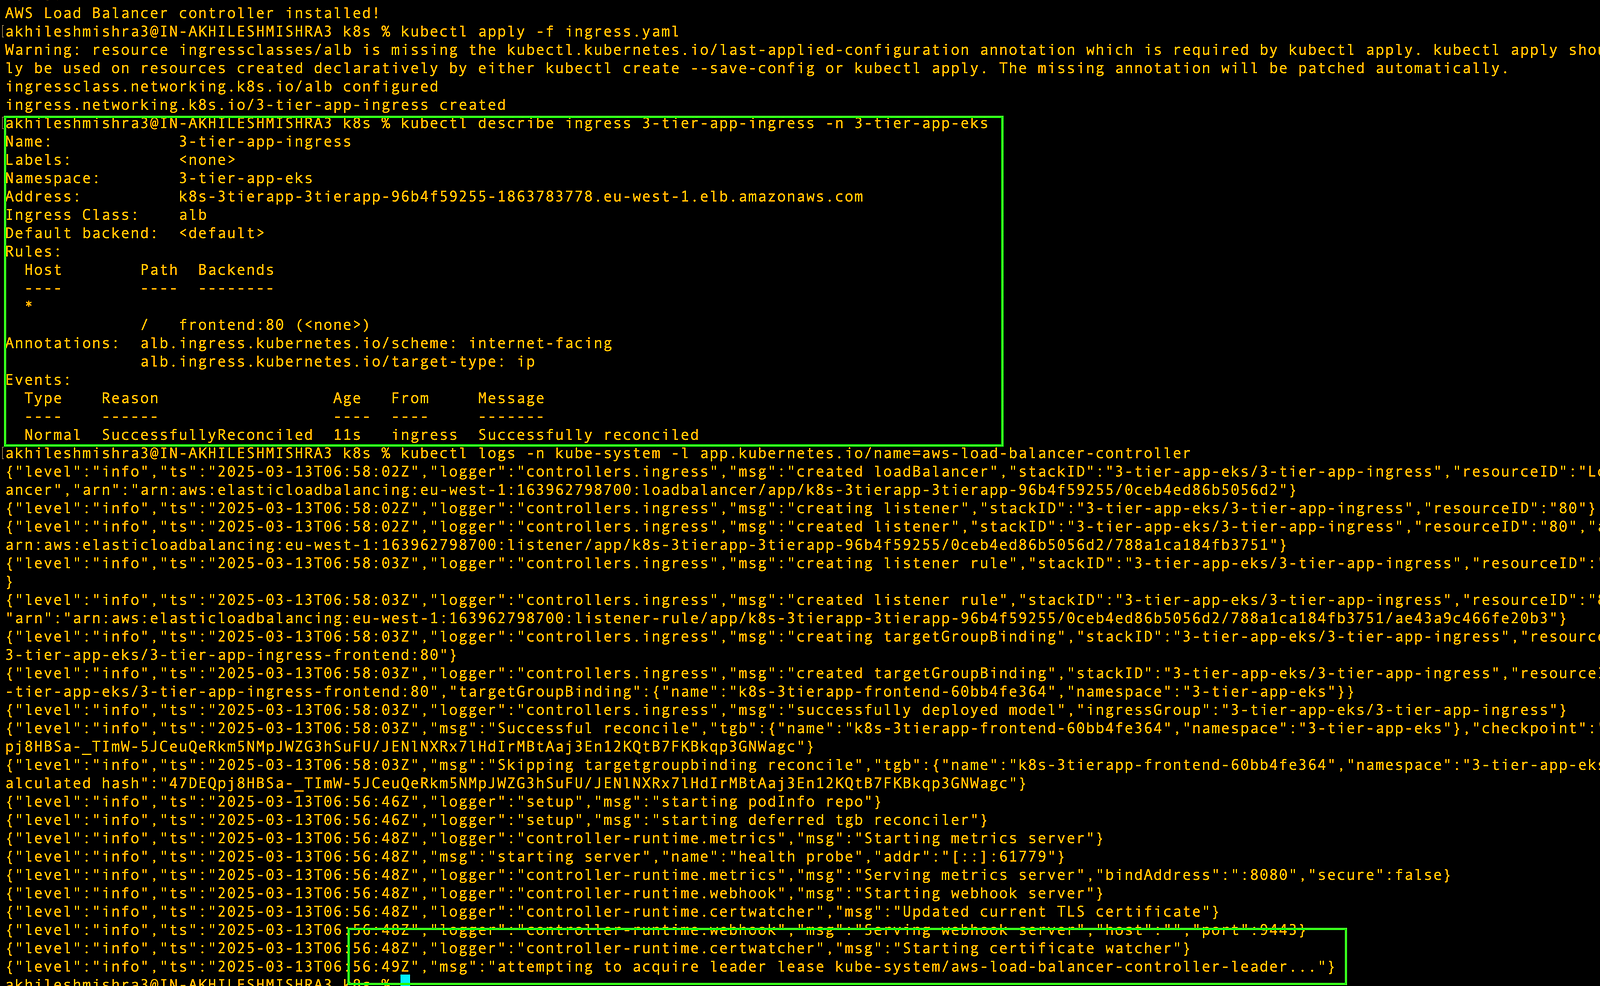
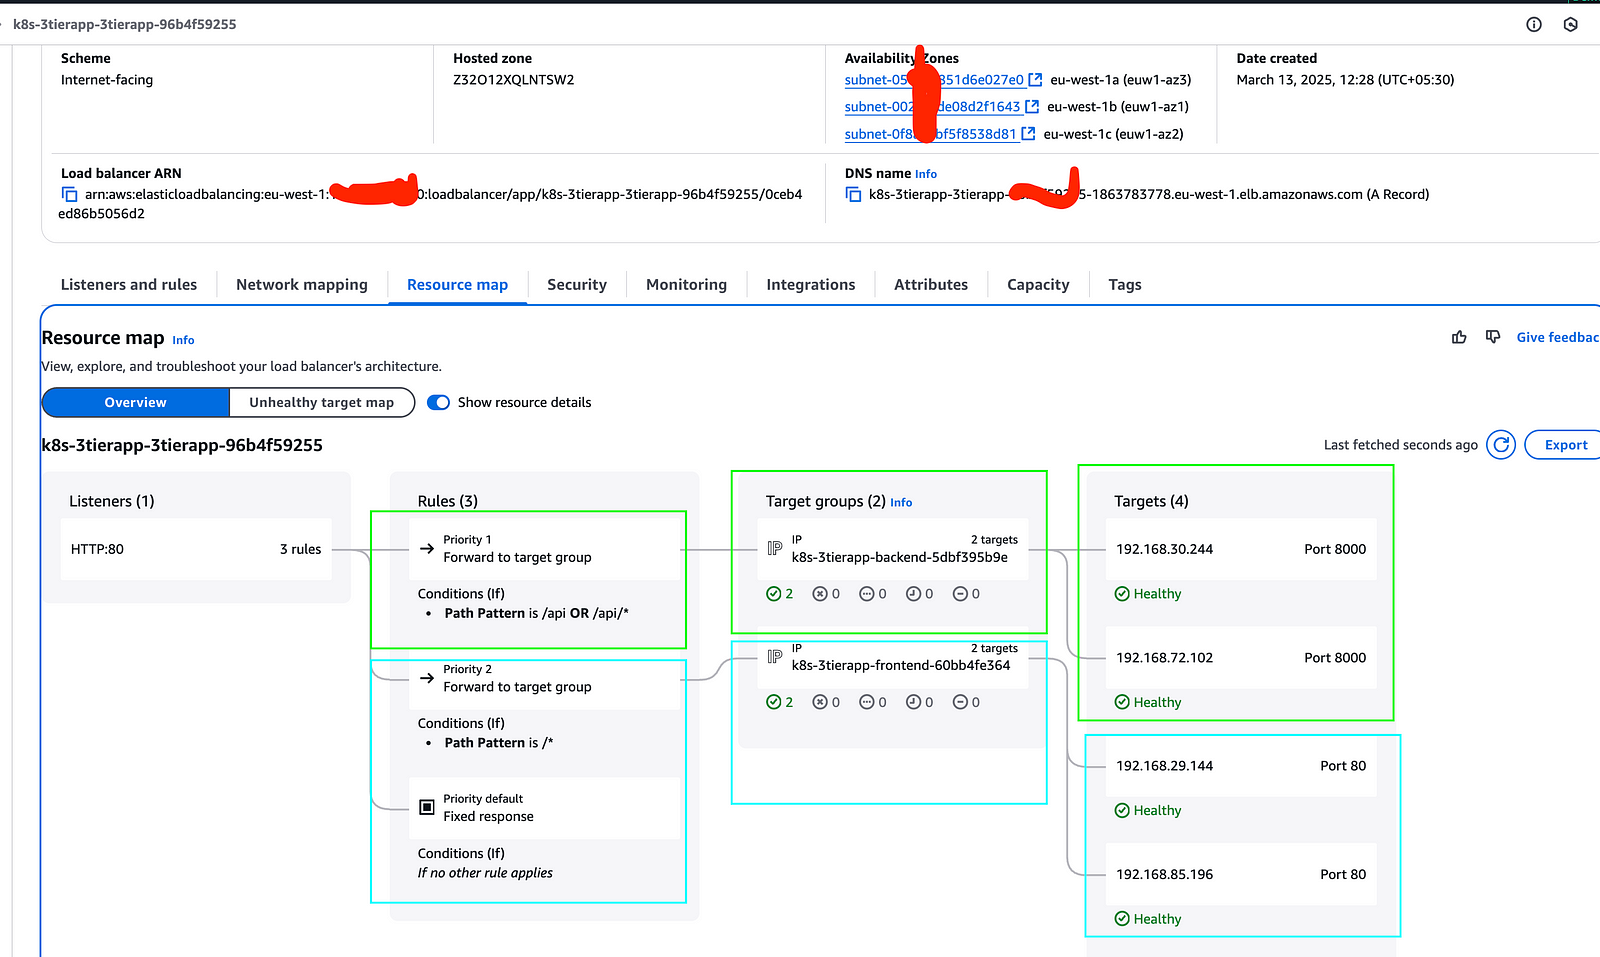
Ingress status shows reconciled, which means it has created the load balancer. You can go to your AWS console where you will see an ALB there. Copy the DNS name for it and paste it into the browser, and you should be able to see your app there.
Validate ALB provisioning and test the routing to backend services
Mapping the domain with the application to access it publicly
- Create a public hosted zone for your registered domain
aws route53 create-hosted-zone \
--name akhileshmishra.tech \
--caller-reference $(date +%s) \
--hosted-zone-config Comment="Public hosted zone for akhileshmishra.tech"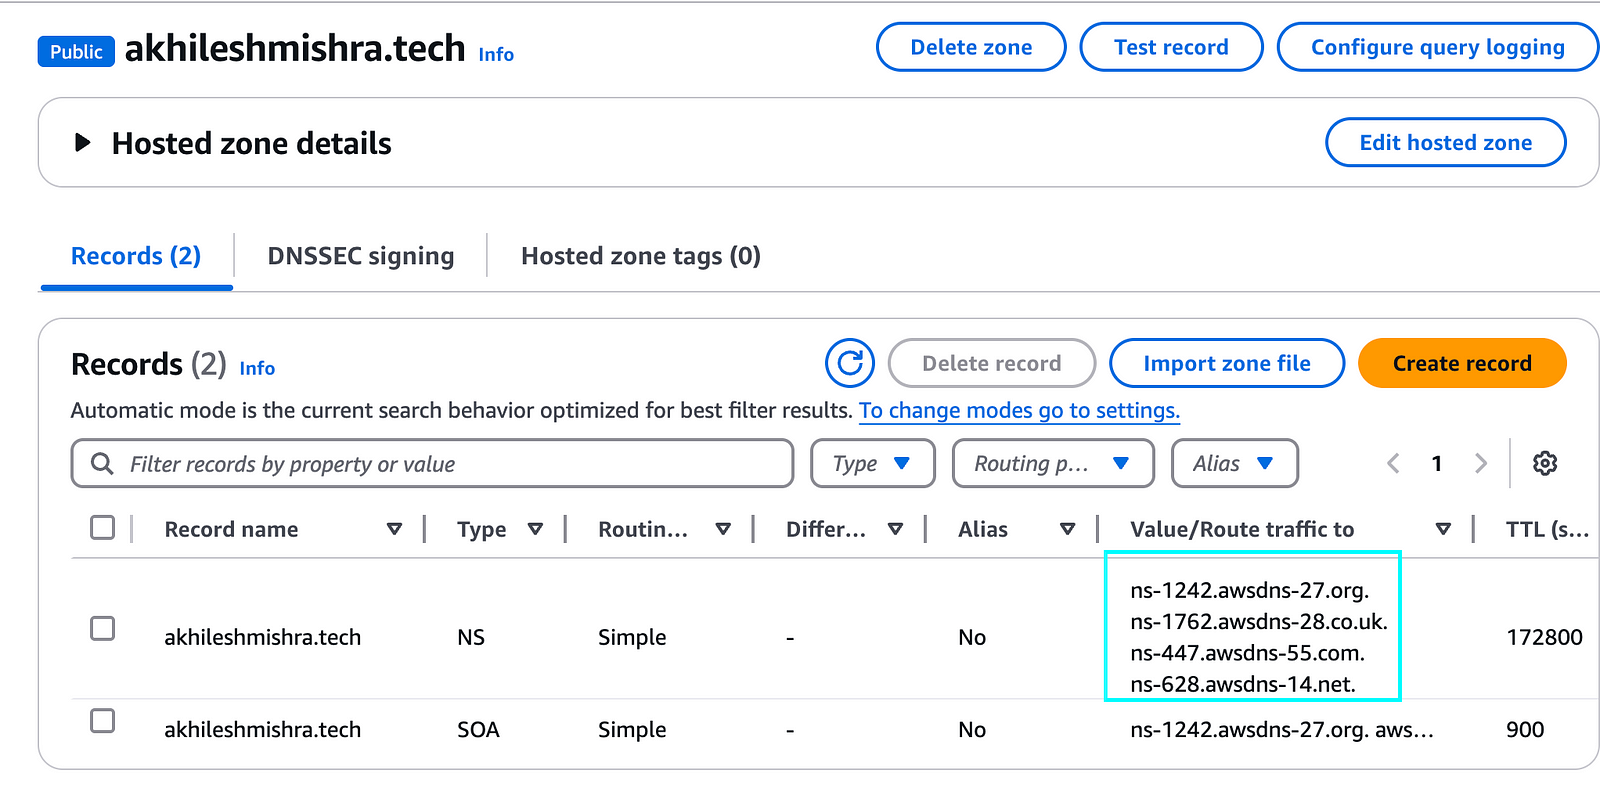
Copy the name servers and update them in your domain (GoDaddy/Namecheap, etc).
Create an alias route to point your domain/subdomain to the ALB.
# Get the ALB DNS name from the Ingress
ALB_DNS=$(kubectl get ingress 3-tier-app-ingress -n 3-tier-app-eks -o jsonpath='{.status.loadBalancer.ingress[0].hostname}')
echo "ALB DNS Name: $ALB_DNS"

# Get the hosted zone ID for your domain
ZONE_ID=$(aws route53 list-hosted-zones-by-name --dns-name akhileshmishra.tech --query "HostedZones[0].Id" --output text | sed 's/\/hostedzone\///')
echo "Hosted Zone ID: $ZONE_ID"

# Create an A record alias pointing to the ALB
aws route53 change-resource-record-sets \
--hosted-zone-id $ZONE_ID \
--change-batch '{
"Changes": [
{
"Action": "UPSERT",
"ResourceRecordSet": {
"Name": "app.akhileshmishra.tech",
"Type": "A",
"AliasTarget": {
"HostedZoneId": "Z32O12XQLNTSW2",
"DNSName": "'$ALB_DNS'",
"EvaluateTargetHealth": true
}
}
}
]
}'
It takes some time for the DNS change to reflect, try pasting the subdomain (app.akhileshmishra.tech in my case) in your browser after some time, it should show you the application.
Note: I will delete all resources before publishing the blog post, you will not find anything if you copy my domain and paste it into the browser.
What next?
In the next blog post, I will guide you through setting up SSL for enhanced security, configuring the CSI driver for stateful applications, managing ECR images, and setting up GitHub build and deployment pipelines. I will also cover using ArgoCD for application deployment and setting up detailed application and cluster monitoring with Prometheus and Grafana.
Here is the Next part of this blog series:
Connect with me on Linkedin: https://www.linkedin.com/in/akhilesh-mishra-0ab886124/
