
A step-by-step guide to adding free, self-managed SSL certificates to your Kubernetes application Running On EKS
This is the second part of the blog post I had written on Advanced Kubernetes Tutorial Every DevOps Engineer Has Been Searching For, where I deployed a production-ready 3-tier (React + Flask + Postgres)application on AWS EKS with real-world setup (EKS, RDS, ALB, Route53, OIDC, IAM, EC2).
Are you looking to advance your DevOps career?
Join my 20-week Advanced, real-world, project-based DevOps Bootcamp is for you.
Advanced Kubernetes Tutorial Every DevOps Engineer Has Been Searching For — Part 2
In that blog post, I walked through deploying a production-ready 3-tier application (React frontend, Flask backend, PostgreSQL database) on AWS EKS. We set up an EKS cluster with managed node groups, created a private RDS PostgreSQL instance, and configured service discovery to connect the backend to the database. We then deployed the application components using Kubernetes deployments, services, secrets, and ConfigMaps, ran database migrations with a Kubernetes job, and finally configured the AWS Load Balancer Controller with proper IAM permissions to expose the application publicly through an Ingress resource. We concluded by setting up Route53 for custom domain routing to the application.

I suggest reading this blog before going through this one.
In this blog post, I will configure the HTTPS endpoint for our application using SSL certificates managed by Cert Manager on EKS.
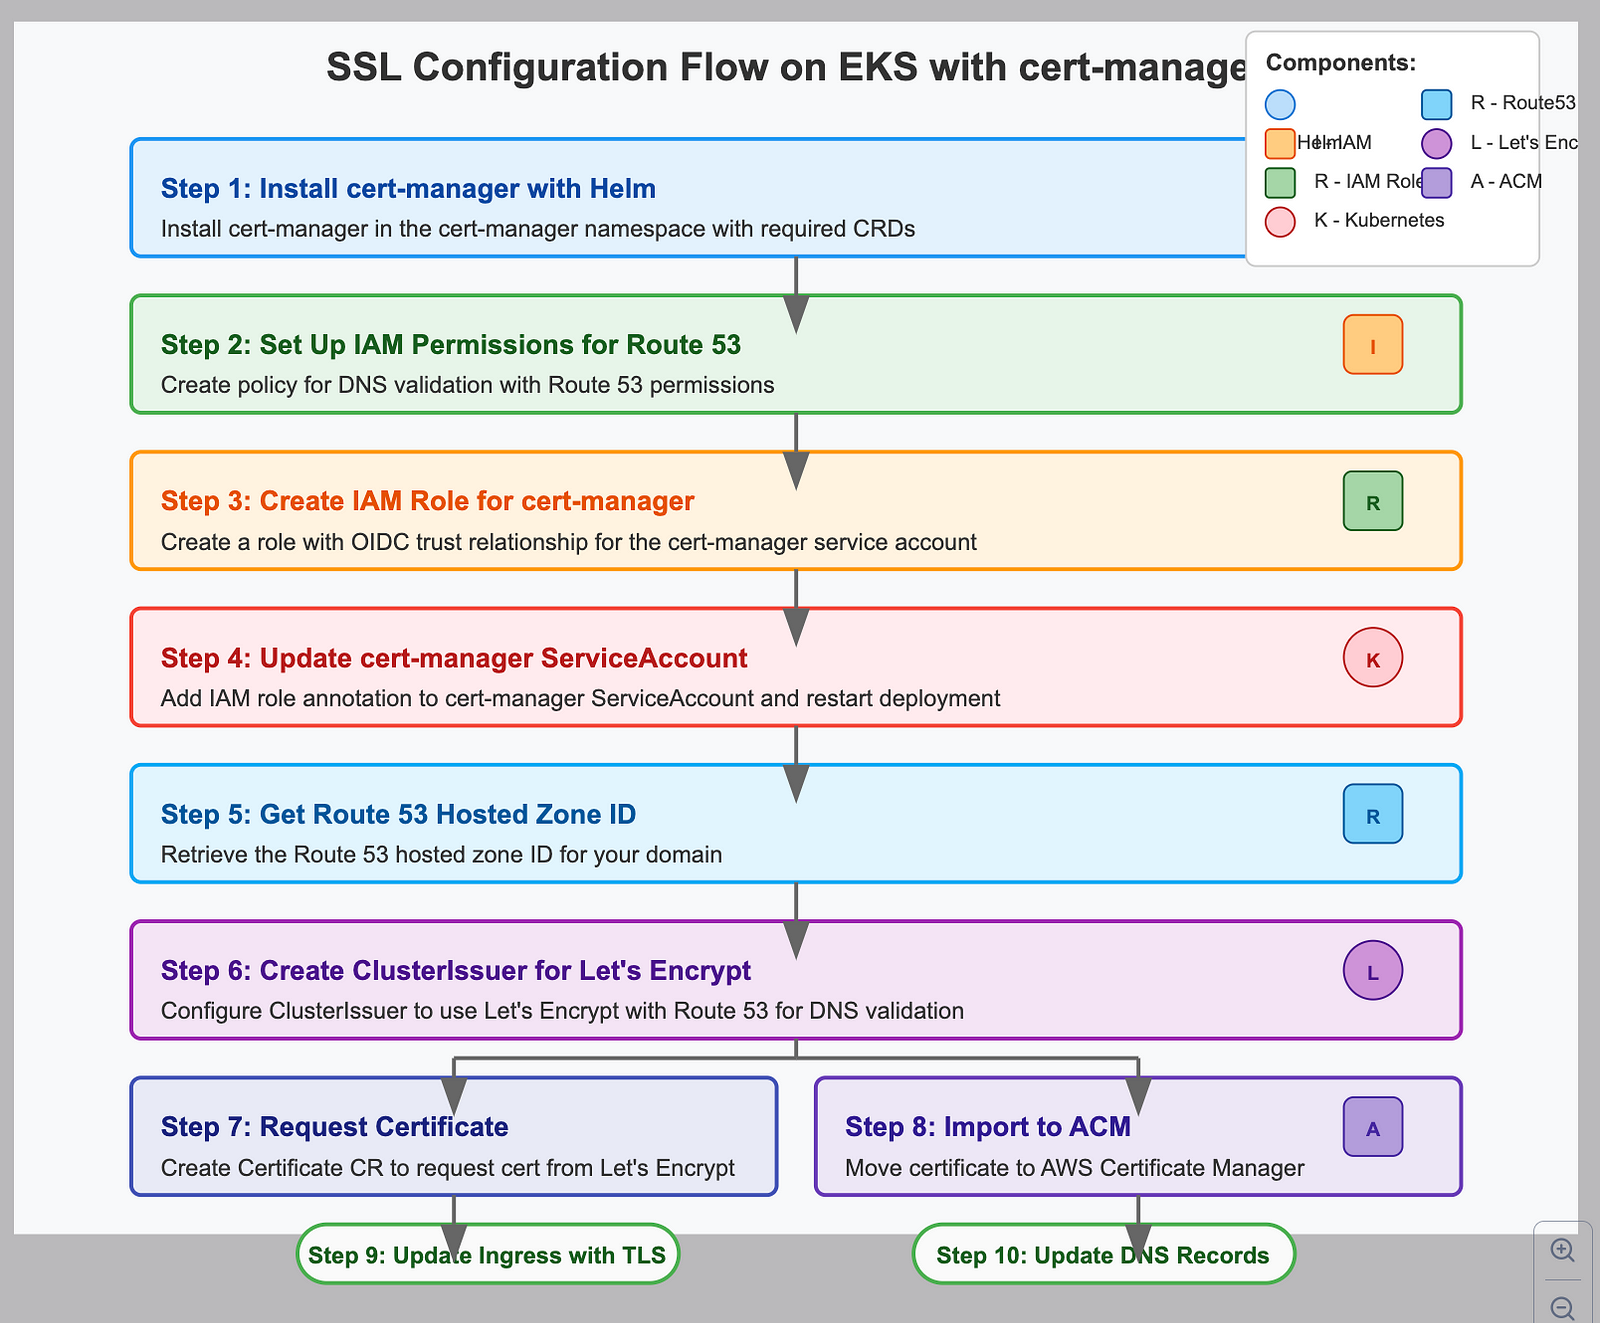
The diagram above illustrates the complete SSL configuration process we’re implementing in this second blog post. It shows the 10 key steps needed to set up HTTPS for your Kubernetes application on AWS EKS:
- Install cert-manager using Helm
- Set up IAM permissions for Route 53 DNS validation
- Create an IAM role for cert-manager with OIDC trust
- Update the cert-manager ServiceAccount with IAM role annotation
- Get your Route 53 hosted zone ID
- Create a ClusterIssuer configured for Let’s Encrypt
- Request a certificate using a Certificate resource
- Import the certificate to the AWS Certificate Manager (ACM)
- Update your Ingress resource to use TLS
- Update DNS records to point to your load balancer
Why Your App Needs HTTPS
When users visit your website without HTTPS, anyone can spy on their activities. HTTPS adds encryption that keeps data private.
It also:
- Shows users the padlock icon, building trust
- Helps your site rank better on Google
- Let’s you use modern web features
This guide uses cert-manager to add free HTTPS to your Kubernetes app.
What is the cert-manager?
Cert-manager is a certificate automation tool for Kubernetes. It handles the entire lifecycle of TLS certificates: requesting them, validating domain ownership, storing them securely, and, most importantly, automatically renewing them before they expire.
Cert-manager runs in its own space (namespace) in your cluster. It handles all the certificate work for you.
Step 1: Install cert-manager with HELM
# Add the Jetstack Helm repository
helm repo add jetstack https://charts.jetstack.io
helm repo update

# Install cert-manager with CRDs
helm install cert-manager jetstack/cert-manager \
--namespace cert-manager \
--create-namespace \
--version v1.13.3 \
--set installCRDs=true

# Verify the installation
kubectl get pods -n cert-manager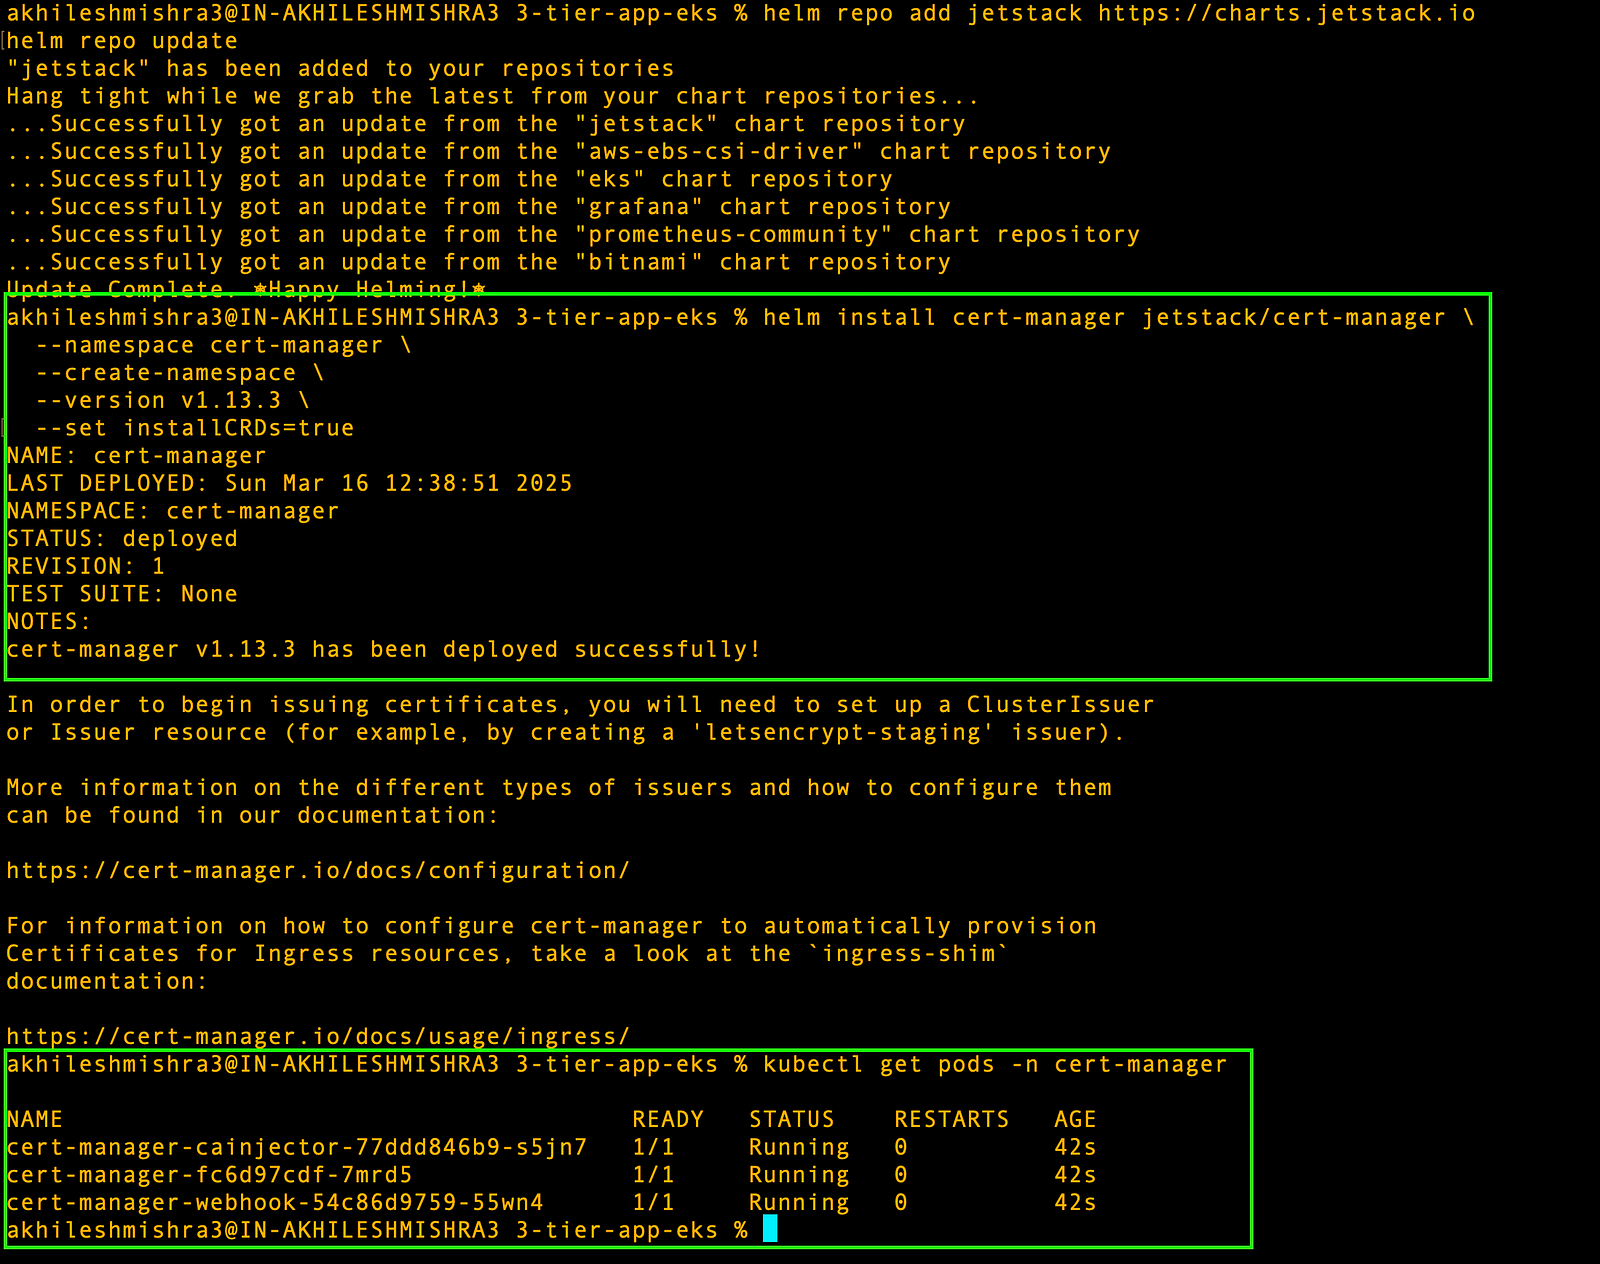
Understanding DNS Validation and Route 53
Let’s Encrypt needs proof you own your domain before issuing certificates.
DNS validation works by adding temporary text records to your domain’s DNS settings. We use this with Route 53 because:
- Works for sites not yet public
- Works even if your site is down
- Supports wildcard certificates (*.yourdomain.com)
The cert manager needs to prove that you own your domain. The easiest way is by creating temporary DNS records. To do this, cert-manager needs permission to update your DNS in Route 53.
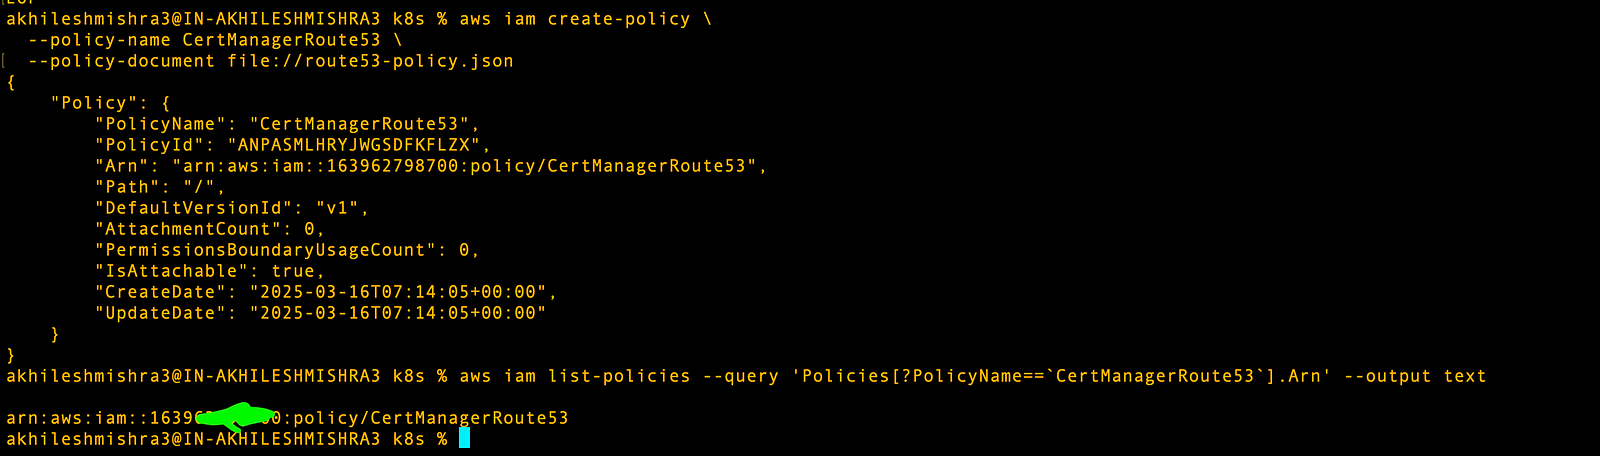
Step 2: Set Up IAM Permissions for Route 53
route53-policy.json{
"Version": "2012-10-17",
"Statement": [
{
"Effect": "Allow",
"Action": "route53:GetChange",
"Resource": "arn:aws:route53:::change/*"
},
{
"Effect": "Allow",
"Action": [
"route53:ChangeResourceRecordSets",
"route53:ListResourceRecordSets"
],
"Resource": "arn:aws:route53:::hostedzone/*"
},
{
"Effect": "Allow",
"Action": "route53:ListHostedZonesByName",
"Resource": "*"
}
]
}
This creates a limited set of permissions that lets the cert-manager create DNS records but nothing else.
# Create the policy
aws iam create-policy \
--policy-name CertManagerRoute53 \
--policy-document file://route53-policy.json

# Get policy ARN (save this for the next step)
aws iam list-policies --query \
'Policies[?PolicyName==`CertManagerRoute53`].Arn' --output text
The trust policy will tell AWS to trust requests coming from the cert-manager service account in the cluster.
Step 3: Create an IAM Role for cert-manager
OIDC and Service Accounts: Connecting Kubernetes to AWS
In a traditional setup, you might use AWS access keys in environment variables or config files. This is insecure and hard to manage. Instead, we’ll use OIDC (OpenID Connect) to let pods in your cluster temporarily assume AWS roles without storing any credentials.
# Get your OIDC provider URL
export CLUSTER_NAME=Akhilesh-cluster
export OIDC_PROVIDER=$(aws eks describe-cluster --name $CLUSTER_NAME \
--query "cluster.identity.oidc.issuer" --output text | sed -e "s/^https:\/\///")- Create the cert-manager trust policy, paste the below code to
certmanager-trust-policy.jsonfile.
certmanager-trust-policy.json{
"Version": "2012-10-17",
"Statement": [
{
"Effect": "Allow",
"Principal": {
"Federated": "arn:aws:iam::$(aws sts get-caller-identity --query Account --output text):oidc-provider/${OIDC_PROVIDER}"
},
"Action": "sts:AssumeRoleWithWebIdentity",
"Condition": {
"StringEquals": {
"${OIDC_PROVIDER}:sub": "system:serviceaccount:cert-manager:cert-manager"
}
}
}
]
}
Create IAM role CertManagerRoute53Role and attach the CertManagerRoute53 policy to it
# Create role
aws iam create-role \
--role-name CertManagerRoute53Role \
--assume-role-policy-document file://certmanager-trust-policy.json

# Attach policy to role
aws iam attach-role-policy \
--role-name CertManagerRoute53Role \
--policy-arn arn:aws:iam::$(aws sts get-caller-identity --query Account --output text):policy/CertManagerRoute53

# Get the role ARN (save this for later)
export ROLE_ARN=$(aws iam get-role --role-name CertManagerRoute53Role --query Role.Arn --output text)
echo $ROLE_ARN
Step 4: Update cert-manager ServiceAccount
Add the IAM role annotation to the cert-manager ServiceAccount
We’re adding an annotation to the cert-manager ServiceAccount that says “When running as this service account, you can assume this AWS IAM role.”
This creates the bridge between Kubernetes authentication and AWS permissions. The restart is necessary because Cert-manager needs to read this annotation when it starts up.
kubectl annotate serviceaccount cert-manager \
--namespace cert-manager \
eks.amazonaws.com/role-arn=$ROLE_ARN
# Restart cert-manager to pick up the new role
kubectl rollout restart deployment cert-manager -n cert-manager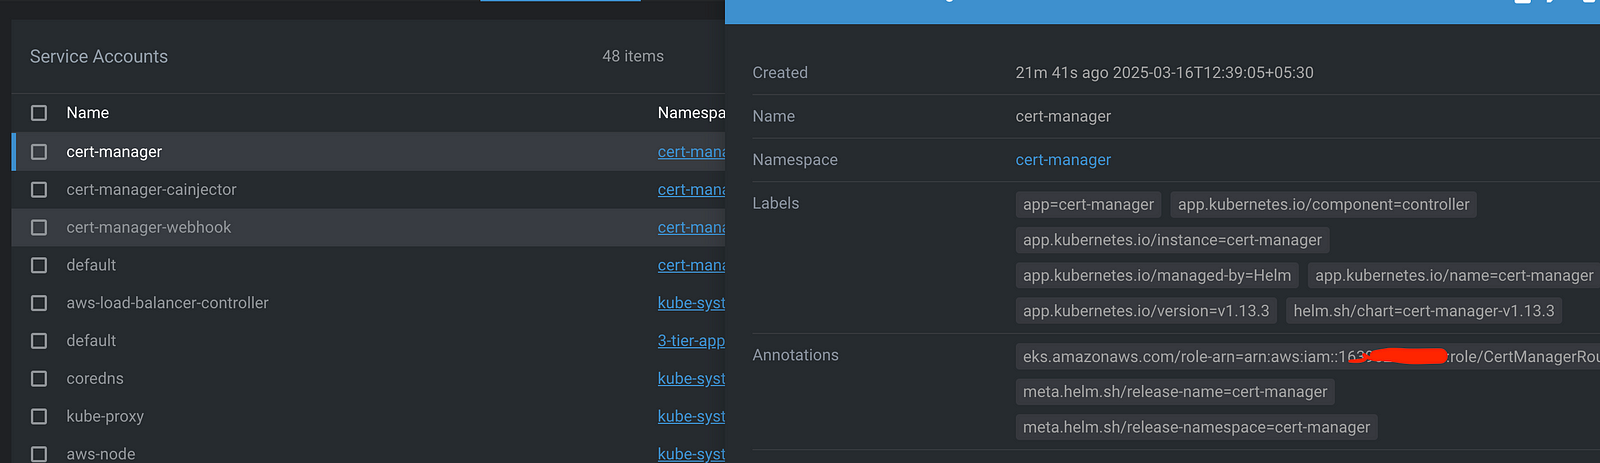
Step 5: Get Your Route 53 Hosted Zone ID
# Replace with your domain
export DOMAIN="akhileshmishra.tech"

export HOSTED_ZONE_ID=$(aws route53 list-hosted-zones-by-name \
--dns-name $DOMAIN \
--query "HostedZones[0].Id" \
--output text | sed 's/\/hostedzone\///')
echo $HOSTED_ZONE_ID
Step 6: Create a ClusterIssuer for Let’s Encrypt
Now we’ll tell Cert manager where to get certificates from
# cluster-issuer.yaml
apiVersion: cert-manager.io/v1
kind: ClusterIssuer
metadata:
  name: letsencrypt-dev
spec:
  acme:
    # Let's Encrypt production API
    server: https://acme-v02.api.letsencrypt.org/directory
    email: akhileshmishra@gmail.com  # Replace with your email
    privateKeySecretRef:
      name: letsencrypt-dev-account-key
    solvers:
    - selector:
        dnsZones:
          - "akhileshmishra.tech"  # Replace with your domain
      dns01:
        route53:
          region: ap-south-1  # Replace with your AWS region
          hostedZoneID: Z01413951IGBQK205UJ2J  # From Step 5
Run these commands to create ClusterIssuer for Let’s Encrypt
kubectl apply -f cluster-issuer.yaml
kubectl get clusterissuer letsencrypt-dev -o wide
This sets up Let’s Encrypt as your certificate provider. Let’s Encrypt gives free certificates that browsers trust.

Step 7: Requesting a Certificate
# certificate.yaml
apiVersion: cert-manager.io/v1
kind: Certificate
metadata:
  name: example-com-tls
  namespace: 3-tier-app-eks
spec:
  secretName: example-com-tls
  issuerRef:
    name: letsencrypt-dev
    kind: ClusterIssuer
  dnsNames:
  - "akhileshmishra.tech" # replace with your domain name
  - "www.akhileshmishra.tech"  # Add if you want to cover www subdomain too
When you create this file, cert-manager:
- Sees your request
- Creates temp DNS records to prove domain ownership
- Asks Let’s Encrypt for a certificate
- Stores the certificate in Kubernetes
This might take a few minutes. You can check progress with:
kubectl get certificate -n 3-tier-app-eks
kubectl get certificaterequest -n 3-tier-app-eks
kubectl get order -n 3-tier-app-eks
kubectl get challenge -n 3-tier-app-eks

# Check the secret was created
kubectl get secret example-com-tls -n 3-tier-app-eks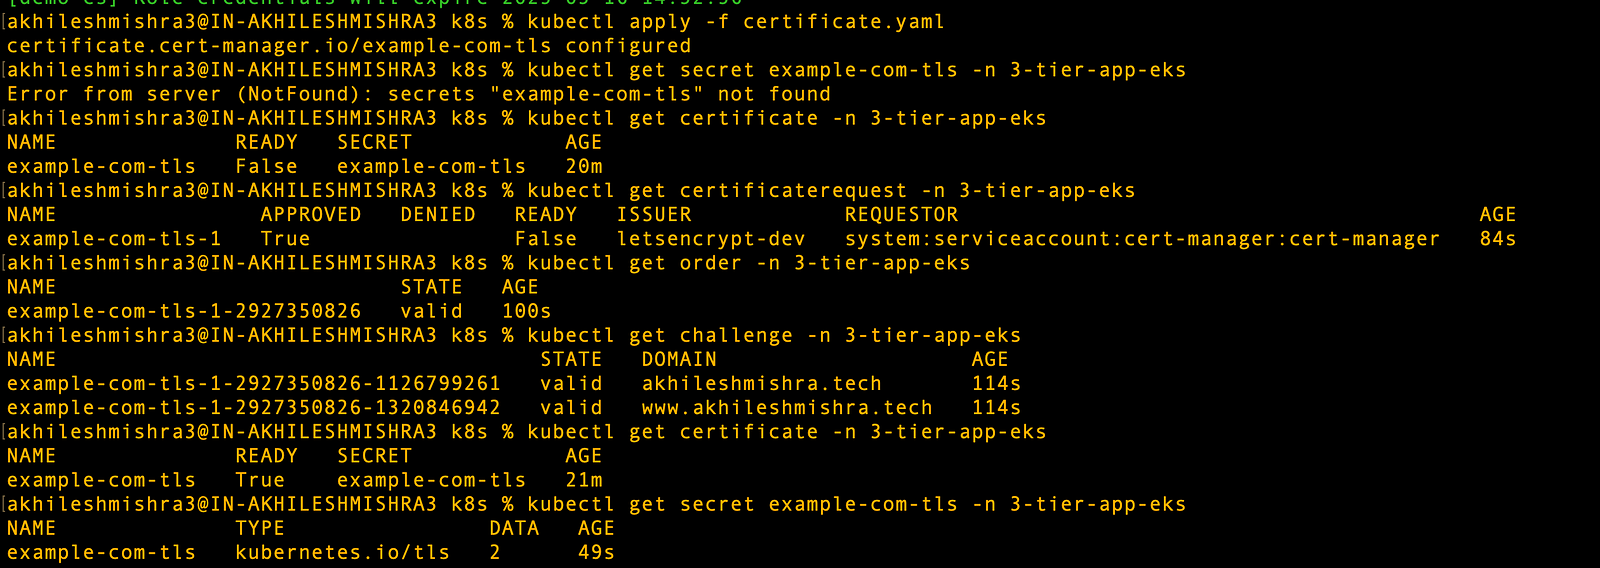
Step 8: Moving the Certificate to the AWS Certificate Manager
AWS load balancers work best with certificates in AWS Certificate Manager (ACM)
# Save the current combined certificate
kubectl get secret example-com-tls -n 3-tier-app-eks -o jsonpath='{.data.tls\.crt}' | base64 --decode > combined.crt

## Split the combined certificate into separate files

# This command saves the first certificate (your server certificate) to cert.pem
awk 'BEGIN {c=0;} /BEGIN CERT/{c++} { if(c==1) print $0}' combined.crt > cert.pem

# This command saves the certificate chain to chain.pem
awk 'BEGIN {c=0;} /BEGIN CERT/{c++} { if(c>1) print $0}' combined.crt > chain.pem

# Get the private key
kubectl get secret example-com-tls -n 3-tier-app-eks -o jsonpath='{.data.tls\.key}' | base64 --decode > key.pem

Upload the certs to ACMaws acm import-certificate \
--certificate fileb://cert.pem \
--private-key fileb://key.pem \
--certificate-chain fileb://chain.pem \
--region eu-west-1
Step 9: Update Your Ingress to Use the TLS Certificate
Setting Up Your Ingress with HTTPS
ingress-with-tls.yaml
apiVersion: networking.k8s.io/v1
kind: Ingress
metadata:
  name: 3-tier-app-eks-ingress
  namespace: 3-tier-app-eks
  annotations:
    alb.ingress.kubernetes.io/scheme: "internet-facing"
    alb.ingress.kubernetes.io/target-type: "ip"
    alb.ingress.kubernetes.io/healthcheck-path: "/"  # This tells ALB to check / for health


    # Enable HTTPS and HTTP to HTTPS redirect
    alb.ingress.kubernetes.io/listen-ports: '[{"HTTP": 80}, {"HTTPS": 443}]'
    alb.ingress.kubernetes.io/ssl-redirect: '443'
    #

    # Use the certificate managed by cert-manager
    alb.ingress.kubernetes.io/ssl-policy: "ELBSecurityPolicy-TLS-1-2-2017-01"
    alb.ingress.kubernetes.io/certificate-arn: arn:aws:acm:eu-west-1:163962798700:certificate/58982a1c-bf20-4d38-9b3b-c8c1ad3e5c46

    # Add this annotation to use the certificate from cert-manager
    alb.ingress.kubernetes.io/actions.ssl-redirect: '{"Type": "redirect", "RedirectConfig": {"Protocol": "HTTPS", "Port": "443", "StatusCode": "HTTP_301"}}'
spec:
  ingressClassName: "alb"
  tls:
  - hosts:
    - "akhileshmishra.tech"
    secretName: example-com-tls  # This must match the secretName in the Certificate resource
  rules:
  - host: "akhileshmishra.tech"  # Replace with your actual domain
    http:
      paths:
      - path: /api
        pathType: Prefix
        backend:
          service:
            name: backend
            port:
              number: 8000
      - path: /
        pathType: Prefix
        backend:
          service:
            name: frontend
            port:
              number: 80
Create the ingress with SSL
kubectl apply -f ingress-with-tls.yaml

# Check the ingress is configured correctly
kubectl describe ingress ingress 3-tier-app-eks-ingress -n 3-tier-app-eks
This creates a load balancer that:
- Listens on HTTP (port 80) and HTTPS (port 443)
- Redirects HTTP to HTTPS
- Uses your certificate for encryption
- Sends API requests to your backend
- Sends other requests to your frontend
Step 10: Update the DNS record to Point to Your App
# Get your hosted zone ID
HOSTED_ZONE_ID=$(aws route53 list-hosted-zones-by-name --dns-name akhileshmishra.tech --query "HostedZones[0].Id" --output text | sed 's/\/hostedzone\///')
echo "Hosted Zone ID: $HOSTED_ZONE_ID"

# Get your ALB DNS name
ALB_DNS=$(kubectl get ingress 3-tier-app-eks-ingress -n 3-tier-app-eks -o jsonpath='{.status.loadBalancer.ingress[0].hostname}')
echo "ALB DNS Name: $ALB_DNS"

# Create A record alias for apex domain (akhileshmishra.tech)
aws route53 change-resource-record-sets \
--hosted-zone-id $HOSTED_ZONE_ID \
--change-batch '{
"Changes": [
{
"Action": "UPSERT",
"ResourceRecordSet": {
"Name": "akhileshmishra.tech",
"Type": "A",
"AliasTarget": {
"HostedZoneId": "Z32O12XQLNTSW2",
"DNSName": "'$ALB_DNS'",
"EvaluateTargetHealth": true
}
}
}
]
}'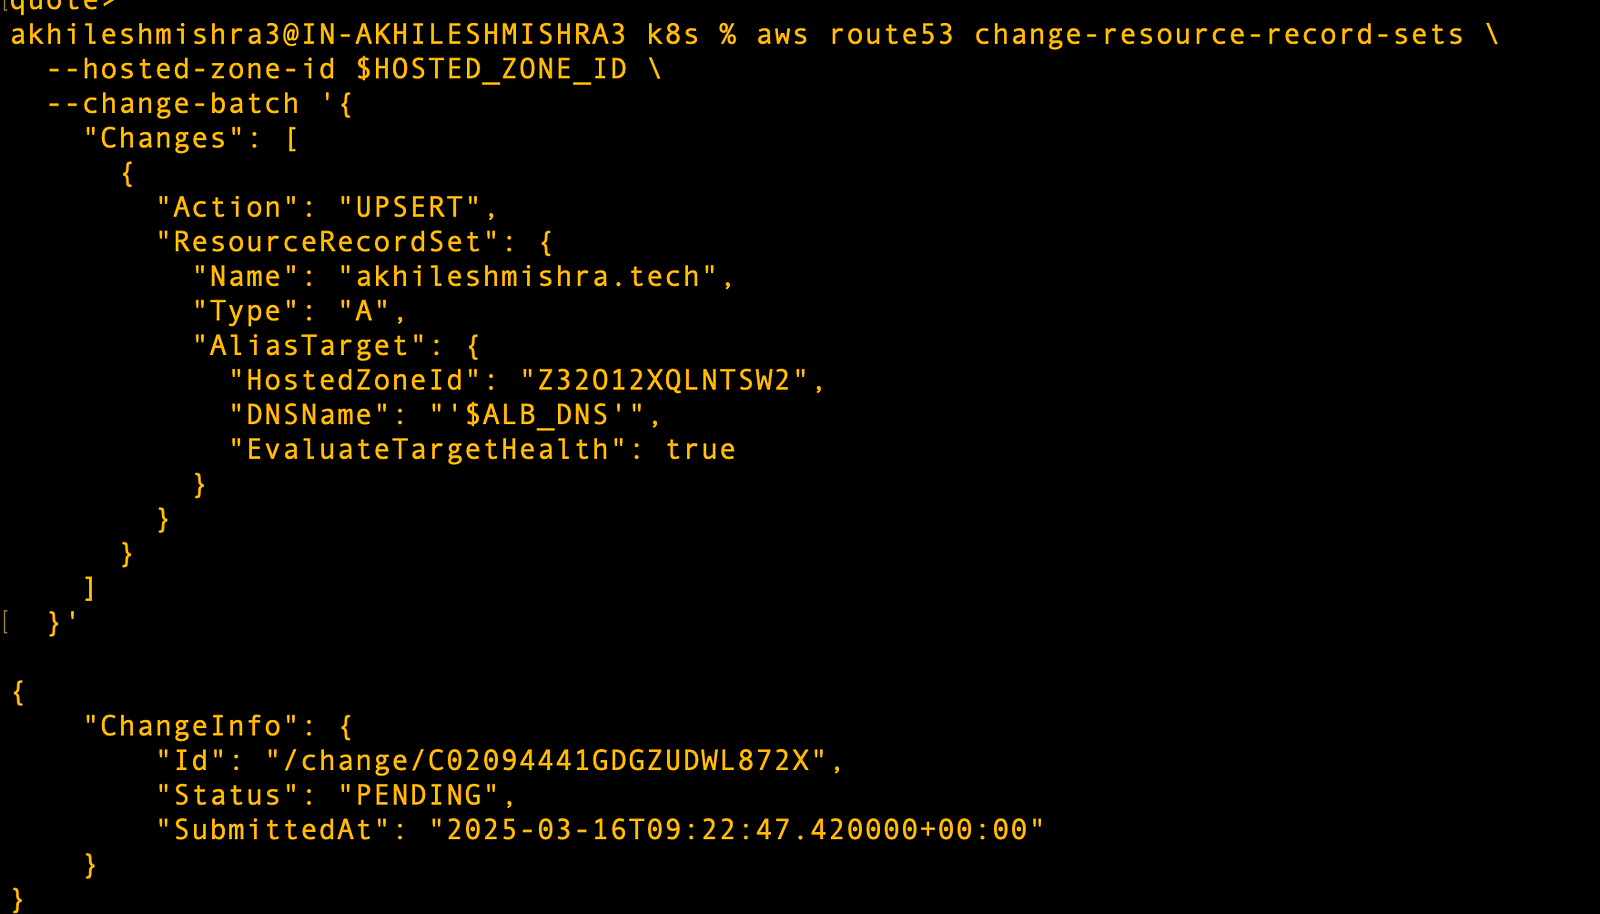
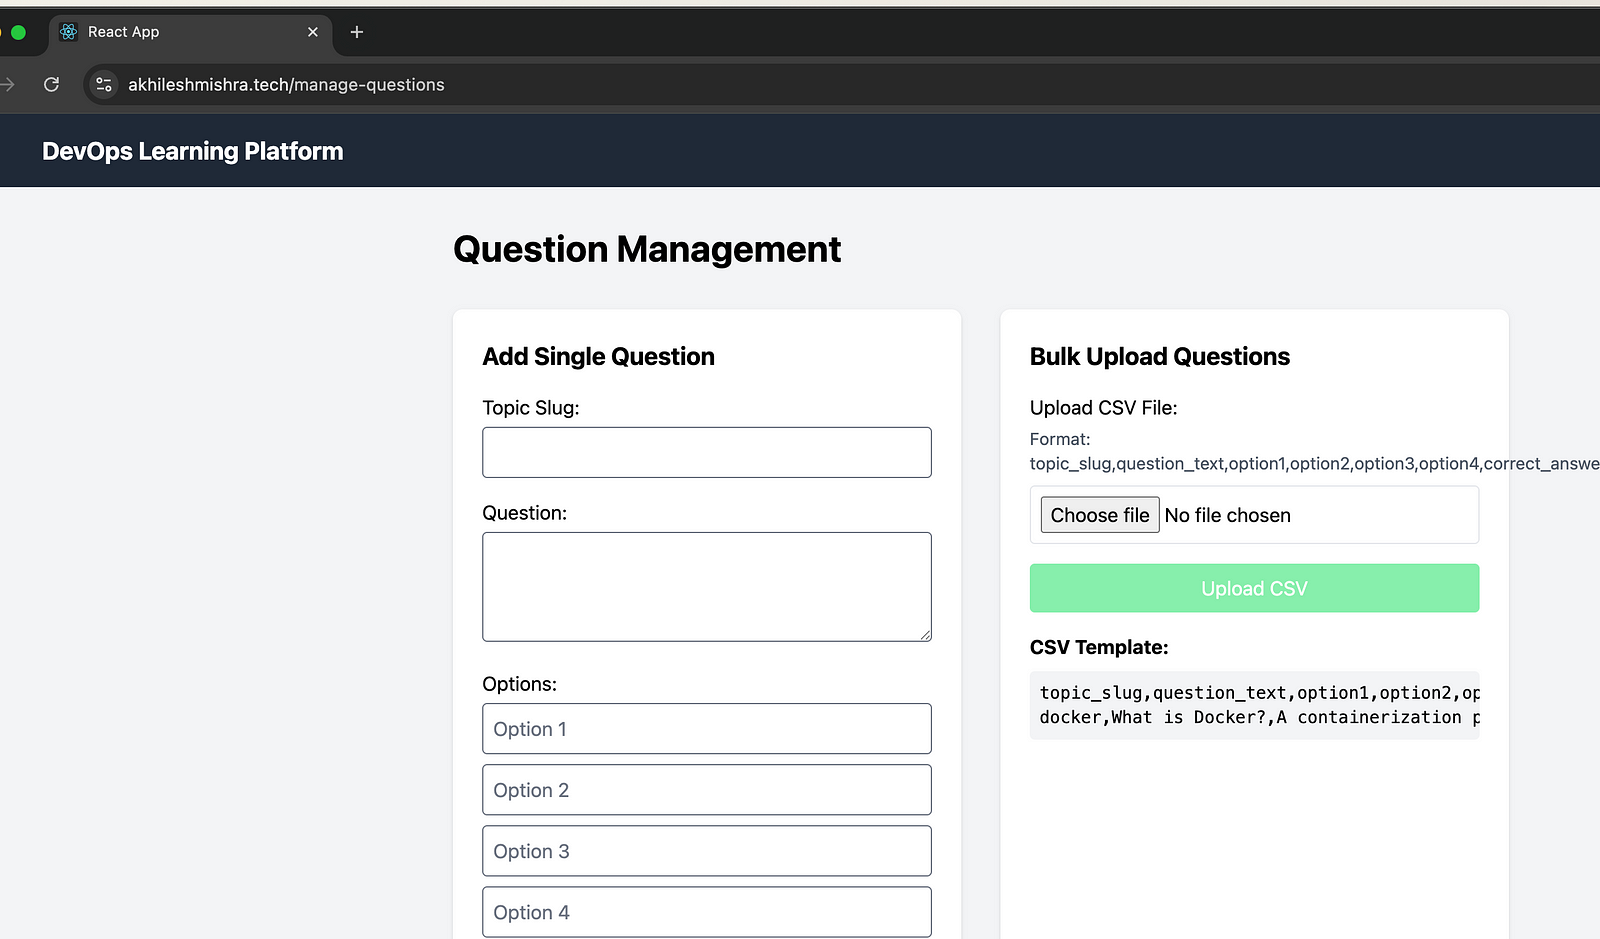
This tells DNS to send traffic for your domain to your load balancer. DNS changes can take a few minutes to work worldwide.
Your app is now secure with HTTPS! Your users will see the padlock icon in their browsers, and all traffic is encrypted. Best of all, cert-manager will automatically renew your certificate before it expires.
Connect with me on Linkedin: https://www.linkedin.com/in/akhilesh-mishra-0ab886124/
In the next tutorial, I’ll show you how to make your app even more robust by adding monitoring, automatic backups, and CI/CD pipelines.
