

When anyone talks about DevOps, CICD is the first word that comes to mind. CICD stands for Continuous Integration and Continuous Deployment (or Delivery).
It’s like having a super-efficient assembly line for your software just like car manufacturers have been using for decades. It increases the speed of software development by eliminating the manual process of build, testing, and deployment of any application.
Now, there are lots of tools out there for setting up CICD. My favorite is GitHub Action for its simplicity. Let me show you how we can build a CICD pipeline to continuously build & deploy a Python Web App on AWS With GitHub Action.
Deploy a Dockerized Flask Application On AWS EC2 With Github Action CICD and Terraform
What will we be doing in this blog post?
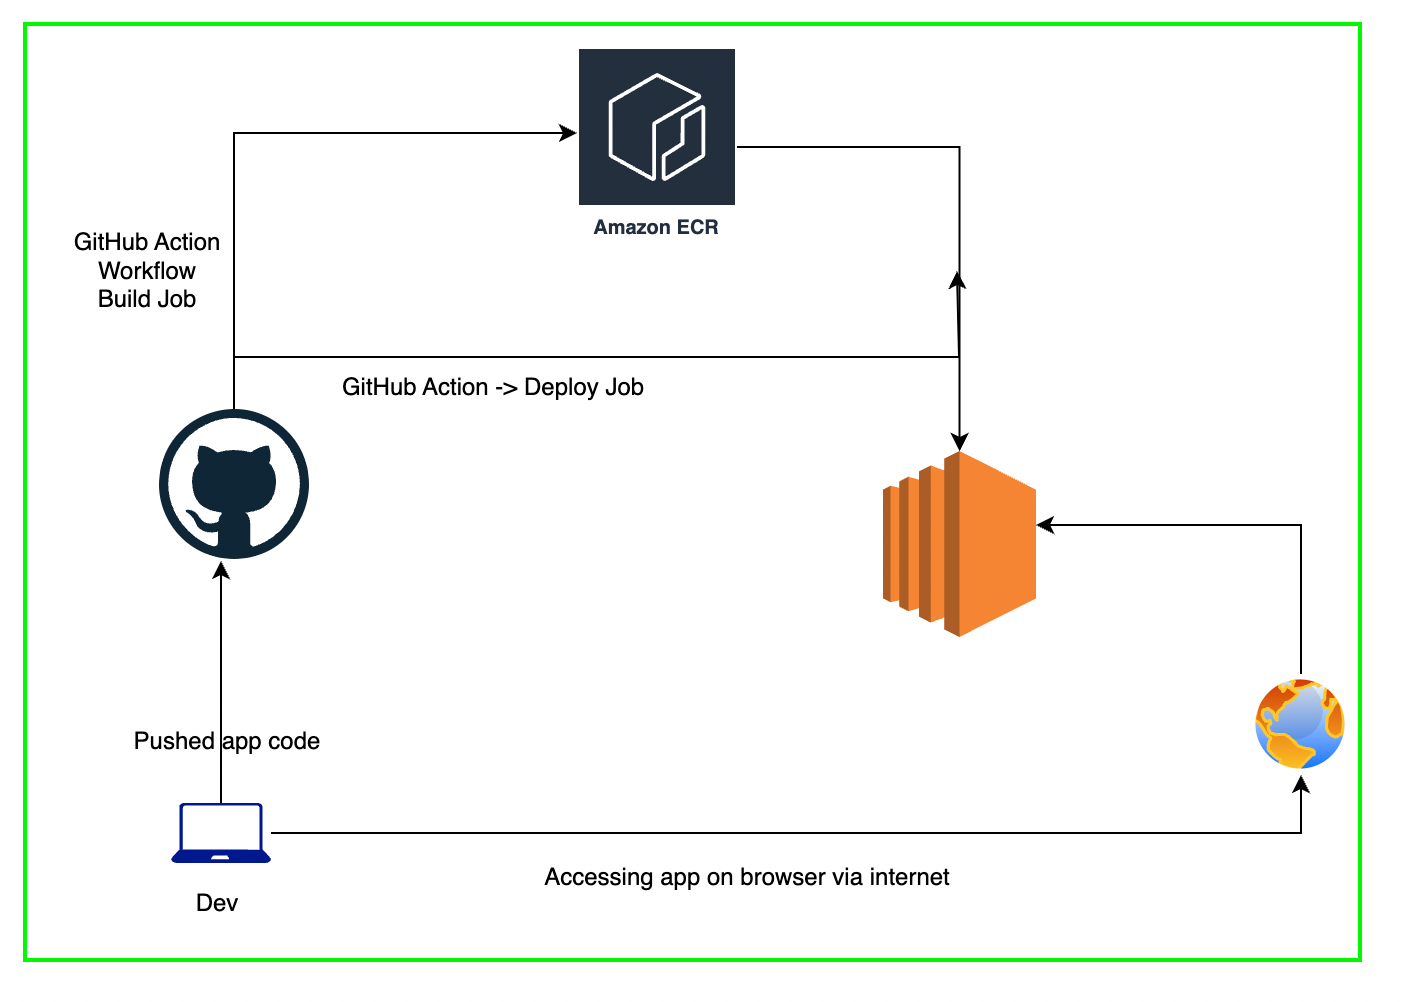
We will deploy the dockerized Flask application on AWS EC2 with GitHub Actions. We will follow the DevOps core principle — CICD(continuous integration and continuous deployment) to build and deploy the application on every code change.
Whenever we change the Python code, its dependencies, or Dockerfile, GitHub Action workflow will build a new Docker image, push it to AWS ECR, and deploy a new version of the Docker container that we can access using EC2 instances public IP on port 80.
Prerequisite
Familiarity with Docker, GitHub Actions, and Terraform on AWS.
Before we can use Terraform and GitHub Actions workflow for our project, let’s create an SSH key pair and IAM Access key/secrets which we will use to run the CICD workflow.
Create an SSH key pair
Go to EC2 -> Key Pair -> Create a SSH key pair. Download the key on your local machine. We will use this key for EC2 instances, and GitHub Actions.

Create a CLI user, attach an admin policy, and create an access key and secret.
Go to IAM -> Users -> Create User -> User Name () -> Attach policies directly -> AdministratorAccess ->


Once the user is created, go to the user, switch to the Security Credentials tab, create access keys, and download the key and secrets. We will use them as Github secrets.

Create a GitHub repository to store all the application code, and create repository secrets that we will use for the GitHub Action workflow.

Create secrets for the AWS access key and secrets from the ones generated in the last step. Also, copy the SSH private key generated in the earlier step to SSH_PRIVATE_KEY secrets. The key starts with “ — — -BEGIN RSA PRIVATE KEY — — -” and ends with “ — — -END RSA PRIVATE KEY — — -”
Let’s start with the main part of the blog post
1. Create an EC2 instance to host our Flask application
We want the EC2 instance to be reachable from the internet on port 80(for HTTP traffic) and 22 (for SSH). We also need the EC2 instance to access the AWS ECR repository. We will use the SSH key created earlier for this EC2 instance.
- Create a VPC, public subnet, internet gateway, and public route to the internet.

- Create a role that allows EC2 to access ECR to push and pull images and attach them to EC2.

- Create a security group to allow inbound traffic on port 80 and 22.

- Create an EC2 instance with a public IP address and route it to the internet. Use the user data script to install and set up the docker on the EC2 instance.

2. Create an ECR repository to store docker images

Add variables and providers to the Terraform configuration as well. I have kept all the Code used in this blog post in public Github Repo.
Clone the complete code in this blog post from my Github Repo on your local machine.
Deploy the Terraform code by running the commands on your local machine. I have also included the GitHub Action workflow code to deploy the Terraform, you can find that at the end of the blog post.
git clone https://github.com/akhileshmishrabiz/flaskapp-awsec2
cd flaskapp-awsec2

# Configure the aws creds
aws configure #(or export access key and secrets as environment variables )
terraform init
terraform apply
Now that you have deployed the AWS resources, we will create a GitHub Action workflow to automate the docker image build and deploy at any code change.
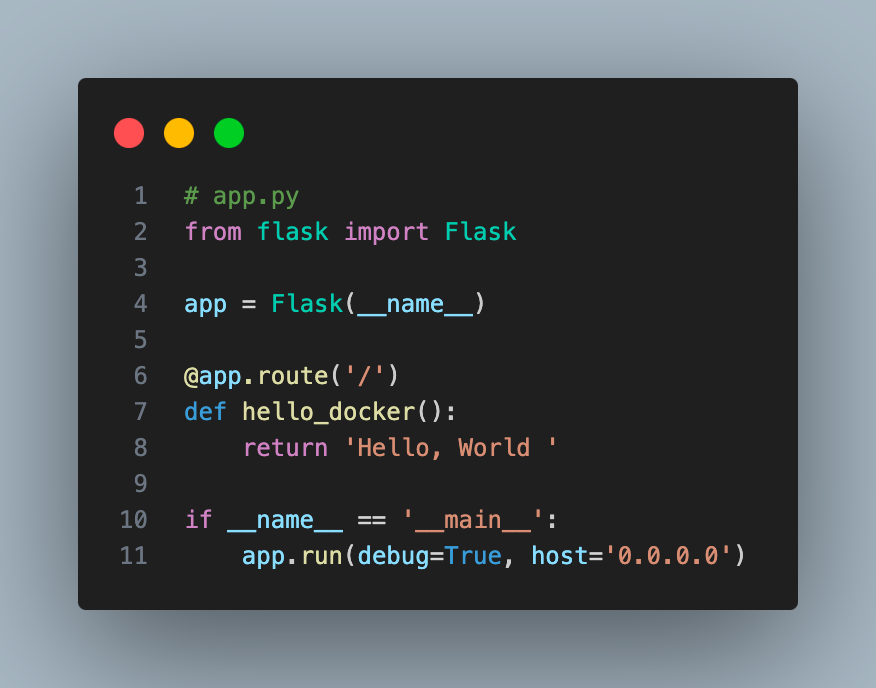
I will deploy a simple Python Flask application and Python code and dependencies in the Src folder in the GitHub repo and a Dockerfile in the root path.
3. Write the application code and dependencies

Let’s create a Dockerfile to build the Docker image.
If you are new to Docker, read these articles:
– Everything You Need To Know About Docker.
– Using docker init to write Dockerfile and docker-compose configs.
4. Create a Dockerfile to package the application

I have added comments to explain the code. This Docker file will install Flask dependencies, expose the app on port 5000, and start the application when we run the Docker container.
5. Create the GitHub Action workflow to build and deploy the Flask application
Create a .github/workflows folder and create a build-deploy.yaml file inside the workflows folder and paste the GitHub Action config to it.
This workflow will trigger if it sees any changes in the application code, its dependencies, or Dockerfile. I have also defined workflow_dispatch which will allow you to run the pipeline manually.
This workflow has 2 jobs — Build and Deploy. Workflow will wait for the build job to complete before triggering the deploy job.
- The workflow builds a Docker image, tags it with the Git SHA ( latest commit ID), and pushes it to an Amazon ECR repository.
- It then deploys the Docker image to an EC2 instance by SSHing into the EC2 instance and running the Docker container. Every new build/deploy job will remove the older version and deploy the newer version of the application.
Let me explain the GitHub Action code
Workflow Triggers:
It triggers pushes to the main branch when there is a code change inside the src folder or Dockerfile.
Workflow Environment Variables:
AWS_REGION specifies the AWS region,AWS_EC2: specifies the name of the EC2 instance where the Docker container will be deployed.ECR_REPOspecifies the name of the Amazon ECR repository where the Docker image will be pushed and GIT_SHA holds the SHA hash of the latest commit pushed to the repository.
Build Job:
This job runs on an Ubuntu machine hosted by GitHub. It checks out the repository code, configures AWS credentials for accessing Amazon ECR, Retrieves the ECR login password, and logs in to Amazon ECR.
It then Builds the Docker image with the latest SHA and pushes the image into ECR.
Deploy Job:
This job starts once the build job is completed. It checks the repository code and configures AWS credentials for accessing AWS resources. It retrieves the public IP address of the specified EC2 instance and connects to the EC2 instance using SSH, cleans up the existing container, and spins up the new container with the latest docker image.
Bonus
As a bonus, I am also providing a GitHub Action workflow to deploy the Terraform code.
This workflow will be triggered if there is any change in Terraform code while it will ignore the application code changes.
I have also added the workflow to destroy the Terraform deployed resources when you are not using them. This workflow uses a workflow_dispatch event trigger, which will enable you to run this workflow.

Deploy the project
You can find all the code for this blog in my GitHub repo. Fork the repo to your account, set up the secrets and that’s all.
I have just pushed all code to GitHub and let’s see if it works.
As you see, it has already deployed Terraform resources and currently running the application build workflow.

Let’s log in to the EC2 machine and see —

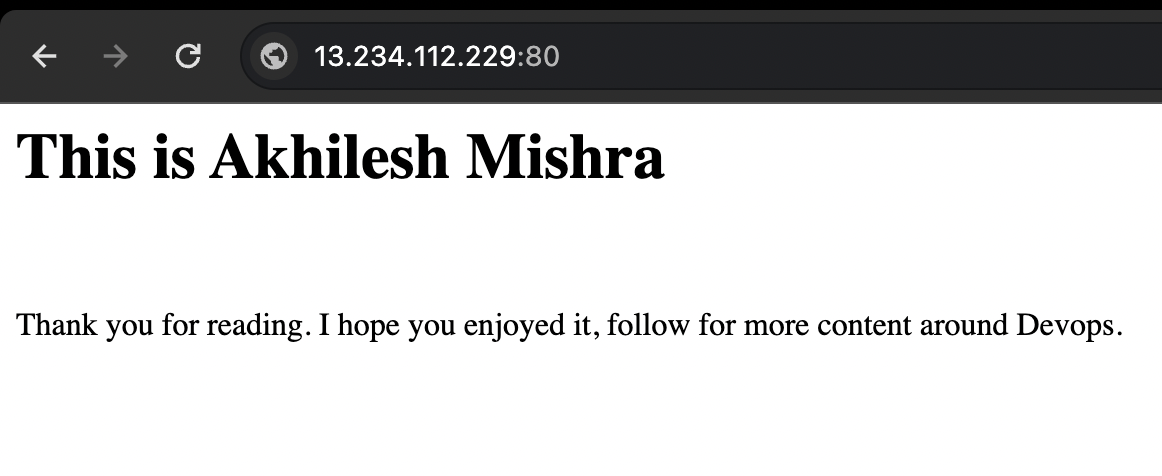
Container is running. Now we will use the EC2 public IP to access the application.

Now I will update the Python code and see if the application gets updated.
Connect with me on Linkedin: https://www.linkedin.com/in/akhilesh-mishra-0ab886124/
